Do you have a question about the Baby Lock A-LINE Lauren BL450A and is the answer not in the manual?
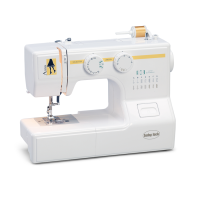
| Model | BL450A |
|---|---|
| Number of Stitches | 50 |
| Needle Threading | Automatic |
| Sewing Speed | 850 stitches per minute |
| Maximum Stitch Width | 7mm |
| Maximum Stitch Length | 5mm |
| Built-in Stitches | 50 |
| LCD Screen | Yes |
| Speed Control | Yes |
| Free Arm | Yes |
| Type | Electronic |
| Weight | 12.1 lbs |
| Bobbin Type | Drop-in bobbin |
Critical safety warning regarding electrical hazards.
General safety precautions for users, children, and operation.
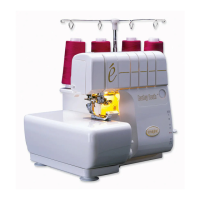
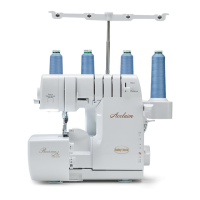
Identifies and labels the main components visible from the front of the machine.
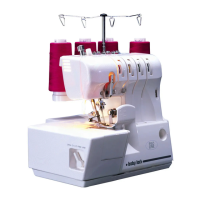
Identifies and labels the main components visible from the rear of the machine.
Steps to open the extension table for access or use.
Instructions on how to remove the free arm cover for access.
Explains the polarized plug and its use for safety.
Details the location and operation of the light and power switch.
Instructions for connecting and using the foot control pedal.
A guide to selecting appropriate needles and threads for different fabric types.
Lists the order for threading the upper looper, lower looper, and needles.
Instructions on extending the machine's thread guide bar for spool placement.
A method for changing threads without rethreading the entire machine.
Initial steps to prepare the machine for sewing, including thread chaining.
Explains the markings on the presser foot for fabric guidance.
Procedures for finishing a seam and creating a thread chain.
Instructions on how to rethread the machine when a thread breaks.
Guide for adjusting thread tensions for a balanced 4-thread overlock stitch.
How to adjust the differential feed for fabric feeding and pucker control.
Instructions for adjusting the overedge seam width.
Guide for setting thread tensions for a 3-thread overlock stitch.
Steps to change the needle plate for rolled hemming.
Configuration settings for narrow and rolled hemming.
Tension settings for narrow hemming Method A.
Tension settings for rolled hemming Method B.
Procedure to convert the machine from 3-thread to 2-thread serging.
Steps to convert from 2-thread to 3- or 4-thread serging.
How to use the machine's free arm for sewing curved or small areas.
Instructions for removing and attaching the blind hem presser foot.
Configuration for blind hemming, including needle and tensions.
Steps for sewing a blind hem using the special presser foot.
Procedure for sewing with the upper blade disengaged for specific stitches.
Machine settings for sewing a flatlock seam.
Tension adjustments for achieving a correct flatlock seam.
Steps for sewing a flatlock seam with proper fabric folding.
Instructions for sewing pin tucks using specific machine settings.
Technique for sewing and turning outside corners.
Technique for sewing and turning inside corners.
How to sew continuous curves without stopping or pivoting.
How to clean the serger machine using provided brushes.
Guidance on which parts require oiling and how often.
Steps to replace the sewing machine's light bulb.
Instructions for replacing the dull lower blade.