Do you have a question about the Baby Lock Crown Jevel BLCJ18 and is the answer not in the manual?
| Maximum Stitch Width | 7mm |
|---|---|
| Maximum Stitch Length | 5mm |
| Needle Threading System | Automatic |
| LCD Display | Yes |
| Free Arm | Yes |
| Weight | 26 lbs |
| LCD Screen | Yes |
| USB Port | Yes |
| Automatic Thread Cutter | Yes |
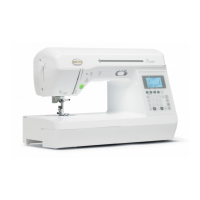
| Type | Embroidery and Sewing Machine |
| Number of Stitches | 741 |
| Stitch Count | 741 |
| Lighting | LED |
| Stitches | 741 |
Warning about unattended plugged-in machines and unplugging after use and before cleaning.
Safety rules for machine use, child safety, intended use, and avoiding openings.
Explains the grounding plug, temporary adapters, and proper grounding connections for electrical outlets.
Provides key specifications like sewing speed, needle system, lubrication, and power consumption for the machine.
States limitations of liability for improper use or use with non-recommended frames.
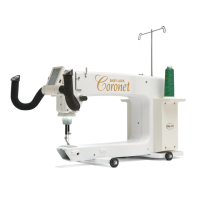
Lists recommended frames for the Baby Lock Crown Jewel quilting machine.
Lists essential safety precautions for operating the quilting machine, including unplugging and avoiding moving parts.
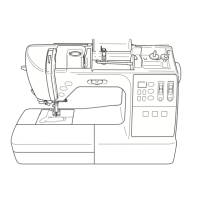
Identifies main components of the machine from the front perspective.
Identifies main components of the machine from the back perspective.
Identifies main components of the machine from the rear perspective.
Details the process for attaching the rear handles, including safety and testing procedures.
Explains how to remove and install or replace LED pin lights on the machine's front handles.
Instructions for connecting the power cord to the machine and the power source.
Guide on how to securely attach the thread mast to the top of the machine.
Explains the basic function of the laser stylus in projecting a beam for tracing patterns.
Covers operating the laser stylus, power connection, and safety when pointing the beam.
Describes how to adjust the laser's focus and image size for optimal pattern tracing.
Details clamp adjustment and the importance of laser labels for direction and warranty.
Lists critical safety precautions when operating the laser stylus, including eye safety.
Step-by-step instructions for mounting the laser stylus on the machine's side or top.
Instructions for correctly inserting the bobbin into the bobbin case, with safety precautions.
Explains how to set and test the bobbin tension, crucial for overall machine balance.
Step-by-step guide on how to correctly fit and secure the bobbin case into the sewing machine.
Instructions on how to bring the bobbin thread up to the top of the fabric for starting stitches.
Details how to adjust and troubleshoot top thread tension, noting differences from home sewing machines.
Covers cleaning and lubricating the machine, including the bobbin assembly and touch screen display.
Describes the main screen interface and button functions on the handlebars, including Manual and Regulated modes.
Explains the Needle Up and Needle Down functions for controlling the needle's final position after stopping.
Details speed control and accessing additional features like lighting, sound, and diagnostics via the 'More' button.
Covers settings within Regulated Mode, including SPI, SR Style, and Precision Mode.
Details the 'Cruise' mode for maintaining a constant minimum stitching speed, ideal for precise movements.
Explains the start indicator changing color based on machine movement and mode.
Controls for LED lights, sound settings, and access to the calculator.
Accessing diagnostic tests and viewing system information like serial number and versions.
Describes how to test the motor sensor by rotating the handwheel and interpreting beep patterns.
Details how to test the needle position sensor by listening for specific beep patterns during handwheel rotation.
Explains testing the X-Motion stitch regulator encoder by moving the carriage and listening for beeps.
Describes testing the speed sensor by observing a stable value on screen after starting the machine.
Details testing the Y-Motion stitch regulator by moving the carriage and listening for beep patterns.
Explains how to test handlebar keys by pressing them and observing the display for correct identification.
Shows how to view machine serial number, board versions, and stitch counters.
Accessing and using the on-screen calculator function.
Explains Precision and Cruise modes, including how they work and when to use them.
Discusses managing quilting speed for stitch regulation and avoiding over-speed conditions.
Advises on selecting high-quality threads and appropriate needle sizes for quilting.
Explains the concept of free-motion quilting and synchronizing machine movement with speed.
Addresses skipped stitches, incorrect needle size, and positioning problems.
Covers fabric tension, top tension adjustment, and proper threading to resolve stitch issues.
Covers reasons for needle breakage, such as bent needles or incorrect installation.
Addresses puckering issues related to tension balance and needle size.
Discusses factors affecting stitch quality, including bobbin case condition and machine speed.
Explains causes of poor tension, handwheel issues, and guiding difficulties.
Addresses difficulties in guiding the machine, such as off-center carriage wheels or table leveling.
Covers hopping foot clearance for thick seams and thread nests under quilts.
Diagnoses motor failure and addresses uneven quilt design due to roller or fabric issues.
Discusses causes of irregular stitches, including worn leaders and stitch regulator settings.
Explains causes for motor stalling and needle thread breakage, including thread quality and spool positioning.
Addresses thread breakage due to hesitation at points or improper needle/hook relationship.
Explains how to check cable connections if the machine display is not visible.
Step-by-step instructions for attaching the adaptor plate to the machine's rear base plate.
Details how to mount the stylus holder onto the adaptor plate.
Explains how to mount and adjust the stylus for pattern tracing, noting it's a consumable part.