EasyManua.ls Logo

Babyletto Crayson Mini Crib User Manual

Babyletto Crayson Mini Crib
8 pages
To Next Page IconTo Next Page
Page #1 background imageLoading...
Page #1 background image
page 1
Grayson Mini Crib (6998) - Assembly and Operation Manual
Congratulations on purchasing a MDB Family product. This crib will provide many years of service if you adhere
to the following guidelines for assembly, maintenance, and operation. This crib is for residential use only.
Any institutional use is strictly prohibited.
Please be sure to follow the instructions for proper assembly. Do not use power screwdrivers. All of our cribs are
made from woods. Please understand that woods have color variations which are the result of nature and are not
defects in workmanship.
DO NOT SUBSTITUTE PARTS. ALL MODELS HAVE THE SAME QUANTITY OF PARTS AND HARDWARE.
YOUR MODEL MAY LOOK DIFFERENT FROM THE ONE ILLUSTRATED DUE TO STYLISTIC VARIATIONS.
revised 01JUN2011
Meijer.com
Question and Answer IconNeed help?

Do you have a question about the Babyletto Crayson Mini Crib and is the answer not in the manual?

Babyletto Crayson Mini Crib Specifications

General IconGeneral
BrandBabyletto
ModelCrayson Mini Crib
CategoryBaby & Toddler Furniture
LanguageEnglish

Summary

CRIB PARTS

Head Panel

The main vertical panels of the crib structure, typically two.

Side Panel

The side vertical panels of the crib structure, typically two.

Base Board

The board that supports the mattress.

Pad

The mattress or padding for the crib.

Base Board Support Bars

Bars used to support the base board, provided in long and short types.

HARDWARE

Allen Head Bolts with Wing Nut

2-1/8" bolts used with wing nuts for securing parts.

Allen Head Bolts with Cap

1-1/8" bolts with caps for attaching casters.

Cam Bolts

2" bolts used with cam locks for panel assembly.

Cam Locks with Nut

Connectors used with cam bolts to secure panels.

Allen Head Bolts

1-9/16" bolts used with an Allen wrench for assembly.

Allen Wrench

Tool provided for tightening Allen head bolts.

Casters with Stopper

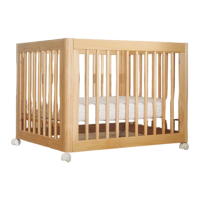
Wheels with brakes for mobility and stability.

ASSEMBLY INSTRUCTIONS

Step 1: Attach Base Board Support Bars

Secure support bars to head and side panels using Allen bolts.

Step 2: Insert Cam Bolts and Locks

Install cam bolts into head panels and cam locks into side panels.

Step 3: Assemble Side and Head Panels

Connect side panels to head panels using cam locks and bolts.

Step 4: Place Base Board

Position the base board into the assembled crib frame.

Step 5: Secure Base Board

Fasten the base board using Allen bolts with wing nuts.

Step 6: Attach Casters

Screw casters onto the bottom of the crib legs.

Step 7: Place Pad and Ready Use

Position the pad on the base board; crib is ready for use.

SAFETY AND IMPORTANT INFORMATION

Infant Suffocation Warnings

Warnings about gaps, soft bedding, and items causing suffocation.

Mattress/Pad Compatibility

Specific requirements for mattress/pad size and thickness.

Warranty and Product Registration

Information on warranty, serial number recording, and product registration.

ADDITIONAL GUIDELINES AND SUPPORT

General Warnings and Precautions

Key safety warnings regarding product use and child safety.

Storage Recommendations

Advice on storing furniture to maintain wood quality.

Care and Cleaning Guide

Instructions for cleaning and maintaining the crib's finish.

One Year Limited Warranty

Details of the warranty coverage and terms.

Related product manuals