SAFETY PRECAUTIONS AND ASSEMBLY
is not a toy. Close adult supervision is necessary
when used by or near children. Please do not leave this unit unattended with
1. Never place empty Nut Roaster on heated stove top. Damage to roasting pan
2. Do not leave Nut Roaster unattended while cooking. Nuts should be stirred
continually throughout the glazing/cooking process.
3. Sugar-based glazes are very hot and can cause burns. Use caution during
cooking and when emptying contents of Nut Roaster.
4. Do not add water to hot nut roasting pan. Steam can cause burns and the pan
5. Use only non-abrasive products to clean the Nut Roaster. Abrasive scrubbers
can damage the non-stick coating and exterior finish of the pan.
Prior to Use and Maintenance:
1. Before using the Nut Roaster, wash nut roasting pan and stir blade in warm
soapy water. Use only non-abrasive products on Nut Roaster. Rinse and dry
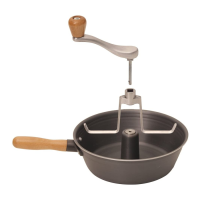
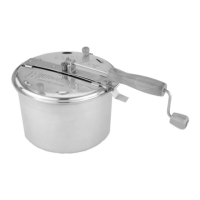
2. Assemble the Nut Roaster:
a. Wood Handle (1). Be sure lock washer is placed over handle screw. Place
screw end of handle into riveted bracket on side of pan (2). Turn handle clock-
wise until secure. Do not over-tighten.
b. Stir Blade (3). Center hole in top of stir blade over center post of pan
(square side of hole facing up). Turn stir blade gently until it slides down
around top of circular post.
c. Stir Handle with Wood Knob (4). Line up square-shaped protrusion on
bottom of stir handle with square opening on top of stir blade. Push down firmly
d. Test Stir Assembly. Turn top handle in clockwise direction to be sure stir
assembly is properly attached and secure. Stir blade should rotate easily and
a. Let pan cool before cleaning to prevent warping.
c. Remove stir handle with wood knob by pulling straight up on handle
d. Remove stir blade by lifting straight up and off of center post.
e. Wash pan and stir blade in warm soapy water. Use only non-abrasive
products on Nut Roaster. Do not soak wood handles. Rinse and dry
f. Do not wash in dishwasher.