23
DOOR
2" (5,1 cm)
3" (7,6 cm)
PARTSREQUIRED(TEMPORARY):
3" (7,6 cm)
DOOR
First, nail lower edge of panel to oor frame using 2" nails 6" apart.
Angle nail to hit oor frame (Fig.A).
3
You have nished standing your FRONT WALL.
FINISH
5
Secure front wall bottom plates to oor using (8) 3" nails (Fig.A).
4
x8
x4
x10
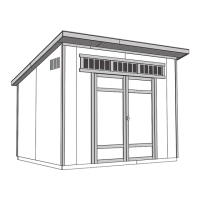
FRONT WALL INSTALLATION
DOOR
3"(7,6cm)
Screwsx4
BOAx2
3"Nailsintobottomplate.
Stand front wall on oor.
Center front wall assembly on the 120" front oor dimension.
Use (2) BOA as temporary braces. Level wall and secure
BOA with two 3" screws.
2
1
120"
(304,8 cm)
Nail2"nailsrst.
2"(5,1cm)
Nails
3"(7,6cm)
Nails
Fig.A
2 x 4 x 93-3/16" (5,1 x 10,2 x 236,7 cm)
x2
BOA