This document describes the Bafang DP E12.CAN display, a user manual for a pedelec (pedal electric cycle) display.
Function Description
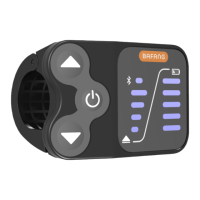
The Bafang DP E12.CAN display serves as the primary interface for controlling and monitoring a pedelec system. It provides essential information to the rider, including battery capacity, support levels, and error messages. The display also integrates control functions for the pedelec's operation, such as switching the system on/off, adjusting assistance levels, and managing headlights. A key feature is its Bluetooth connectivity, allowing it to interact with the Bafang Go APP on a smartphone for extended functionality and data display. It also includes a USB port for charging external devices.
Important Technical Specifications
- Model: DP E12.CAN BUS
- Housing Material: PC1414
- Indicator Type: Blue LED
- Operating Temperature: -20°C to 45°C
- Storage Temperature: -20°C to 50°C
- Waterproof Rating: IP65
- Storage Room Humidity: 30%-70% RH
- USB Port Output: 5V, 500mA (for charging external devices)
Usage Features
System ON/OFF
- Switching On: Press and hold the "System On/Off" button (>2 seconds) on the display.
- Switching Off: Press and hold the "System On/Off" button (>2 seconds) again.
Selection of Support Levels
- When the display is on, briefly press the "Up" or "Down" button (<0.5 seconds) to cycle through support levels.
- There are 4 support levels, with level 1 being the lowest and level 4 the highest.
- The system defaults to level 1 when switched on. Level 0 indicates no support.
Headlights / Backlighting
- Turning On/Dimming: Hold the "System On/Off" button (>2 seconds). The level and battery indications will dim, and the controller will turn on the lights.
- Turning Off/Brightening: Hold the "System On/Off" button (>2 seconds) again. The level and battery indications will brighten, and the controller will turn off the lights.
- Automatic Activation: If the display is turned on in a dark environment, the display backlight and headlight will turn on automatically. If manually turned off, they must be manually turned on again.
Walk Assistance
- Activation Condition: Walk assistance can only be activated when the pedelec is stationary.
- Activation Steps:
- Briefly press the "Down" button continuously until the support level reaches 0.
- At this point, briefly press the "Up" button, and the highest level indicator (level 4) will start to flash.
- Then, press and hold the "Up" button. The level indicator will flash successively from 1st to 4th.
- The walk assistance mode is activated, and the pedelec moves at approximately 6 km/h.
- Deactivation: After releasing the "Up" button, the motor stops automatically. The level indicators stop flashing, and the level 4 indicator starts to flash. If no operation occurs within 5 seconds, the level indicator will automatically switch to level 0.
Battery Capacity Indication
- The battery capacity is shown using 5 LED levels.
- A flashing lowest level indicator signifies that the battery needs charging.
- LED Indication Definition (from down to up) and Capacity Range:
- 5 LEDs: 80%-100%
- 4 LEDs: 60%-80%
- 3 LEDs: 40%-60%
- 2 LEDs: 20%-40%
- 1 LED: 5%-20%
- 1 LED flashing: <5%
Bluetooth Function
- The display connects to the Bafang Go APP via Bluetooth.
- All pedelec information (bikes, battery, sensor, controller, and HMI) can be displayed on a connected smartphone.
- The Bluetooth indicator on the display will flash when successfully connected to a smartphone.
USB Charge Function
- An external USB device connected to the display's USB port will be charged.
- The maximum charging voltage is 5V, and the maximum charging current is 500mA.
Error Code Definition
The display can indicate pedelec errors through flashing level indicators. Level 1 indicates the tens digit of an error code, and level 2 indicates the units digit. For example:
- Error code 04: Level 1 does not light, and level 2 flickers 4 times. After a 1-second pause, the pattern repeats. This indicates "The throttle is not back in its correct position."
- Error code 11: Level 1 flickers once, then level 2 flickers once. After a 1-second pause, the pattern repeats. This indicates "The temperature sensor inside the motor has an error."
The manual provides a comprehensive list of error codes and their corresponding troubleshooting steps. Common errors and their declarations include:
- 04: The throttle is not back in its correct position.
- 05: The throttle has fault.
- 07: Overvoltage protection.
- 08: Error with the hall sensor signal inside the motor.
- 09: Error with the Engine phase's.
- 10: The temperature inside the engine has reached its maximum protection value.
- 11: The temperature sensor inside the motor has an error.
- 12: Error with the current sensor in the controller.
- 13: Error with the temperature sensor inside of the battery.
- 14: The protection temperature inside the controller has reached its maximum protection value.
- 15: Error with the temperature sensor inside the controller.
- 21: Speed sensor Error.
- 25: Torque signal Error.
- 26: Speed signal of the torque sensor has an error.
- 27: Overcurrent from controller.
- 30: Communication problem.
- 33: Brake signal has an error (if brake sensors are fitted).
- 35: Detection circuit for 15V has an error.
- 36: Detection circuit on the keypad has an error.
- 37: WDT circuit is faulty.
- 41: Total voltage from the battery is too high.
- 42: Total voltage from the battery is too low.
- 43: Total power from the battery cells is too high.
- 44: Voltage of the single cell is too high.
- 45: Temperature from the battery is too high.
- 46: The temperature of the battery is too low.
- 47: SOC of the battery is too high.
- 48: SOC of the battery is too low.
- 61: Switching detection defect.
- 62: Electronic derailleur cannot release.
- 71: Electronic lock is jammed.
- 81: Bluetooth module has an error.
For any persistent errors, users are advised to restart the system and, if the problem continues, contact their retailer or technical personnel.
Maintenance Features
- Waterproof Design: The product is designed to be waterproof (IP65). However, submerging the display under water is highly discouraged.
- Cleaning:
- Do not use thinners or other solvents to clean the display, as these substances can damage the surfaces.
- Avoid cleaning the display with a steam jet, high-pressure cleaner, or water hose.
- Error Correction: If error information cannot be resolved using the provided instructions, contact your retailer.
- QR Code Label: Keep the QR code label attached to the display cable. This information is crucial for future software updates.
- Warranty: Warranty does not cover wear, normal use, and aging of the product.