Do you have a question about the Bard Groshong NXT PICC and is the answer not in the manual?
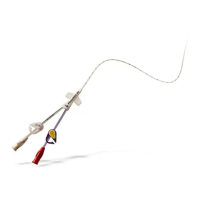
Explains the patented 3-position, pressure-sensitive valve that controls fluid flow and prevents backflow.
Lists benefits like increased safety, no need for heparin flushing, reduced clamping, and less flushing.
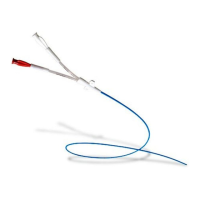
PICC for short or long-term peripheral access to the central venous system for IV therapy or blood sampling.
Lists conditions where the PICC is contraindicated, like infection or insufficient patient size.
Contraindications for ChloraPrep use, especially in children and those with allergies.
Intended for single use, not a right atrium catheter, potential biohazard after use.
Flammable, not for electrocautery, external use only, potential for injury if in eyes/ears/mouth.
Read instructions, physician order required, qualified practitioners only, secure wings/adapter.
Never use force to remove stylet, if resistance occurs, adjust and reattempt.
Remove needles slowly while injecting last 0.5ml saline to prevent backflow.
Use aseptic techniques when opening lumen. Chlorhexidine is suggested; avoid acetone/iodine.
Hold connector below heart level to prevent fluid level drop and air entry when changing caps.
Examine package, check expiration, inspect kit, flush catheter with saline.
Avoid sharp instruments, smooth clamps, avoid perforating catheter, no damage/leaks, no sharp angles.
Use suture wings to secure catheter without compromising patency; do not place sutures around catheter.
Do not use if damaged/leaking. Accessories need Luer lock. Discontinue injections if extravasation occurs.
Infusion pressure > 25 psi can damage vessels. Do not use a syringe smaller than 10 ml.
Lists potential serious complications like air embolism, infection, thrombosis, arrhythmias, etc.
Apply tourniquet, select vein (basilic preferred), release tourniquet.
Position arm at 90°. Measure for SVC placement from insertion site to sternal notch/third intercostal space.
Attach prefilled syringe, preflush with saline or heparinized saline to wet stylet. Syringe may stay attached.
Set up sterile field. Prepare site with ChloraPrep, do not touch sponge. Wet area, allow to dry.
Apply tourniquet to distend vessel. Wear sterile gloves. Drape patient over puncture site.
Remove needle guard, grip needle hub. Perform venipuncture, observe flashback, advance introducer sheath.
Support introducer sheath. Apply slight pressure. Release tourniquet. Withdraw needle from sheath.
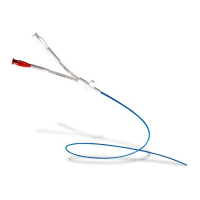
Insert catheter into introducer. Advance catheter slowly. Note resistance at 7cm for dual-lumen catheters.
Advance catheter for central placement. Turn head to prevent jugular cannulation. Position arm at 90°.
Do not position tip in right atrium; may cause cardiac arrhythmia, erosion, or tamponade.
Introducer sheath remains on the catheter at this time.
Stabilize catheter. Withdraw introducer sheath. Split and peel sheath away from catheter.
Remove wing from card, squeeze open, place around catheter. Apply StatLock stabilization device.
Stabilize catheter. Slowly remove stylet. Caution: Never use force to remove stylet.
Remove non-splitable introducer. Slide it off the proximal end of the catheter.
For single lumen only: Cut catheter with scalpel/scissors, leaving 4-7 cm for connector. Inspect cut.
Advance connector over catheter end. Attach connector to blunt, align grooves, slide oversleeve.
Attach syringe. Aspirate for blood return, flush with 10ml saline. Note: 3ml for peds. Caution: Slow removal.
Verify catheter tip location radiographically.
Illustrates dual-lumen and single-lumen insertion to bifurcation and catheter within 7cm of bifurcation.
Maintain per hospital protocols. Includes dressing changes, flushing, and handling occluded catheters.
Remove dressing, grasp catheter, remove slowly. If resistance, apply warm compress. Examine tip.
| Brand | Bard |
|---|---|
| Device Type | Peripherally Inserted Central Catheter (PICC) |
| Model | Groshong NXT |
| Material | Polyurethane |
| Radiopaque | Yes |
| Sterile | Yes |
| Valve Type | Groshong Valve |
| Catheter Length | 55 cm |
| French Size | 5 Fr |
| Lumen Options | Single Lumen |