Do you have a question about the Barudan BEXT 120V and is the answer not in the manual?
Basic safety precautions and importance of icons for safe machine operation.
Proper grounding procedures for electrical safety and outlet connection types.
Explains various warning labels to ensure safe operation and prevent injury.
Details technical specifications of the machine, including capacity, display, power, and ports.
Highlights key functionalities and operational advantages of the machine.
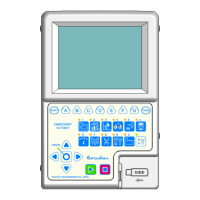
Identifies and illustrates the main parts and components of the machine's control panel.
Describes the function of each panel key and its associated numeric input.
Provides instructions on how to turn the machine's power source switch on and off.
Guides the user through the process of setting the machine's origin point before operation.
Explains the two operational modes of the Automat: Stand-By and Drive.
Details the basic layout and elements of the XS Automat's display screen.
Explains the design information and machine condition displays on the screen.
Covers how to configure the display settings for the design list.
Describes how scheduled memos are displayed upon machine power-on.
Explains the confirmation messages that appear before executing certain changes.
Details how error messages are displayed and how to close them.
Explains the use of a barcode scanner for specific functions and compatible barcode types.
Illustrates how to use the numeric entry dialogue box for inputting values.
Describes the process of entering characters using the character entry dialogue box.
Advises against using test or diagnostic functions during normal operation.
Instructions for manually changing the needle or color of the embroidery design.
Explains how to manually trim the top and bobbin threads using the trimming key.
Instructions for releasing the thread clamp for easier threading.
Details how to use the appliqué function to manually position the presser foot.
Explains how changing frames moves the pantograph for positioning.
Describes how the bobbin counter stops the machine and trims bobbins at preset stitch counts.
Instructions on switching off the monitor to save electricity.
Explains how to register points for pantograph movement and programming.
Describes the function of the laser pointer to indicate the needle's sewing position.
Guides on moving the pantograph to the center of the field or sub-soft limits.
Explains how to use the Design Loading/Downloading Key and select devices.
Outlines the uses of a USB flash drive for storing files, system updates, and editing.
Step-by-step guide on loading designs from a USB flash drive into the machine.
Instructions on how to search for designs on a USB flash drive using barcodes.
Details the process of saving designs from the machine to a USB flash drive.
Covers instructions for managing USB flash drives, including creating and deleting folders.
Explains the ABC Mode function for automatic design loading via COM port.
Provides instructions for loading designs from a connected device via the COM port.
Details how to save designs to a connected device via the COM port.
Instructions for selecting a design from Machine Design Memory for embroidery.
Explains how to view detailed information about a selected design.
Describes how to zoom in on a design for greater detail.
Provides instructions on how to delete a design from the machine's memory.
Instructions for changing the names of designs stored in memory.
Explains how to display and reset production counts for selected designs.
Instructions for simulating thread consumption for each needle.
Details how to set up and use the Name Drop function for displaying names.
Instructions on how to view and change color codes within a design's F-List.
Explains how to display and change color functions using the Easy list.
Instructions for adding running or jump stitches to a design using the Jog keys.
Details how to change design scale, stitch length, and spacing using the DSP menu.
Instructions for creating outline stitching data for designs, used for cutting or as a guideline.
Explains how to program three different frame types to limit pantograph movement.
Instructions for changing color sequences while the machine is sewing.
Instructions for changing all function codes while the machine is sewing.
Instructions for changing program settings for a selected design.
A list detailing various program parameters, their functions, and default values.
Explains how to change program settings using barcode scanning.
Guides on setting offsets for Appliqué and Frame parameters using the Jog keys.
Describes programming Sub-Soft limits to define embroidering areas using frame types.
Explains how to automatically repeat designs within the embroidery area.
Details how to automatically lay out the maximum number of patterns in the embroidery area.
Instructions for registering the design start point for each design.
Instructions for putting the machine into Drive mode, where sewing can occur.
Instructions on how to change the machine's sewing speed.
Explains how to limit the maximum machine speed per the needle being sewn.
Describes the perimeter trace feature to ensure proper pantograph placement before sewing.
Displays design and frame outline to check if the design fits within the frame.
Moves the design automatically to the center of the frame outline.
Allows the display to zoom in on the current stitch position while in Drive mode.
Moves the pantograph through the design without sewing, only available in Drive Mode.
Instructions for floating directly to a specific stitch number.
Instructions for floating to a specific color change in the design data.
Allows selecting any name in the design to start or re-sew while in Name Drop mode.
Provides instructions for re-setting the origin for a design after it has started sewing.
Instructions for changing color sequences while the machine is sewing.
Instructions for changing all function codes while the machine is sewing.
Instructions for backing up the machine to repair a missed stitch.
Explains how the machine can resume sewing from where it left off after a power interruption.
Details requirements and functions for using the network system.
Instructions for registering and entering operator codes with the Automat.
Instructions on how an operator reports being on break and the machine not sewing.
Explains how to place a call to the server and customize call notifications.
Instructions on reporting that the machine is not in production.
Instructions on downloading designs saved on the server via direct download mode.
Instructions for downloading scheduled designs from the server.
Allows selecting a folder of designs on the network for download.
Instructions for downloading designs from the server using a barcode scanner.
Automates LAN operation download in schedule mode, useful for sequential downloads.
Instructions for uploading designs from the Automat to the server.
Explains downloading designs using the COM protocol mode with a serial cross cable.
Instructions on how to change the machine's condition (MC) parameters.
A comprehensive list of Machine Condition parameters, their functions, ranges, and default values.
Instructions for Sequin device operations and adjusting mode, not available in Drive mode.
Instructions for setting up network configurations, including IP addresses and ports.
Instructions for setting screen colors using RGB values or a color list.
Instructions for setting thread color displays for designs by changing RGB values or using a color list.
Explains the structure and naming conventions for saving help files to a USB drive.
Instructions for setting the Automat's date and time.
Instructions for displaying the BEXT software version information.
Allows adding frequently used functions as shortcuts to the main screen.
Instructions for setting frame outlines for hoop display, only in Stand-by mode.
Displays model and serial number information for the machine.
Displays production totals for the last 5 days.
Allows writing and displaying memos on specified calendar dates.
Selects whether to automatically add a stop function when reading a design into memory.
Describes the BEXS system file structure and where to save update files.
Instructions for updating the machine's system software using a USB flash drive.
Steps for updating the Linux system program on the machine.
Instructions for initializing the machine's memory, requiring data backup.
Guides on initializing the CF card, which deletes the OS and all date.
A list of function codes used in the machine's operation.
Details sub-functions related to various operations like Chenille and Zigzag.
Lists common error messages, their descriptions, and troubleshooting steps.