Page 7<&(%$*4.8"4,7%K'*#$"&8#L%/7*,#*%4,77%HMNNNMNIIMOPQP1Item 63445
?@<6ARST6;@ACSED@CEA6E@EU6 ?6AFT
@##*5+7>0D&'8$"83
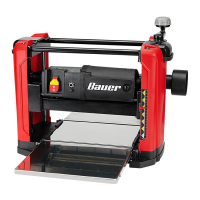
U@FACSEd A(,8#/&($%T7,8*(%'#"83%U,((>"83%B,897*#%&87>L%9&%8&$%7"2$%)"$.%;&77*(#1
C8#$,77"83%Y'#$%U.'$*
E&$*- Dust Chute may be installed in
either left or right discharge direction.
1. Using included Wrench, attach Dust Chute
to back of Planer with two Hex Screws.
2. Attach dust collection system to discharge end.
Y"#4.,(3*
689
B*b%
?4(*)
B*b%
?4(*)
V(*84.
Y'#$%
U.'$*
\;&77*(#%8&$%
#.&)8_
<"3'(*%X
@$$,4."83%B,897*
1. Using included Wrench, attach Depth
Adjustment Handle to top of right
Carrying Handle with Hex Bolt and Washer.
2. Insert Plug into opening to cover hardware.
B*b%X&7$%
,89%V,#.*(%
Y*/$.%
@9='#$5*8$%
B,897*%
T7'3%
<"3'(*%U
D&'8$"83
V@;ECEWd%%@$$,4.%T7,8*(%#*4'(*7>%$&%#&7"9%,89%7*Z*7%#'(2,4*%$.,$%4,8%#'//&($%)*"3.$%
&2%T7,8*(%,89%)&(J/"*4*L%)"$.%*8&'3.%47*,(,84*%2&(%5&Z*5*8$%&2%)&(J/"*4*1%%
E&$*- Verify that mounting surface has no hidden
components before drilling or driving bolts.
1. Use base to mark mounting holes
on mounting surface.
2. Mount base to mounting surface using
appropriate hardware (sold separately).
A&/%
!"*)
D&'8$"83%
B&7*#
D&'8$"83%
B&7*#
<"3'(*%Y%