Page 9;&(%$*4.8"4,7%<'*#$"&8#=%/7*,#*%4,77%>?@@@?@AA?BCDC1Item 57610
EF;6GHIJ6KFGLIMNFLMG6MFMO6 E6GPJ
I/*(,$"83%L8#$('4$"&8#
K*,9%$.*%6MGLK6%LNJIKGFMG%EF;6GH%LM;IKNFGLIM%#*4$"&8%,$%$.*%+*3"88"83%&2%$."#%5,8',7%
"847'9"83%,77%$*Z$%'89*(%#'+.*,9"83#%$.*(*"8%+*2&(*%#*$%'/%&(%'#*%&2%$."#%/(&9'4$1
R*8*(,7%I/*(,$"&8
O&(9%e&&W
1. An extension cord (sold separately) will be
required. Ensure that the extension cord is an
outdoor type extension cord and that it is the
correct design to accept this appliance’s plug.
2. QFKMLMRY%%%
GI%JK6!6MG%6T6OGKLO%EeIOf%FMU%
E6KLIPE%J6KEIMFT%LM[PKH-%%
G.*%*Z$*8#"&8%4&(9%5'#$%(*5,"8%
#*4'(*9%$&%$.*%,//7",84*g#%/7'31
3. Secure the extension cord
using the cord hook
as explained below.
a. Make a loop in the
extension cord, and
press that cord loop
through the hole
in the handle.
b. Hook that cord loop
around the cord hook.
c. Make sure the Trigger is released,
then plug the cord into the connector.
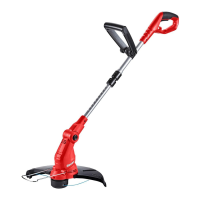
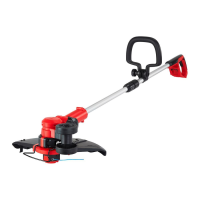
F9X'#$%E.,2$%e*"3.$
Adjust height as necessary by pressing down on Height Adjustment Lock, pulling Lower
Shaft out to desired length, then releasing Lock to secure Shaft in place.
e*"3.$%
F9X'#$5*8$%
T&4W%
T&)*(%
E.,2$
F9X'#$%G("55*(%e*,9%F837*
Adjust head angle by pressing the Head Angle Button, moving Trimmer Head
until desired angle is achieved, then releasing button. See below.
e*,9%F837*%
S'$$&8
K&$,$*%E.,2$
5RWDWH6KDIWE\SXOOLQJXSRQ$QJOH/RFNURWDWLQJ8SSHU6KDIWFORFNZLVH
and releasing Angle Lock. The Upper Shaft will click into place.