Bayco Products, Inc. • 640 South Sanden Blvd. • Wylie, TX 75098 • 1-800-233-2155 • 1-469-326-9400 • www.baycoproducts.com
INS-827-19
Instruction Manual
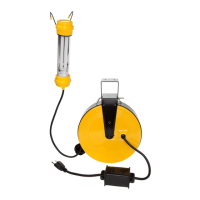
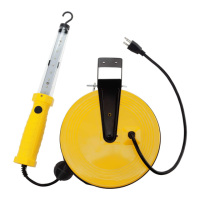
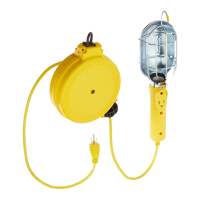
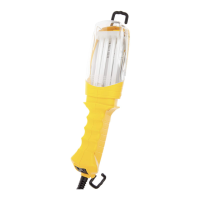
Models 827
13 Watt Fluorescent Work Light
on Retractable Reel
Electrical Rating - All models use 125 Volts 60 Hz
CAUTION - TO REDUCE THE RISK OF ELECTRIC SHOCK AND FIRE - PULL
PLUG
WHEN SERVICING, OR WHEN RE-LAMPING - USE ONLY 13 WATT OR SMALLER
BULB
CAUTION
DO NOT use in explosive atmospheres, near ammable liquids, or where explosion
proof lamps are required.
DO NOT use in the proximity of vehicles or equipment when there is a risk of
ammable liquids coming into contact with the hand lamp.
DO NOT immerse in water.
DO NOT use in areas where water can accumulate or in rain or mist.
CAUTION: Risk of Electric Shock – For Light Duty Dry Location Use Only.
GENERAL USE CORD REEL ONLY. NOT FOR HARD USE. FOR INDOOR DRY
LOCATION USE ONLY FOR LIGHT DUTY RESIDENTIAL USE ONLY
WARNING: NOT FOR USE ABOVE HAZARDOUS LOCATIONS
CAUTION: DO NOT USE IN HAZARDOUS LOCATIONS AS REQUIRED BY THE
CANADIAN ELECTRICAL CODE, PART I
IMPORTANT SAFETY INSTRUCTIONS
This product has a polarized plug (one blade is wider than the other). As a safety
feature, this plug will t in a polarized outlet only one way. If the plug does not t fully in
the outlet, reverse the plug. If it still does not t, contact a quali ed electrician. Never use
with an extension cord unless the plug can be fully inserted. Do not attempt to defeat
this safety feature.
CAUTION: PULL OUT CORD TO FULL LENGTH WHEN USING RECEPTACLE
CAUTION: DO NOT ALLOW THE CORD TO RETRACT BY ITSELF AS DAMAGE
OR INJURY MAY OCCUR FROM EXCESSIVE REWIND SPEED
CAUTION: DRYWALL WILL NOT HOLD THE WEIGHT OF THE REEL ASSEMBLY
CAUTION: READ AND UNDERSTAND MOUNTING INSTRUCTIONS BEFORE
ATTEMPTING INSTALLATION AND USE OF THIS PRODUCT
OPERATION
Plug into 120 Volt 60 Hz polarized outlet. Notice the polarized plug and insert
properly. Operate switch. Lamp may ash several times before lighting.
• Pull out desired length of cord. Notice a clicking noise when pulling. Cord will stay at
the desired length during clicking and rewind after a pull past the clicking noise. Extended
length when retracted can be adjusted by sliding plastic ball to desired position.
CAUTION: DO NOT ALLOW CORD TO RETRACT BY ITSELF, AS DAMAGE TO
CORD END FITTINGS MAY OCCUR FROM EXCESSIVE REWIND SPEED.
TO CLEAN OUTSIDE OF UNIT: Unplug the unit before cleaning and dry thoroughly
before re-using. Use a soft cloth with mild detergent. DO NOT use solvents such as
gasoline, turpentine, etc., to clean the unit. NEVER immerse the reel or cord end ttings
(receptacles or lamps) in water.
BULB REPLACEMENT
1. Disconnect the light from electrical outlet
2. Remove the plastic cover from the cord end of the light.
3. Use the edge of a knife blade to lift out the plastic rivet at the top of the handle.
4. Carefully pull the tube from around the bulb-holder. The bulb will remain in the
socket.
5. Carefully pull up on bulb to remove and discard the old bulb.
6. Insert new bulb in socket in bulb holder. Be sure bulb is properly seated against the
bulb-holder.
7. Slide the tube assembly over the bulb and insert top of bulb into the oval slot in the
top of the bulb holder. Bulb should just penetrate slot.
8. Align the holes in the tube with the holes in the bulb-holder handle and install both
plastic rivets. Press rmly until seated.
9. Replace the plastic cover aligning the cover to t over the on / off switch.
10. Restore power connection and test lamp by pressing the power switch.
NOTE: EVEN NEW LAMPS WILL FLASH SEVERAL TIMES BEFORE LIGHTING.
REPLACEMENT BULBS
Use PL-13 twin-tube uorescent bulb.
A replacement lamp may be obtained from Bayco products.
MOUNTING
Ceiling or Wall Installation
1. Select a location within 18 inches of an electrical outlet. The outlet for a garage door
opener is desirable.
2. Drywall will not hold the weight of the reel assembly, so locate a ceiling joist or wall
stud and using the mounting bracket as a template, mark the holes so they are centered
on the ceiling joist or stud.
3. Attach the mounting bracket to the stud using the 2 wood screws provided.
4. Align the holes on the side of the reel with the holes in the side of the mounting
bracket and insert the pin.
5. Place the retaining ring on the pin and twist until the entire ring is through the hole
in the pin. DO NOT operate this reel without the retaining ring in place on the pin.