EasyManua.ls Logo

BCS ROTEX R5 User Manual

Default Icon
50 pages
To Next Page IconTo Next Page
Page #1 background imageLoading...
Page #1 background image
FALCIACONDIZIONATRICE
MOWER CONDITIONER ROTEX R5
FAUCHEUSES – CONDITIONNEUSE MOD. ROTEX R6
SEGADORA ACONDICIONADORA ROTEX R7
MÄHER MIT QUETSCHVORRICHTUNG
MANUALE D’ USO E MANUTENZIONE Codice 90103067 Edizione
OWNER’ S MANUAL Code 90103067 Edition
MANUEL D’ ENTRETIEN Code 90103067 Edition 12/10
MANUAL DE USO Y MANTENIMIENTO Codigo 90103067 Edición
WARTUNGSANLEITUNG Kodezahl 90103067 Ausgabe
BCS SpA - V.le Mazzini, 161 - 20081 ABBIATEGRASSO - MI - Italia

Table of Contents

Question and Answer IconNeed help?

Do you have a question about the BCS ROTEX R5 and is the answer not in the manual?

BCS ROTEX R5 Specifications

General IconGeneral
BrandBCS
ModelROTEX R5
CategoryLawn and Garden Equipment
LanguageEnglish

Summary

Safety and Operational Warnings

Understanding Operational Symbols

Explains danger and prohibition symbols used in the manual.

General Safety Precautions

Use machine as intended, wear protective clothing, and use qualified personnel.

Prohibited Operations

Proximity Warning After Stopping

Wait for all parts to stop rotating after PTO disconnection.

Maintenance Safety Procedures

Ensure PTO is disconnected, engine off, and key removed before maintenance.

Operation Proximity Warning

Do not operate the machine with bystanders nearby.

Use with Damaged Protection Systems

Do not operate the machine if safety devices are damaged.

Intended Use Only

Operate the machine only for its designed purpose.

Technical Specifications

Safety Labels and Instructions

Machine Identification Label

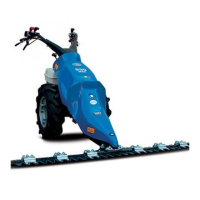
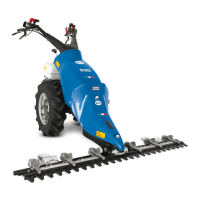
Information regarding the mower unit and its PTO speed.

Tightening Torque Specifications

Details on correct tightening torques for bolts and nuts.

Lifting Point Identification

Indicates the designated lifting points on the machine.

Danger Symbols Explained

Explains symbols related to moving parts and projectile hazards.

Safety Release Mechanism Warning

Caution regarding releasing tensioned springs.

Blade Hazard Warning

Warning about the danger of sharp cutting blades.

Machine Identification and Marking

Machine Serial Number Location

Shows the location of the serial number on the machine.

Machine Identification Plate

Details about the identification plate attached to each machine.

Tractor Coupling Procedure

Tractor Preparation and Cleaning

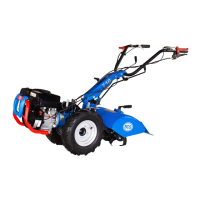
Prepare the tractor and check that lifting attachments are clean.

Machine Leveling

Ensure the machine is positioned horizontally.

Attaching Lifting Arms

Insert pins into lifting arms and secure with safety spindles.

Connecting Drive Shaft and Third Point

Insert the cardan shaft and the third point coupling.

Connecting Hydraulic Lines

Connect the hydraulic cylinder line to the tractor's intake.

Positioning Hitch Pins

Position hitch pins on tractor arms at specified height.

Raising Machine and Securing Support Leg

Raise the machine and secure the support leg with the safety spindle.

Cutting Bar Lifting Procedure

Lifting Bar for Field Maneuvers

Lift bar using hydraulic cylinder with RPM limiting device lowered.

Lifting Bar for Transport

Turn limiting device up for total bar lifting in transport condition.

Cutting Bar Weight Adjustment

Adjusting Bar Ground Weight

Adjust ground weight using rod C and spring tie rod.

Bar Balancing Safety Precautions

Perform balancing with bar vertical, safety rod inserted, and springs unloaded.

Road Circulation Procedures

General Road Safety

Observe all safety features and drive carefully to prevent accidents.

PTO Revolutions and Drive Speed

Recommended PTO Speed

Use only 540 rpm PTO for good cutting quality; avoid other speeds.

Cutting Height Adjustment

Safety Release Device

Blade Replacement Procedure

Safety Precautions for Blade Replacement

Ensure tractor engine is off and PTO is disconnected before replacement.

Removing Blades and Pins

Remove screw A and pin B to replace the blades.

Replacing Blades, Pins, and Screws

Replace blades, pins, and screws simultaneously for best results.

Re-assembly and Tightening Torques

Clean parts, re-assemble, and tighten screws to 7 kgm.

Rapid Blade Change System

Instructions for using the rapid blade change system.

Blade Rotation Direction Check

Ensure blade rotation direction matches the arrow on the blade.

Conditioner Roller Adjustment

Cutting Bar Lubrication

Cutting Bar Oil Change

Disk Flange with Torque Limiter

Warranty Information

Related product manuals