3.1.1 Main Piston Seals
The main piston is assembled using special methods so it must be changed
as one component.
Remove the cylinder block from the main piston handles by opening the
three screws hidden under the cylinder collar. Rotate the cylinder unit until
the screws are visible one by one in the collar’s hole. When all screws are
loosened, pull the cylinder unit apart from the handle
Too loosen the piston, open the lock ring (see picture). Replace the piston
and reassemble.
3.1.2 Fine Control Seal
The variable volume is disassembled by opening the three 1.5 mm
hexagonal screws holding the retaining collar. Open the volume unit by
turning the knob counterclockwise.
After replacing the o-ring or after carrying out other reparative actions
grease the seal with pressure proof grease (e.g. Esso Nebula EP). When
reassembling, use a suitable sealant to avoid leakage (e.g. Locktite 572).
3.1.3 Release Valve Seal
Detach the release valve hand wheel from the release valve stem by
opening the 2 mm hexagonal screw. Turn the hand wheel upside down (the
stop pin pointing upwards) and fix it back to the release valve stem. Rotate
the had wheel counterclockwise to remove the release valve stem. Now the
release valve seal is visible.
Note that both the check valve spring and the check valve itself are
disassembled at the same time. Be careful not to damage or drop them
while replacing the release valve seal.
When reassembling, apply silicon oil on the vent valve stem and the
release valve seal.
3.1.4 Replacing the Check Valve Seal
The procedure is exactly the same as when replacing the release valve
seal (see the description above) but this time you also need to remove the
check valve spring and the check valve.
Replace the check valve seal, apply silicon oil and reassemble.
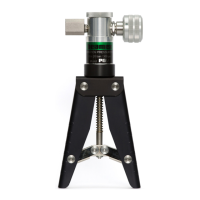
1 DESCRIPTION
The PGM calibration pressure pump is designed to manually generate
pressure up to 20 bar (300 psi) for quick and accurate calibration of
pressure gauges, transducers and other pressure measuring instruments.
1.1 Standard Accessories
The standard accessories are as follows:
∗ Service seal kit for PGM.
∗ Opening tool (hex wrench)
∗ Output adapters:
• G 1/8” male 60° int. cone
•
2 connectors for 1/8” ID hose
•
2 connectors for 1/8” ID / 1/4" OD hose with nut
•
Plug
∗ This Instruction Manual.
2.2 Optional Accessories and Spare Parts
The optional accessories are as follows:
∗ Carrying case
∗ T-tubing set with connectors
∗ 1.5 m / 4.9” hose
∗ Service seal kit for PGM.
g d