27English
5.1 Connecng the outdoor sensor
1. in the normal mode, press the "CH/+" buon on the back of the weather
staon to connect the sensor to the desired channel.
2. Press the "CH/+" - buon repeatedly unl the desired channel appears in
the display.
If, e.g., CH 1 is displayed, press the SENSOR buon to connect the sensor to
channel 1.
3. The signal symbol begins to ash unl recepon is successful. The symbol
disappears if a signal is not received within 5 minutes.
4. When the signal for CH 1-8 is interrupted and cannot re-establish
the connecon within 1 hour, the signal symbol then disappears. The
temperature and humidity values are now shown as error ("ER") for the
corresponding channel.
5. If the signal is not re-established within 48 hours, the "ER" display becomes
permanent, and you have to reset the corresponding sensor and then press
the "SENSOR" buon to connect the sensor again.
Note: Aer replacing the baeries of the wireless sensor or if the main unit cannot
receive a signal, you can manually search for the signal by pressing the "CH/+
" buon, selecng the appropriate channel, and then pressing the "SENSOR"
buon.
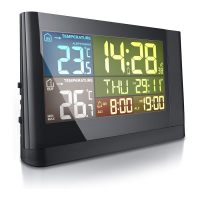
5.2 Displaying the indoor temperature and outdoor sensor values consecuvely
1. Connect the required outdoor sensors as described in secon 5.1.
2. In the normal mode, press and hold the "CH" buon for 2 seconds to acvate
the automac cycle mode. Aer you hear a "beep", the cycle symbol ( ) will
be displayed. The weather staon now alternately displays the indoor tempera-
ture (IN) and the connected outdoor sensor channels (CH1-8) with a duraon of
4 seconds.
Press the "CH" buon once again in the auto cycle mode to make it stop and to
display the current channel.