STEP BY STEP SETUP INSTRUCTIONS
(with PRA Version 22)
The following instructions are intended as a quick set up guide only,
and are not comprehensive. It is strongly recommended that the user
read the latest software manual that comes with your version of PRA
software.
1. Check if you have received all components
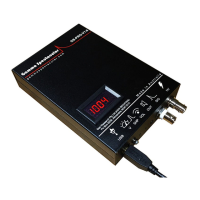
Your GS-USB-PRO should come with the following:
One USB cable
One 3.5 mm jack audio cable
One small screwdriver for adjusting the voltage
This manual.
Unless this product is part of a kit, detectors and cables are not
included.
2. Connect the GS-USB-PRO to a suitable PC
Immediately on connecting the GS to a live USB port, the voltage
display should light up.
note: The GS-USB-PRO does not have an on/off switch
3. Check PC connection
Open the PC control panel > Sound > Recording and confirm that the
computer has recognised the "USB AUDIO CODEC" optionally check
the box "Listen to this device" if you want to hear the sound from your
detector. No driver installation should be required.
note: If step 3 fails try disconnecting and re-connecting the USB.
4. Adjust the bias voltage
Use the 2.5 mm screwdriver provided and set the voltage by trimming
the potentiometer (B) until the voltmeter displays the recommended
voltage for the intended detector.
The voltmeter measures voltage above the 1 Mohm coupling, for detectors
with very low impedance dividers the voltage display may appear overstated.
 Loading...