EasyManua.ls Logo

Beem CM1153TE-GS - User Manual

Beem CM1153TE-GS
68 pages
Go to English
Print Icon
To Next Page IconTo Next Page
Loading...
1 DE
2 Lieferumfang
2 Geräteübersicht
2 Legende
3 Informationen zu Deiner Gebrauchsanleitung
3 Erklärung der Symbole
3 Erklärung der Signalrter
3 Bestimmungsgemäßer Gebrauch
4 Sicherheitshinweise
7 Vor dem ersten Gebrauch
7 Aufstellen und Anschließen
8 Bedienung und Betrieb
8 Uhrzeit
8 Wassertank füllen
8 Kaffeepulver einfüllen
8 Tropfstopp
9 Aroma-Funktion
9 Warmhaltefunktion
9 Zubereitung
9 Kaffeezubereitung mit Zeitvorwahl
10 Zeitvorwahl deaktivieren
10 Reinigung und P ege
10 Entkalken
11 Aufbewahrung
11 Entsorgung
12 Fehlerbehebung
13 Gewährleistung und Haftungsbeschränkungen
13 Technische Daten
Question and Answer IconNeed help?

Do you have a question about the Beem CM1153TE-GS and is the answer not in the manual?

Overview

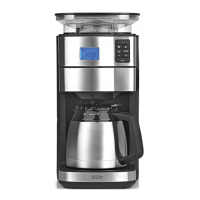
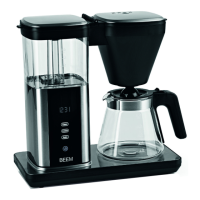
This document describes a filter coffee machine, model CM1153TE-GS, with an article number of 02275. It operates on a voltage supply of 220-240V ~ 50-60 Hz and has a power rating of 1550 W. The device falls under Protection Class I.

Function Description:

The filter coffee machine is designed for brewing coffee using ground coffee powder. It features a water tank with a capacity for 4-10 cups (approximately 125 ml per cup) and a glass jug with a capacity of approximately 1.25 litres. The device includes a filter insert, a filter compartment, a drip stop, and a hotplate to keep coffee warm.

Device Overview (Key Components):

  • Water Tank Lid (1): Covers the water tank.
  • Filter Compartment Lid (2): Covers the filter compartment.
  • Filter Compartment (3): Area where the filter insert is placed.
  • Glass Jug with Lid (4): Collects the brewed coffee and has a lid that interacts with the drip stop.
  • Filter Insert (5): Holds the coffee filter paper and ground coffee.
  • Drip Stop (6): Prevents dripping when the glass jug is removed.
  • Hotplate (7): Keeps the brewed coffee warm.
  • Control Panel (8): The main interface for operating the device.
  • Fill-Level Indicator (9): Shows the water level in the tank.
  • Water Tank (10): Holds water for brewing.

Control Panel (Key Indicators and Fields):

  • CLEANING (11): Cleaning reminder indicator.
  • Timer Activated Indicator (12): Indicates when the timer function is active.
  • Time (13): Displays the current time.
  • TIMER (14): Field for setting the time and programming the timer.
  • AROMA (15): Field for switching the "Aroma" function on/off.
  • AUTO (16): Field for activating/deactivating the timer.
  • Start/Stop (17): Field for starting or stopping the brewing process.

Usage Features:

  • Time Setting: Upon plugging in, the control panel and display light up, and "12:00" flashes. The clock uses a 24-hour format. Hours and minutes can be set by touching the TIMER (14) field. The time is saved until a new time is set or the device is unplugged. To re-enter time setting mode, touch TIMER for approximately 3 seconds.
  • Water Filling: Open the Water Tank Lid (1) and fill the Water Tank (10) with the desired amount of water (up to 10 cups). Only use water for brewing; do not add milk or other liquids. Close the lid. The device uses all water in the tank for brewing.
  • Coffee Powder Filling: Open the Filter Compartment Lid (2), insert the Filter Insert (5) into the Filter Compartment (3), and place a size 1x4 filter paper inside. Add the desired amount of ground coffee directly into the filter (recommended: one level measuring spoon or one heaped teaspoon per 125 ml cup). Close the lid.
  • Drip Stop Function: The Drip Stop (6) prevents coffee from dripping when the Glass Jug (4) is removed. During operation, the glass jug with its lid must be placed under the filter compartment. The jug's lid pushes the drip stop on the filter insert upwards, allowing coffee to flow. The glass jug should not be removed for more than 30 seconds during brewing to prevent overflow.
  • "Aroma" Function: This function extends the brewing time for a more intense coffee flavour. Touch the AROMA (15) field to activate it (it will flash). If brewing starts while activated, the field continues flashing, and the "Aroma Plus" function is on. This function automatically switches off after each brewing process.
  • Keep-Warm Function: The device has an automatic keep-warm function, keeping the hotplate on for approximately 40 minutes after brewing. To end it prematurely, touch the Start/Stop (17) field.
  • Brewing Coffee: Prepare the machine as described (water, coffee). Touch the Start/Stop (17) field to begin brewing. The control fields will turn off, except for Start/Stop (17) and AROMA (15) if active. Hot water will be poured over the coffee powder. Three beeps will sound after brewing, and all fields will reappear. The glass jug can then be removed. To stop brewing early, touch the Start/Stop (17) field again.
  • Making Coffee with a Preset Time: The clock must be set first. Touch the AUTO (16) field for approximately 5 seconds; the Time (13) and Timer Activated (12) indicators will flash. Use the TIMER (14) field to set the desired start hour and minute, then confirm by touching AUTO. The Timer Activated (12) indicator will light up constantly. The device will automatically start at the preset time.
  • Deactivating Preset Time: Touch the AUTO (16) field. The set time and Timer Activated (12) indicator will flash. Touch AUTO again for 2-3 seconds; the indicator will turn off, and programming is deactivated. The preset time remains stored and can be reactivated until a new time is programmed or the device is unplugged.

Maintenance Features:

  • Cleaning: Do not use toxic, corrosive, or abrasive cleaning agents or scouring sponges. Dispose of filter paper and empty the glass jug (4). Clean the Filter Insert (5) and Glass Jug (4) after each use with detergent and warm water, or in a dishwasher. Wipe the housing inside and out with a damp cloth, using a little detergent for stubborn dirt. Regularly check the connecting cable for damage.
  • Descaling: Limescale affects coffee quality, water, causes power loss, and shortens device lifespan. Regular descaling (every 2-6 weeks, depending on water quality and usage) is recommended. Signs for descaling include excessive steam and slower brewing. The device reminds you to descale after approximately 80 brewing processes by displaying CLEANING (11).
    • Descaling Process: Fill the Water Tank (10) to the MAX mark with a descaler/water solution (max 1:20, e.g., 50 ml concentrate per 1 litre water). Place the Glass Jug (4) under the coffee outlet. Touch the Start/Stop (17) field for approximately 3 seconds; CLEANING (11) will flash, and descaling will start. The descaler liquid is boiled at regular intervals. The device switches off when the tank is empty, and CLEANING turns off (approx. 15 minutes). To stop early, touch Start/Stop (17) for 3 seconds. Empty the glass jug and rinse the device by running two full tanks (10 cups) of clear water through it. Clean all accessories.
  • Storage: Disconnect from mains if not used for a long time. Clean and dry the device completely. Store in a dry, clean, frost-free place, protected from direct sunlight and out of reach of children and animals.

Beem CM1153TE-GS Specifications

General IconGeneral
BrandBeem
ModelCM1153TE-GS
CategoryCoffee Maker
LanguageEnglish

Related product manuals