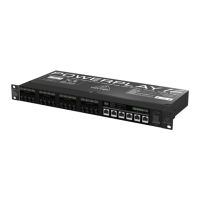
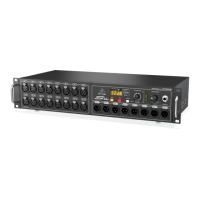
16 17DIGITAL SNAKE S16 Quick Start Guide
DIGITAL SNAKE S16 Getting started
(EN) Step 3: Getting
started
Before powering the unit on, make all
audio and digital connections.
Turn on the power.
The default con guration is active when
all status LEDs above the CONFIG button
are o (see Seq . 1 in Operation
ModeChart). If your application requires a di erent
output setup, press and hold the CONFIG button to
enter con guration mode. Whilepressing the
CONFIG button, turn the SELECT/ADJUST knob to
scroll through the items. You can select from the
following options:
• Engage the SN MASTER function to designate
the master unit when using two S16 units in a
standalone snake application. Thisis available in
4 modes, 44.1 kHz and 48 kHz, eachwith Splitter
mode engaged or disengaged.
• Engage the SPLITTER function to send the
16 local input signals directly to the ADAT OUT
and P16 jacks. When the SPLITTER function is
disengaged, theADAT OUT jacks carry AES50
channels 17-32 and P16 carries channels 33-48.
• Select whether the OUTPUT jacks 1-8 carry the
AES50 channels 1-8 (LEDs o ), 9-16, or 17-24 by
engaging the OUT +8 or OUT +16 function.
Release the CONFIG button to exit
con guration mode. See the Operation
Mode Chart for moredetails.
Repeatedly press the SELECT/ADJUST
knob until the left side of the display
shows “In”. Turn the SELECT/ADJUST
knob to select one of the inputs 1-16.
Press the 48 V button to toggle the
selected channel’s phantom power
on/o , if necessary.
Press the GAIN button. The button will
light, and the gain can now be adjusted
with the SELECT/ADJUST knob. Turn the
knob to the right until the loudest peaks in your
speaking or playing cause the -9 dB LED to light
brie y in the meter.
With headphones connected to the
PHONES jack, turn the adjacent
MONITORING LEVEL knob up to a
comfortable listening level.
(ES) Paso 3: Puesta en
marcha
Antes de encender esta unidad, realice
todas las conexiones audio y digitales.
Encienda la unidad.
La con guración por defecto está activa
cuando todos los pilotos de estado que
están encima del botón CONFIG están
apagados (vea Seq.1 en la Tabla del modo operativo,
p.19). Si su aplicación requiere un ajuste de salida
diferente, mantenga pulsado el botón CONFIG para
acceder al modo de con guración.Mientras
mantiene pulsado este botón CONFIG, gire el mando
SELECT/ADJUST para ir pasando por los
distintos elementos. Puede elegir entre
estasopciones:
• Active la función SN MASTER para designar la
unidad master o controladora cuando use dos
unidades S16 en una aplicación de manguera
independiente. Esto está disponible en 4 modos,
44.1 kHz y 48 kHz, cada uno con el modo Splitter
activado o desactivado.
• Active la función SPLITTER para enviar
directamente las 16 señales de entrada local a
las tomas de salida ADAT OUT y P16. Cuando está
función SPLITTER esté desactivada, las tomas
ADAT OUT darán salida a los canales AES50 17-32
y las P16 a los canales 33-48.
• Elija si las tomas OUTPUT 1-8 dan salida a los
canales AES50 1-8 (pilotos apagados), 9-16 ó
17-24 activando la función OUT +8 ó OUT +16.
Deje de pulsar el botón CONFIG para
salir del modo de con guración.
Vealatabla de Modos operativos
paramásdetalles.
Pulse de forma repetida el mando
SELECT/ADJUST hasta que en la parte
izquierda de la pantalla aparezca “In”.
Gire después este mando SELECT/ADJUST para
elegir una de las entradas 1-16.
Pulse el botón 48 V para activar o
desactivar la alimentación fantasma
del canal elegido, si es necesario.
Pulse el botón GAIN. El botón se
iluminará y podrá ajustar ahora la
ganancia con el mando
SELECT/ADJUST. Gire el mando hacia la derecha
hasta que los picos de mayor volumen de su
conversación o interpretación hagan que el piloto
-9 dB se ilumine brevemente en el medidor.
Con unos auriculares conectados a la
toma PHONES, gire el mando
MONITORING LEVEL que está al lado
hasta conseguir un nivel de escucha confortable.
 Loading...