2 3
MICROPOWER PS400 MICROPOWER PS400
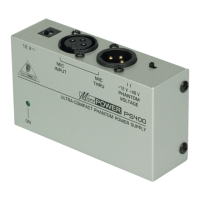
(1) 12 V connector:
To connect the power supply unit to the PS400, use the 12 V
connector. Connecting the power supply unit to the mains
automatically switches the PS400 on. To disconnect the unit
from the mains, pull out the main cord plug.
(2) ON LED:
As soon as the unit is connected to the mains, the ON LED is
illuminated.
(3) MIC INPUT connector:
To send a microphone signal to the PS400, you need an audio
cable that includes XLR connectors. Plug:
• • one XLR connector into the MIC INPUT connector
• • the other XLR connector into the condenser microphone
(4) MIC THRU connector:
To route the microphone signal from the PS400 to a mixer or a
microphone preamplier, you need an audio cable that includes
XLR connectors. Plug:
• • one XLR connector into the MIC THRU connector
• • the other XLR connector into the mic input of a mixer or,
alternatively a microphone preamplier
(5) +12 V / +48 V PHANTOM VOLTAGE switch:
To select the voltage that you need, push this switch toward
+12 V or, alternatively +48 V. For details about what value to
use, refer to instructions from the microphone manufacturer.
SERIAL NUMBER: To register the unit, use the serial number that is
located on the bottom of the PS400.
Setup Example
The following is an example of how to set up the PS400:
Fig. 2: PS400 setup example
MICROPOWER PS400
PROMIXER DJX750
STUDIO CONDENSER
MICROPHONE C-1
MIC THRU
MIC INPUT
 Loading...

