(EN) Step 3: Getting
started
(ES) Paso 3: Puesta en
marcha
(FR) Étape 3 : Mise en
œuvre
(DE) Schritt 3: Erste
Schritte
(PT) Passo 3: Primeiros
Passos
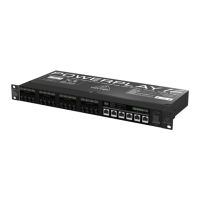
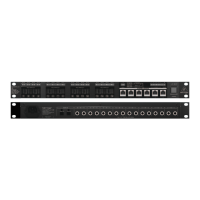
POWERPLAY 16 P16-M/P16-I/P16-D Getting started
(EN) Connect the external
power supply to the P16-M.
(You may also bus-power the
P16-M usingthe CAT5 digital
connection from the P16-IorP16-D.)
(ES) Conecte la fuente de alimentación
exterior al P16-M. (También puede
usar el P16-M con alimentación por bus
usando la conexión digital CAT5 desde el
P16-IoP16-D.)
(FR) Connectez l’alimentation externe au
P16-M (vous pouvez également alimenter
le P16-M par le bus interne grâce à la
liaison numérique CAT5 du P16-I ou du
P16-D).
(DE) Verbinden Sie das externe Netzteil mit
dem P16-M. (Sie können den P16-M auch
über ein CAT5-Digitalkabel vom P16-I oder
P16-D mit Bus-Spannung versorgen.)
(PT) Conecte a fonte de alimentação
externa ao P16-M. (Você também pode
usar o bus-power P16-M usando a conexão
digitalCAT5 do P16-I ouP16-D).
(EN) Connect a shielded CAT5
cable from a P16-I, P16-D,
oranother P16-M to the
ULTRANET IN connection on
the P16-M.
(ES) Conecte un cable CAT5 con blindaje
desde un P16-I, P16-D, u otro P16-M a la
toma ULTRANET IN del P16-M.
(FR) Connectez un câble blindé CAT5 entre
un P16-I, un P16-D, ou un autre P16-M à
l’embase ULTRANET IN du P16-M.
(DE) Führen Sie ein abgeschirmtes
CAT5-Kabel von einem P16-I, P16-Doder
anderen P16-M zum ULTRANET
IN-Anschlussdes P16-M.
(PT) Conecte um cabo blindado CAT5 do
P16-I, P16-D, ou outro P16-M à conexão
ULTRANET IN noP16-M.
(EN) If you plan to daisy-chain
the P16-M with an additional
P16-M or P16-D, runan
additional CAT5 cable from
the ULTRANET THRU connection to the
devices further down the chain.
(ES) Si va a conectar en cadena el
P16-M con un P16-M o P16-D adicional,
conecteuncable CAT5 más desde la
toma ULTRANET THRU a los dispositivos
siguientes de lacadena.
(FR) Si vous souhaitez relier le P16-M à
un autre P16-M ou à un P16-D, reliez un
câble CAT5 supplémentaire entre l’embase
ULTRANET THRU et l’appareil en aval.
(DE) Wenn Sie den P16-M mit einem
weiteren P16-M oder P16-D verketten
möchten, führen Sie ein zusätzliches CAT5-
Kabel vom ULTRANET THRU-Anschluss
zu den weiter hinten in der Kette
platziertenGeräten.
(PT) Se planejar fazer uma conexão em
série do P16-M com um P16-M adicional,
passe um cabo CAT5 adicional da conexão
ULTRANET THRU até os aparelhos que
estejam conectados à série maisadiante.
(EN) If using headphones,
plugyour headphones into
thePHONES jack using a
¼"TRSplug.
(ES) Si va a utilizar auriculares,
conéctelosala toma PHONES usando
unaclavija TRSde6,3 mm.
(FR) Si vous utilisez un casque, connectez
le casque au Jack stéréo 6,35 mm PHONES.
(DE) Schließen Sie bei Bedarf Ihre
Kopfhörer mit einem 6,3 mm
Klinkenstecker an die PHONES-Buchsean.
(PT) Se estiver utilizando fones de ouvido,
ligue os fones ao jack PHONES usando um
plugue TRS de ¼de polegadas (6.35 mm).
(EN) If using external powered
monitors, run audio cables
with ¼" TS plugs from the
LINE OUT outputs to the
monitors.
(ES) Si va a utilizar monitores
autoamplicados, conecte unos cables
audio con clavijas TS de 6,3mm desde
las salidas LINE OUT a la entrada de
losmonitores.
(FR) Si vous utilisez des enceintes actives
externes, utilisez des câbles audio en Jacks
mono 6,35 mm entre les sorties LINE OUT
et les enceintes.
(DE) Führen Sie ggf. Audiokabel
mit 6,3 mm Klinkenstecker von
den LINE OUT-Ausgängen zu Ihren
externenAktivmonitoren.
(PT) Se estiver usando monitores externos,
passe cabos de áudio com plugues TS de
¼ de polegadas (6.35 mm) das saídas LINE
OUT até os monitores.
(EN) Power up the P16-M by
pressing the ON/OFF button in
to the “ON” position.
(ES) Encienda el P16-M pulsando el
botón ON/OFF hasta que quede en la
posición“ON”.
(FR) Placez le P16-M sous tension en
plaçant la touche ON/OFF en position “ON”.
(DE) Schalten Sie den P16-M mit der
ON/OFF-Taste ein (Schalter auf “ON”).
(PT) Ligue o P16-M pressionando o
botãoON/OFF, colocando-o na posição
deligar“ON”.
P16-M Basic Mix Setup
Configuración básica de mezcla
del P16-M
P16-M — Mise en œuvre d’un
mixageélémentaire
P16-M Prinzipielle Einrichtung
derMischung
Conguração de mixagem
básica P16-M
(EN) Turn the OUTPUT LEVEL
knob all theway down to the
full counter-
clockwiseposition.
(ES) Coloque el mando OUTPUT LEVEL en la
posición mínima (tope izquierdo).
(FR) Tournez le bouton OUTPUT LEVEL
auminimum.
(DE) Drehen Sie den OUTPUT LEVEL–Regler
ganz nach links bis zum Anschlag.
(PT) Gire o botão OUTPUT LEVEL todo para
baixo na posição anti-horário.
(EN) Turn the OUTPUT LIMITER
knob all the way up to the full
clockwise position.
(ES) Gire el mando OUTPUT LIMITER hasta
su tope derecho (ajuste máximo).
(FR) Tournez le bouton OUTPUT LIMITER
aumaximum.
(DE) Drehen Sie den OUTPUT LIMITER–
Regler nach rechts bis zum Anschlag auf.
(PT) Gire o botão OUTPUT LIMITER
completamente no sentido horário.
(EN) Conrm that the
ULTRANET LED is lit.
(ES) Compruebe que el piloto
ULTRANET esté encendido.
(FR) Vériez que la Led ULTRANET
soitallumée.
(DE) Achten Sie darauf, dass die ULTRANET
LEDleuchtet.
(PT) Conrme que o LED indicador da rede
ULTRANET está aceso.
(EN) Activate your audio
channels by pressing each
CHANNEL SELECT button until
the LED lights up red. (Green
LED ickering=audio signal activity; red
LED constant=mono channel or stereo-
linked pair selected; red LED
blinking=channel is part of a selected
group, but channel is currently
notselected.)
(ES) Active sus canales audio pulsando
cada uno de sus botones CHANNEL SELECT
hasta que sus pilotos se iluminen en rojo.
(parpadeo de piloto verde=actividad de
señal audio; pilotorojo jo=canal mono
o par enlazado en stereo seleccionado;
parpadeo de piloto rojo=el canal
forma parte de un grupo seleccionado,
peroelcanal en sí no está seleccionado
enese momento).
(FR) Activez les voies audio en appuyant
sur chaque touche CHANNEL SELECT,
jusqu’à ce que la Led s’allume en rouge.
(Ledverte clignotante= présence de
signal audio ; Led rouge constante=
voie mono ou paire de voies couplées
sélectionnée; Ledclignotante rouge = la
voie fait partie d’un groupe sélectionné,
mais la voie n’est passélectionnée).
(DE) Aktivieren Sie Ihre Audiokanäle,
indemSie jede CHANNEL SELECT–Taste
drücken, bis die LED rot leuchtet.
(grüne LED ackert = Audiosignal-
Aktivität; rote LED leuchtet = Monokanal
oder gekoppeltes Stereopaar gewählt;
rote LED blinkt = Kanal ist Teil einer
gewählten Gruppe, aber Kanal ist aktuell
nicht gewählt.)
(PT) Ative os canais de áudio apertando
cada botão CHANNEL SELECT até que o
LED se ilumine com uma cor vermelha.
(LEDverde tremulando=atividade de sinal
de áudio; LED vermelho constante=canal
mono ou par estéreo vinculado
selecionado; LEDvermelho piscando=o
canal faz par com um grupo selecionado,
mas o canal não está selecionado
nomomento.)
(EN) While playing audio,
slowly turn theOUTPUT LEVEL
knob clockwise untilyou have
a comfortable basic
monitoringlevel.
(ES) Mientras reproduce la señal audio,
girelentamente hacia la derecha el
mando OUTPUTLEVEL hasta que consiga
un nivel de monitorización básico que le
resulteadecuado.
(FR) Pendant que le signal audio est
lu, montezprogressivement le bouton
OUTPUT LEVEL jusqu’à ce que le niveau
d’écoute vous convienne.
(DE) Drehen Sie während der Wiedergabe
von Audiosignalen den OUTPUT LEVEL–
Regler langsam nach rechts, bis ein
angenehmer Abhörpegel erreicht ist.
(PT) Enquanto estiver tocando o áudio,
girelentamente o botão OUTPUT LEVEL
no sentido horário até que você tenha
um nível de monitoramento básico
confortável.
(EN) Slowly turn the OUTPUT
LIMITER knob counter-
clockwise to get the limiter
working and nd an
acceptable balance between dynamics and
control of volumepeaks.
22 23Quick Start GuidePOWERPLAY 16 P16-M /P16-I /P16-D
 Loading...