Do you have a question about the Behringer U-PHORIA UMC204HD and is the answer not in the manual?
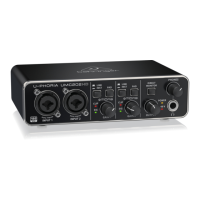
The Behringer U-PHORIA UMC202HD/UMC204HD is an audio interface designed for digitizing audio, compatible with Windows 7, 8, and 10 operating systems. It facilitates the conversion of analog audio signals into digital format, primarily for recording purposes at high resolution.
The core function of the Behringer U-PHORIA UMC202HD/UMC204HD is to act as an intermediary between an analog audio source and a computer, converting the analog signal into a digital stream that can be processed and stored by the PC. This device is crucial for achieving high-fidelity audio digitization, particularly for applications requiring detailed and accurate sound reproduction. It supports a high sample rate of 192 kHz, ensuring that the digitized audio captures a wide dynamic range and frequency response, which is essential for professional audio work.
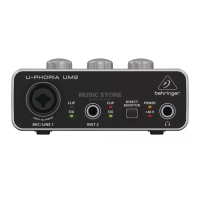
The interface includes inputs for connecting analog audio sources, such as microphones or line-level instruments. These inputs are designed to handle various signal types, providing flexibility for different recording scenarios. The device also features outputs for monitoring the audio, allowing users to listen to the input signal or the processed digital audio in real-time. This monitoring capability is vital for adjusting levels and ensuring the quality of the recording.
For stereo users, the system can accommodate two UMC20xHD units, enabling simultaneous capture of multiple audio channels. This setup is particularly useful for recording stereo sources or for multi-track recording where different instruments or vocals need to be captured independently. The device integrates with a dedicated digitizer software, such as "Graff Digitizer," which provides the necessary tools for managing the recording process, including level meters and sample rate settings.
Setting up the Behringer U-PHORIA UMC202HD/UMC204HD involves a straightforward driver installation process. Users begin by connecting the device to their PC via a supplied USB cable. While Windows may initially attempt to find drivers, the official drivers are provided on a dedicated disc, labeled "Behringer UMC Drivers and DT build." Running the BEHRINGER_UMC_DriverSetup_v3.29.0 file from this disc initiates the installation, which is guided by on-screen instructions. For stereo configurations, once the first unit's drivers are installed, connecting the second UMC20xHD typically results in automatic driver installation.
A critical step in optimizing the device for high-resolution recording is setting the sample rate to 192 kHz. This is done through the Windows 'Control Panel'. Users navigate to 'Sound' settings, select the 'Recording' tab, and then access the 'Properties' of the 'Line - BEHRINGER UMC20xHD 192k' device. Within the 'Advanced' tab, the desired sample rate of '2 channel, 24 bit, 192000 Hz (Studio quality)' is selected. Applying these settings ensures that the digitizer operates at its maximum fidelity. Stereo users must repeat this process for each connected soundcard.
Connecting the digitizer to the PC and the UMC20xHD involves a multi-cable setup. A 15-pin D-type connector connects to the back of the digitizer, while a smaller 9-pin D-type connector connects to the PC's serial port or a USB to serial adapter. The 'A' side jack plug connects to 'Input 1' and the 'B' side jack plug to 'Input 2' of the UMC20xHD for mono configurations. For stereo users, the 'AL' jack plug connects to 'Input 1' and the 'AR' jack plug to 'Input 2' of one UMC20xHD, leaving the 'B' side jacks unplugged initially.
The physical controls on the UMC20xHD units are designed for intuitive operation. All knobs, including gain controls, should initially be set to a minimum (fully anti-clockwise), and all buttons should be in the out position. The '+48v' switch on the back of the unit should be set to off. The gain controls on the front panel allow users to adjust the input level. It is crucial to monitor the level meters in the associated Graff software to prevent clipping or distortion, which occurs if the signal hits the top of the meter.
For users whose PCs lack a serial (RS232) port, a supplied RS232 to USB adapter is used. Installation of this adapter involves inserting a 'USB to serial driver' CD, browsing to the appropriate operating system folder, and running the PL2303_Prolific_DriverInstaller. After installation, plugging in the adapter allows Windows to automatically apply the drivers. Users can verify the installation in the Windows device manager under 'ports (COM & LPT)', where 'Prolific USB to serial COM port(COM??)' should be visible, indicating the assigned COM port.
The first run with the Graff Digitizer software involves identifying the correct COM port and assigning soundcards. After installing the software from the 'Digitizer 6.18' CD, users launch the program and click the 'About' link. From this interface, the correct COM port for the digitizer is selected. The software automatically assigns soundcards upon exiting this page. For stereo systems, the software assigns one soundcard per side. To determine which soundcard is used for which side, users digitize a tape and observe which side's level meters (A or B) show activity. Based on this, the A and B side jacks are plugged into the appropriate UMC20xHD units.
While the manual does not explicitly detail maintenance features in terms of physical upkeep, the operational procedures outlined contribute to the longevity and optimal performance of the device. Ensuring correct driver installation and configuration is a primary maintenance aspect, as it prevents software conflicts and ensures stable operation. Regularly checking and updating drivers, if new versions become available, can also be considered a form of software maintenance that keeps the device compatible with evolving operating systems and improves performance.
Proper handling of the physical units, such as connecting cables securely but without excessive force, helps prevent wear and tear on ports and connectors. Storing the devices in a clean, dust-free environment when not in use can protect internal components from damage. Adhering to the recommended initial settings for knobs and switches (minimum gain, buttons out, +48v off) before starting operation helps prevent accidental overloads or damage to connected equipment.
Monitoring audio levels during recording is a crucial operational maintenance step. Preventing the signal from hitting the top of the level meters in the Graff software avoids digital clipping and distortion, which not only degrades audio quality but can also indicate excessive input levels that might stress the device's input circuitry over time. By following these guidelines, users can ensure the Behringer U-PHORIA UMC202HD/UMC204HD continues to perform reliably and deliver high-quality digitized audio.
| Type | Audio Interface |
|---|---|
| Number of Inputs | 4 |
| Number of Outputs | 4 |
| Phantom Power | Yes |
| Bit Depth | 24-bit |
| Sample Rate | 192 kHz |
| Connectivity | USB 2.0 |
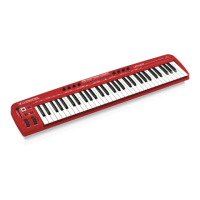
| MIDI I/O | Yes |
| Number of Preamps | 2 |
| Direct Monitoring | Yes |
| Headphone Output | 1 |
| Driver | ASIO, Core Audio |
| Analog Inputs | 2 x XLR/TRS Combo |
| Preamps | 2 x MIDAS |