9
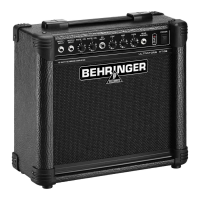
ULTRATWIN GX210
1.3.1 Front panel
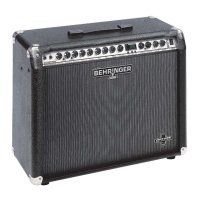
Fig. 1.2: The front panel control elements
1
These are the ULTRATWIN’s 1/4" PHONE JACK INPUTS to which you can connect your guitar. The
HI INPUT has been designed for low-output guitars (e.g. those equipped with single coil pickups), while
the LO INPUT should be used for guitars with very high output power (e.g. guitars with humbuckers).
Use a commercial 1/4" mono cable (please no DIY (Do It Yourself), better ask your specialized retailer),
with good mechanical and electrical shielding, so as to avoid unpleasant surprises during rehearsals or
concerts.
2
The CLEAN channel’s CLEAN VOLUME control determines the volume of the clean channel.
3
Press the CHANNEL button to toggle between the CLEAN and OVERDRIVE channels. When the
OVERDRIVE channel is on, the associated LED lights up.
4
Use the OVERDRIVE control to determine the degree of distortion in the OVERDRIVE channel.
5
The MID BOOST button allows you to raise the midrange frequencies in the OVERDRIVE channel.
When the button is on, the associated control LED lights up.
6
Use the MORPHING control to crossfade between the various distortion characteristics available.
7
The PRESENCE control allows you to boost/cut the high midrange frequencies.
8
The VOLUME control adjusts the volume of the OVERDRIVE channel.
+ Use both VOLUME controls to optimize the volume ratio of the two channels, so that no volume
differences can be heard when switching from one channel to the other. This setting is also
effective on the level-dependent digital effects!
9
The BASS control in the EQ section boosts/cuts the low frequency range.
10
Use the MID control to raise or lower the medium frequency range.
11
The TREBLE control governs the high frequency range.
+ Please note that with all three EQ controls set fully to the left, there will be no signal sent to the
speaker, which is due to the classical and extremely efficient EQ circuit used in the ULTRATWIN.
12
The PARAMETER control allows you to edit one effect-specific parameter. Once selected with the
PARAMETER control, its value is displayed and the associated LED lights up (see ).
+ When the MIDI functions are inactive, one effect can be stored for each of the two channels on
your ULTRATWIN, which allows for instance, to select a DELAY effect for the OVERDRIVE
channel and assign a REVERB/CHORUS effect to the CLEAN channel. The corresponding program
numbers will be stored with the channels and can be recalled using the footswitch or the front
panel buttons. When MIDI is on, this assignment feature will be disabled, so that in this mode
both channels and effects can be selected separately.
13
The STATUS LEDs inform you about the type of parameter you can edit with the PARAMETER control
(an exception being the MIDI LED).
1. INTRODUCTION