EasyManua.ls Logo

Bellini BDI604SG - User Manual

Bellini BDI604SG
20 pages
Print Icon
To Next Page IconTo Next Page
Loading...
GSM Retail Australia Pty Ltd ABN: 53 007 582 475
For Warranty and technical queries: 1300 373 199 Aust OR 0508123108 NZ www.belliniappliances.com.au
Model: BDI604SG FINELINE: 5102874 Aus/NZ Only 60cm Built In Induction Cooktop
INSTALLATION & OPERATION
INSTRUCTIONS
60 cm Built In Induction Cooktop
Model No.
BDI604SG Fineline: 5102874 Aust
BDI604SG –F Fineline: 5102874 N/Z
V.12 AUG18
Question and Answer IconNeed help?

Do you have a question about the Bellini BDI604SG and is the answer not in the manual?

Summary

Safety Instructions

General Safety Guidelines

Covers installation by trained engineers, built-in requirements, fault handling, and electrical connections.

Correct Appliance Usage

Details safe operation for users, including children, and proper appliance use.

Childrens Safety Precautions

Guidelines for safe use by children aged 8+ and supervision requirements.

Safety During Use and Cleaning

Supervision for Young Children

Ensures young children do not play with the appliance and recommends child safety device.

Safety During Appliance Use

Covers spill removal, burn risks, electrical appliance cables, fire hazards, and pacemaker use.

Safety During Cleaning

Instructions for safe cleaning, emphasizing power off and avoiding steam jets.

Preventing Appliance Damage

Advice on avoiding damage from falling objects, cookware, melting items, and improper use.

Product Disposal Guidelines

Instructions for responsible disposal of the appliance as electrical waste.

Product Description and Features

Control Panel and Features

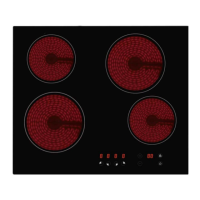
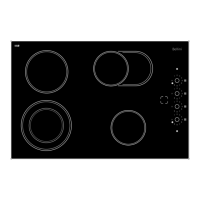
Details zone indicators, power slide control, timer, booster, child lock, on/off, and heat indicators.

Included Accessories

Lists and illustrates included accessories such as the user manual and fixing bracket.

Technical Specifications

Provides dimensions, weight, electrical connection, rated power, power levels, and timer duration.

Installation Requirements

Pre-Installation Checks

Ensures work surface suitability, heat resistance, oven cooling fan, clearance, and isolating switch.

Post-Installation Checks

Confirms power cable accessibility, adequate airflow, thermal barrier, and isolating switch accessibility.

Locating Fixing Brackets

Guidance on placing the unit on a stable surface before attaching fixing brackets.

Adjusting Bracket Position

Instructions on how to fix the hob and adjust bracket position for tabletop thickness.

Installation Cautions

Highlights professional installation, avoiding installation above certain appliances, and heat resistance.

Installation Procedures

Cupboard Cutting Dimensions

Provides detailed dimensions for cutting cupboards and installing the hob, including safety distances.

Ventilation and Work State Importance

Emphasizes ensuring proper ventilation and that the hob is in good working order.

Electrical Connection Procedures

Details requirements for suitable domestic wiring, voltage, cable sections, and avoiding adapters.

Electrical Connection Notes

Covers suitability of wiring, cable positioning, and the need for qualified electricians for alterations.

Finalizing Installation

Electrical Cable and Connection Safety

Covers cable replacement, circuit breaker requirements, correct connections, and cable handling.

Terminal Board Connection Steps

Step-by-step guide for opening the terminal board and making electrical connections.

Single-Phase Connection Options

Explains single-phase connection for appliances with four or more heating units.

Completing Electrical Connection

Final step for closing the terminal cover and completing the electrical connection.

Final Appliance Fixing

Instructions for placing the hob into the cupboard and ensuring a proper seal.

Using Your Appliance

Appliance Controls and Indicators

Explains the function of zone indicators, power slide control, timer, booster, child lock, on/off, and heat indicators.

Operating Your Cooktop

Starting the Cooking Process

Step-by-step guide to power on, select zones, and adjust heat settings for cooking.

Using the Booster Function

Details how to activate the booster for maximum power for 5 minutes and how to cancel it.

Using the Timer Function

Explains using the timer as a minute minder or to turn off zones, with a maximum setting of 99 minutes.

Timer Functions

Setting the Minute Minder

Step-by-step instructions for setting the minute minder function on the cooktop.

Setting the Auto-Off Timer

Step-by-step instructions for setting the timer to automatically turn off cooking zones.

Cancelling the Timer

Procedure for cancelling an active timer setting by setting it to '00'.

Cooking Tips

Heat Setting Suitability Guide

Guide correlating heat settings (1-9) with suitable cooking methods and food types.

Simmering and Cooking Rice

Advice on simmering techniques, including temperature, use of lids, and rice absorption method.

Searing Steak Guide

Step-by-step instructions for achieving juicy steaks, including preparation and cooking times.

Stir-Frying Techniques

Tips for quick stir-frying, including ingredient preparation, pan preheating, and combining ingredients.

Choosing the Right Cookware

Proper Pan Bottom Size Selection

Recommendations for pan bottom diameter based on zone size for optimal induction compatibility.

Selecting Pan Base Type

Advice on choosing pans with thick, flat bases for induction cooking and avoiding rough surfaces.

Choosing Pan Material

Guidance on suitable and unsuitable pan materials for induction cooktops, including specific recommendations.

Cookware Handling Cautions

Important warnings about avoiding scraping the glass, not leaving utensils on the hob, and never heating empty pans.

Maintenance and Troubleshooting

Maintenance Safety Precautions

Ensures the cooktop is disconnected from power before cleaning and advises on handling spills.

Everyday Cleaning Procedures

Steps for cleaning everyday soiling on glass, including product use and drying.

Cleaning Boilovers and Sugary Spills

Instructions for immediate removal of spills using a scraper, with safety warnings.

Cleaning Touch Controls

Procedure for cleaning touch controls when spills occur, including drying thoroughly.

Product Warranty Information

Warranty Definitions

Defines terms like Australian Consumer Law, Company, Consumer, and Consumer Guarantees.

Consumer Law Rights

Clarifies that warranty benefits are in addition to rights under the Australian Consumer Law.

Company Warranty Statement

States that the Bellini product is warranted to be free of manufacturing defects and perform to specifications.

Warranty Applicability

Confirms warranty benefits extend only to the original purchaser for domestic use.

Warranty Period

Specifies the warranty commencement date and duration of three (3) years.

Warranty Coverage Details

Outlines that defects found within the warranty period will be repaired or replaced by the company.

Warranty Exclusions

Lists conditions under which the warranty is void, such as improper installation or misuse.

Australian Consumer Law Statement

Mandatory statement regarding consumer entitlements for major failures and acceptable quality.

Warranty Claim Process

Proof of Purchase Requirement

Emphasizes the need for proof of purchase to obtain warranty benefits.

Service Area Limitations

Explains warranty coverage limitations for customers outside the company's service area.

Transport Responsibility

Details responsibilities for safely disconnecting, packing, and insuring products for return.

Costs for Warranty Claims

Outlines customer responsibility for costs associated with returning and redelivering products for warranty.

Product Examination Process

Describes how the company or its agent will examine products to determine warranty service.

Warranty Filing Instructions

Instructs users not to send the warranty document but to fill it out and keep it with the invoice.

Retaining Purchase Records

Advises keeping the purchase receipt as proof of purchase for warranty claims.

Product Development Notes

Informs users that product improvements may result in slight differences from illustrations.

Warranty Service Contact

Provides the primary phone numbers for warranty service in Australia and New Zealand.

Overview

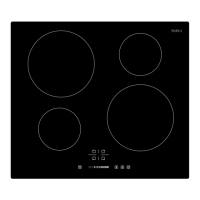
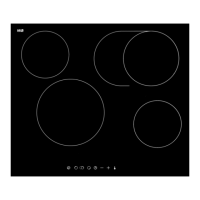
This document is an installation and operation manual for the Bellini 60 cm Built-In Induction Cooktop, model BDI604SG (Fineline: 5102874 for Australia/New Zealand).

The Bellini BDI604SG is a 60 cm built-in induction cooktop designed for domestic cooking and frying of food. It features four induction heating zones with varying power outputs and diameters, controlled by a touch-sensitive control panel.

Function Description:

The cooktop operates on the principle of induction heating, where electromagnetic fields directly heat the cookware, making the cooking zones themselves less hot compared to traditional electric hobs. It offers precise control over cooking temperatures and includes several safety and convenience features.

Important Technical Specifications:

  • Dimensions (h x w x d): 60 x 590 x 520 mm
  • Net Weight: 10.2 Kg
  • Electrical Connection: 220-240V~ 50 or 60Hz
  • Rated Input Power: 7000W
  • Power Level: 9 settings
  • Max Timer Duration: 99 minutes
  • Heating Zones:
    • Zone 1: max. 1200/1500 W, 140mm diameter
    • Zone 2: max. 2300/2600 W, 220mm diameter
    • Zone 3: max. 1200/1500 W, 140mm diameter
    • Zone 4: max. 2300/2600 W, 220mm diameter

Usage Features:

The cooktop is controlled via a touch-sensitive panel with the following controls:

  • Heating zone selection controls: To select which cooking zone to adjust.
  • Timer control: Allows setting a minute minder or a timer to turn off specific cooking zones. The maximum timer setting is 99 minutes.
  • Power / Timer slider touch control: Used to increase or decrease power settings (from 0 to 9) or adjust the timer duration.
  • Boost control (B): Activates a booster function for a selected zone, allowing it to reach its maximum achievable power setting for 5 minutes. After 5 minutes, if the original power level was 0, it defaults to level 9.
  • Child lock: Locks the control panel to prevent unintentional operation. When activated, "Lo" is displayed, and only the On/Off button can be used.
  • ON/OFF control: Turns the appliance on or off. When turned on, "0" is displayed above the power setting.
  • Residual heat indicator (H): An "H" lights up on the power display to indicate that a particular zone is very hot and should not be touched. This indicator may remain on for approximately 30 minutes, depending on the power setting selected.

Cooking Process:

  1. Power on the unit; the buzzer beeps once, and displays show "–" or "– –", indicating standby mode.
  2. Touch the ON/OFF control.
  3. Place a suitable pan on the desired cooking zone.
  4. Touch the heating zone selection control; an indicator next to the key will flash.
  5. Adjust the heat setting using the slide control.
  • If no heat setting is chosen within 1 minute, the hob automatically switches off.
  • The cooktop can detect if a pan is suitable; if not, the display will flash, indicating an unsuitable pan.

Timer Functionality:

The timer can be used in two ways:

  1. Minute Minder: Does not turn off any cooking zone when the set time is up.
  2. Cooking Zone Timer: Turns off one or more cooking zones after the set time. To set the timer:
  • Select the heating zone (for cooking zone timer) or ensure the cooktop is on (for minute minder).
  • Touch the timer control.
  • Use the slider control to set the desired time (up to 99 minutes).
  • The display shows the shortest timer duration if multiple zones are timed. A red dot next to the power level indicator shows which zone is selected for timing. To cancel the timer, select the zone, touch the timer control, and set the timer to "00" using the slider.

Cookware Suitability:

  • The appliance indicates if a pan is suitable by flashing the power indicator if not.
  • Recommended minimum pan bottom diameters: 120mm for 140mm zones, 180mm for 220mm zones.
  • Pans with a thick, flat bottom are best. Avoid pans with rough bases to prevent scratching the cooktop surface.
  • Suitable materials: Enameled stainless steel with a special induction-compatible base.
  • Unsuitable materials: Glass, ceramic, earthenware, aluminum, copper, and non-magnetic stainless steel.
  • Caution: Lift pans to move them to avoid scratching. Do not leave empty cooking utensils on the hob when switched on, as they may be detected and heated. Never heat an empty pan.

Maintenance Features:

  • General Cleaning:
    • Always disconnect the cooktop from the main power supply and ensure it is cool before cleaning.
    • Spills and splashes should be cleaned as quickly as possible to prevent hardening and sticking.
    • Use kitchen paper or a cloth for slight stains.
    • For more resistant stains, use a specific product for vitro-ceramic glass, following product instructions.
    • To avoid permanent damage, clean any residue with a cleaner formulated for ceramic glass cooktops.
    • Avoid heavy-duty scourers, nylon scourers, and harsh/abrasive cleaning agents as they can scratch the glass.
    • Never leave cleaning residue on the cooktop, as it can stain the glass.
  • Specific Cleaning for Boilovers, Melts, and Sugary Spills:
    • Remove immediately with a fish slice, palette knife, or razor blade scraper.
    • Scrape the soiling to a cool area of the cooktop.
    • Clean with a dishcloth or paper towel, then follow general cleaning steps.
    • Caution: Razor blades are sharp; use with extreme care and store safely.
  • Cleaning Touch Controls:
    • Switch off the cooktop.
    • Soak up spills.
    • Wipe the touch control area with a clean, damp sponge or cloth.
    • Wipe the area completely dry with a paper towel.
    • Switch the cooktop back on.
    • Note: Liquid on controls may cause beeping, automatic shutdown, or malfunction.

Installation Requirements:

  • Installation must be performed by trained, registered service engineers.
  • The work surface must be square, level, heat-resistant, and at least 30mm thick.
  • If installed above an oven, the oven must have a built-in cooling fan.
  • All clearance requirements and standards must be met.
  • A suitable isolating switch (3mm air gap contact separation in all poles) must be incorporated into the permanent wiring, easily accessible to the customer.
  • The power supply cable must not be accessible through cupboard doors or drawers.
  • Adequate fresh air flow to the base of the hob is required.
  • A thermal protection barrier must be installed below the hob if installed above a drawer or cupboard.
  • The safety distance between the hotplate and the cupboard above it should be at least 760mm.
  • The wall and heating zone above the table surface must withstand heat.
  • The sandwich layer and adhesive must be heat-resistant.
  • The hob should not be installed directly above a dishwasher, fridge, freezer, washing machine, or clothes dryer due to humidity.
  • Electrical connections must be made by a specialist aware of legal and regulatory requirements.
  • The power cord should be connected to a 3x20A omni-polar circuit breaker.
  • For direct mains connection, an omni-polar circuit-breaker with a minimum 3mm opening between contacts is required.
  • The domestic wiring system must be suitable for the hob's power draw, and the voltage must match the rating plate.
  • Power supply cable sections must withstand the specified load.
  • Avoid adapters, reducers, or branching devices.
  • The power supply cable must not touch hot parts and its temperature must not exceed 75°C.
  • Any alterations to the domestic wiring system must be made by a qualified electrician.
  • If the cable is damaged, it must be replaced by the manufacturer, after-sale agent, or authorized technical staff.
  • The cable must not be bent, kinked, or compressed.

Warranty:

The Bellini cooktop comes with a 3-year in-home warranty for domestic use, covering manufacturing defects and performance issues. The warranty does not apply to commercial or industrial usage, misuse, neglect, accidental damage, improper installation or maintenance, alterations, or damage from power surges or incorrect power supply. For warranty claims, customers in Australia should call 1300 373 199, and in New Zealand, 0508 123 108. Proof of purchase is required for warranty service.

Bellini BDI604SG Specifications

General IconGeneral
BrandBellini
ModelBDI604SG
CategoryCooktop
LanguageEnglish

Related product manuals