EN
STAND FAN
Thank you for purchasing the electric Bel¬lus fan! If the fan
is serviced normally, it will operate for many years. Read this
manual carefully before using the fan, and keep it for future
reference!
SAFETY INSTRUCTIONS
When using electrical devices, always take basic precaution to
decrease the risk of re, electric shock and personal injury. Al-
ways follow these safety instructions:
1. Only use the fan in the way described in the instruction
manual. Using the fan in a way other than the recommended
use may cause a re, an electric shock or personal injury.
2. Do not use the fan outdoors.
3. To prevent electric shocks, do not place the fan in a window,
immerse the device, plug or power cable in water or spray
them with any liquid.
4.This fan requires a grounded power source. Never con-
nect the fan to any other power source than an appropriately
grounded one. DO NOT neglect this safety precaution.
5. Avoid touching the moving parts of the fan.
6. Switch the fan OFF and unplug the power cable, when the
fan is not used, when it is moved from one location to another
or when it is being installed or cleaned.
7.When you want to unplug the power cable, switch the fan
OFF and remove the power cable from the power source by
pulling the plug. Never pull the cable.
8.Do not use the fan near explosive and/or ammable gases.
9. Do not place the fan or any of its parts near an open re, a
cooking device or a heater.
10. Do not use the fan if the power cable or the plug is dam-
aged, if the device does not operate properly, or if it has fallen
or is damaged in any way.
11. Using accessories other than those recommended by the
manufacturer may be harmful.
12. Place the fan on a dry and level platform.
13. Do not x the fan onto a wall or hang it on the ceiling.
14. Do not use the fan if the casing has come loose or is dam-
aged.
15. If the plug ts loosely in an alternating current socket, it
may overheat and make the plug bend. When you have to re-
place the loosened or worn wall socket, contact an author-
ised electrician.
16. If the power cable is damaged, it must be replaced by an
authorised electrician or a professional mechanic in order to
prevent danger.
17. Do not use the fan unless the protective front and back
guards are installed. WARNING! To decrease the risk of re and
electric shock, do not use this fan with a semiconductor con-
troller.
18. Children shall not play with the appliance. Cleaning and
user maintenance shall not be made by children without su-
pervision.
19.The appliance is not intended for use by person (including
children) with reduced physical, sensory, mental capabilities
or lack of experience and knowledge, unless they have been
given supervision or instructions concerning use of the appli-
ance by a person responsible of their safety.
20. Do not leave the fan funning unattended.
21. Never try to open or repair the device by yourself as this
could result in damage to property and injure to people.
Note! This device is not suitable for industrial use.
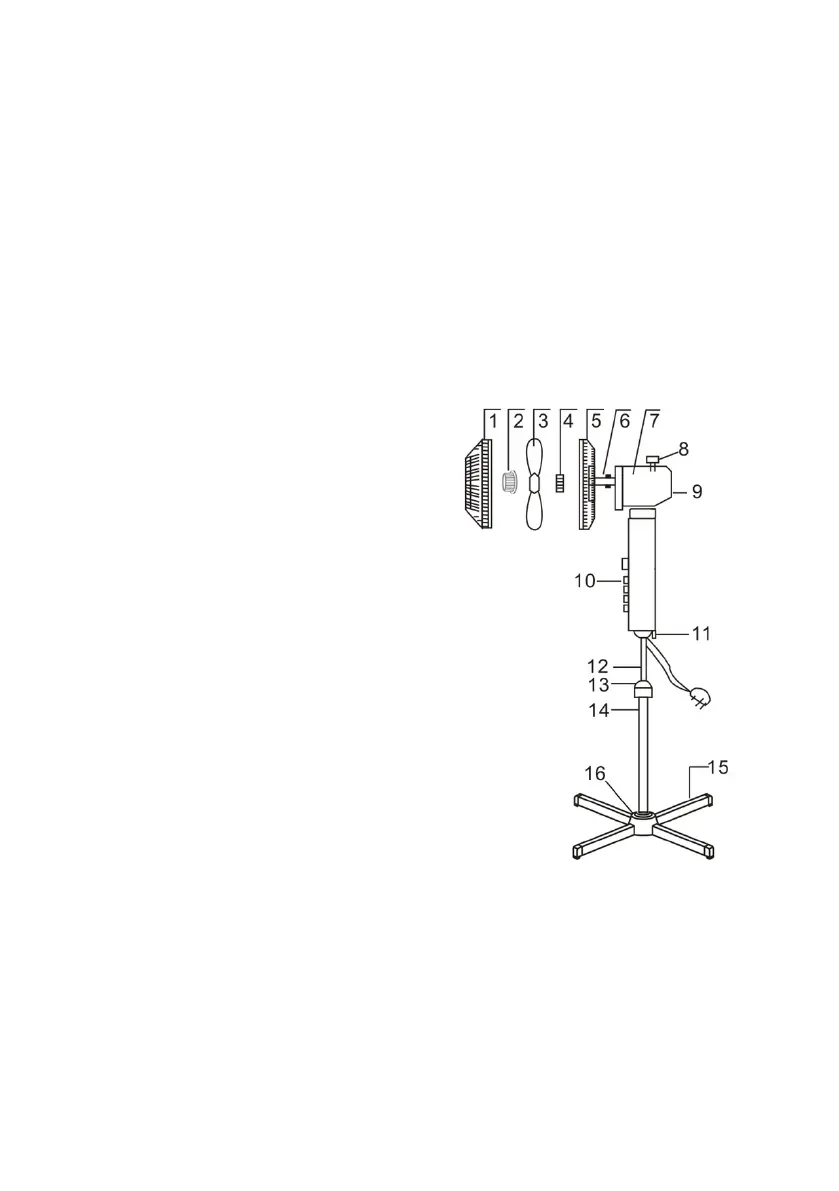
FEATURES OF THIS PRODUCT
1. front grille
2. blade cap
3. blade
4. plastic mounting nut
5. rear grille
6. motor shart
7. motor housing
8. oscillating knob
9. pitching
10. fan body
11. set skrew
12. inner tube
13. hight adjustment collar
14. outer tube
15. base
16. base decorative cap
1. Front grille
2. Blade cap
3. Blade
4. Plastic mounting nut
5. Rear grille
6. Motor shart
7. Oscillating knob
8. Motor housing
9. pitching
10. fan body
11. Set skrew
12. Inner tube
13. Hight adjustment collar
14. outer tube
15. base
16. base decorative cap
ASSEMBLY:
1. Installation of the outer tube and the base: insert the tube into the hole
one the base, then fasten the screws on the base.
2. Installation of the fan: set the fan in the adjustable pole and fasten the
fan.
3. Installation of the rear grille: put the rear grille on the motor housing
and fasten it with the mounting nut.
4. Installation of the Blade: Push along the motor shaft and fasten firmly
the blade with blade cap.
5. Installation of the front grille: Hang the front grille to rear grille with the
position fixer provided at the rim of grill and then fix together with clips
provided.
 Loading...