9
Check Rockler.com for updates. If you have further
questions, please contact our Technical Support
Department at 1-800-260-9663 or
support@rockler.com
Jointing is the process of cutting flat, square,
straight edges on a board. It’s typically done
on a free-standing power jointer but can
be done on a router table for boards that
are no thicker than the cutting height of the
router bit used. The Bench Dog ProFence
has integral slots to accept the included
aluminum Jointer Bars (12). When installed in
pairs in the slots, these bars “shim out” the
outfeed subfence either 1/16" or 1/32".
1. Unplug the router and install a 1/2"
diameter straight or spiral up-cut router
bit, setting the bit height according to
the capacity of the bit and the thickness
of your stock.
2. From the back of the fence, loosen the
1" Round Knobs (7) on the outfeed MDF
Adjustable Fence Face (2).
3. Slide both Jointer Bars (12) behind the
outfeed MDF Adjustable Fence Face (2)
in matching slots -- either the second and
fourth slots (to remove 1/32" of material)
or the first and third slots (to remove
1/16" of material). Tighten the
1" Round Knobs (7).
4. Using a straightedge held flush against
the outfeed MDF Adjustable Fence
Face (2) as a guide, adjust the fence to
align the outfeed side precisely with the
cutting edge of the bit.
5. Remove the straightedge. From the
back of the fence, loosen the 1" Round
Knobs (7) on both MDF Adjustable Fence
Faces (2) and slide the Fence Faces
toward the bit to make the gap between
the faces and the bit as small as possible
without making contact. Tighten the
1" Round Knobs once the Fence
Faces are in position. Adjust the
Bit Safety Guard (3).
6. Plug in the router and make a test cut in
scrap stock. If adjustments are needed,
unplug the router and readjust the fence
position, using the straightedge as a
guide. Then make another test cut. Don’t
be surprised if several adjustments are
required to achieve the final position.
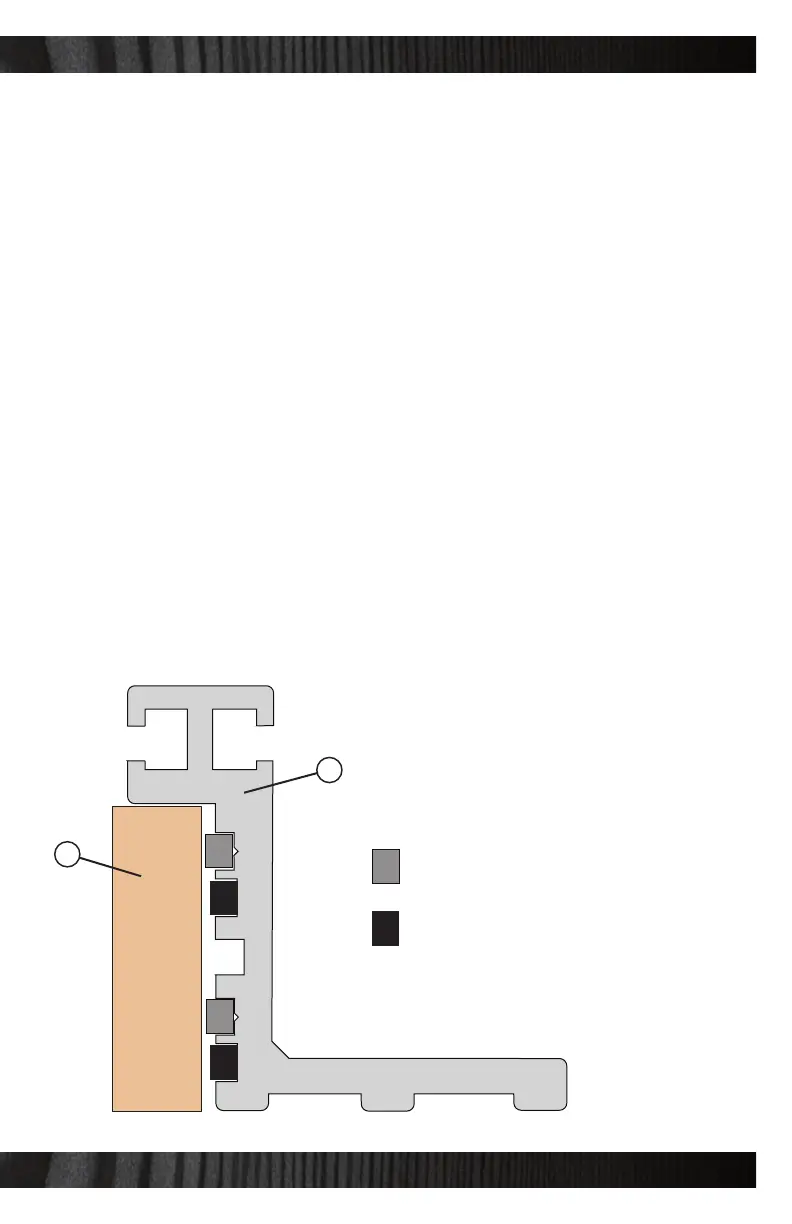
Jointing Bar Attachment
Use in slots 1 and 3 for 1/16" cuts
Use in slots 2 and 4 for 1/32" cuts
1
2
3
4
4
4