26
Assembly
1. Insert four 5/16"-18 x 1
1
⁄4" T-Bolts (6)
in the holes in the front face of the
Aluminum Fence (1). Loosely thread a
1" Round Knob (7) on the outside two
T-Bolts. From the back side of the
Aluminum Fence, fit the Dust Port (4)
onto the two inner T-Bolts and loosely
thread a 1" Round Knob on each bolt.
2. Attach the Adjustable MDF Fence
Faces (2) by sliding them onto the
5/16"-18 T-Bolts and tightening the
1" Round Knobs (7).
3. Slide two 5/16"-18 x 1
1
⁄4" T-Bolts (6) into
the forward-facing T-Slot of the Aluminum
Fence (1). Fit the Bit Safety Guard (3) over
the T-Bolts and secure with a 1" Round
Knob (7) on each T-Bolt.
4. Determine whether the 3/8"-16 x 2
1
⁄2"
Hex Bolts (9) or 3/8"-16 x 2
3
⁄4" Carriage
Bolts (10) are appropriate for your router
tabletop. Insert the appropriate bolts up
through the slots in the bottom of the
Aluminum Fence (1) and place a 3/8"
Nylon Washer (11) and a Knob Spacer (8)
on each. Then loosely thread a 3/8"-16
T-Knob (5) on each bolt.
5. Fit the bottom of the 3/8"-16 x 2
1
⁄2"
Hex Bolts (9) or 3/8"-16 x 2
3
⁄4" Carriage
Bolts (10) into the mounting slots in
your router table.
The Bench Dog
ProFence Adapter Kit (27911, sold
separately) is required if installing on the
Rockler HPL Router Tabletop (46924)..
Set the Bit Safety
Guard (3) directly over the router bit,
at least 1/2" above the top of the bit or
the top of the workpiece (whichever is
highest) to prevent the bit from cutting
into the Safety Bit Guard.
When adjusting the position of the Router
Table Fence, always ensure that no part
of the Aluminum Fence (1) will contact
the router bit.
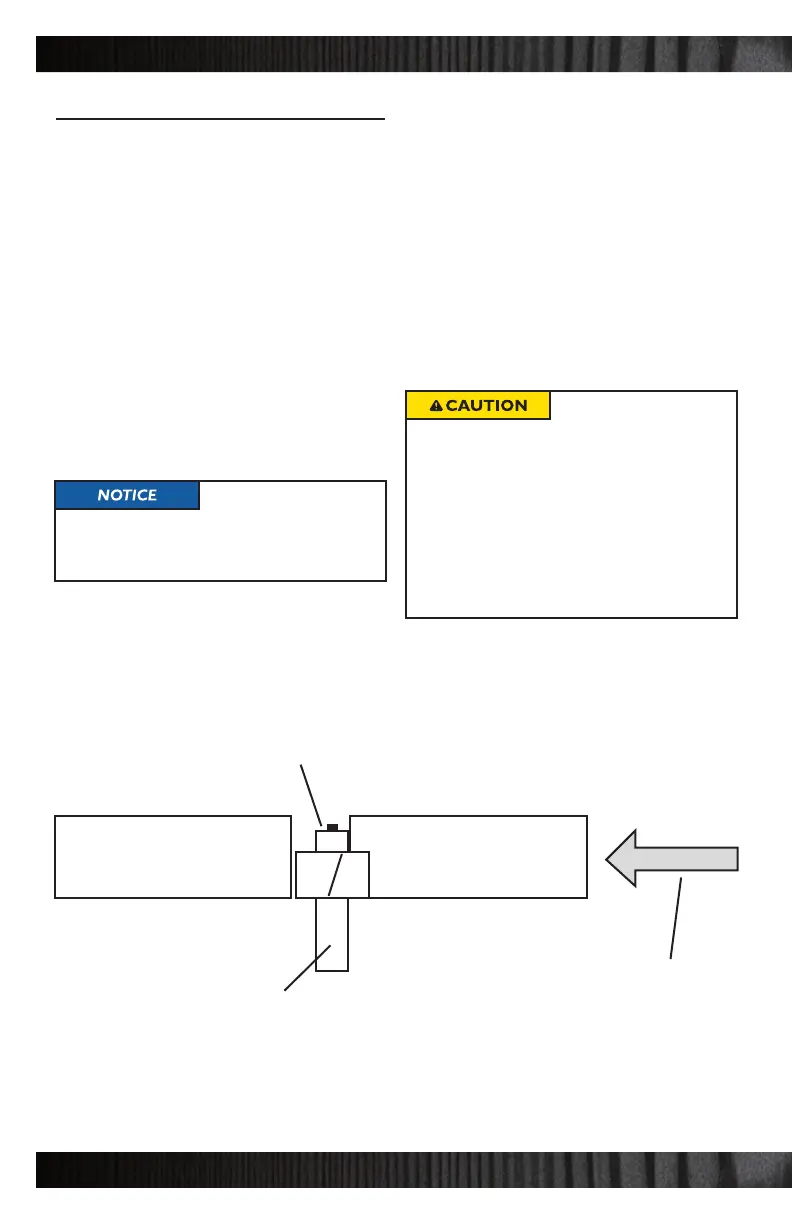
Infeed subfence adjusted to zero clearance
Infeed SubfenceOutfeed Subfence
Feed Direction
Router Bit Guide Bushing
Router Bit