EN
Laying the foundation plate - Cement foundation
If there is no cement floorin
a cement* foundation must be pr
ared. Proceed as follows:
1 - Di
minimum 40x30cm, at last 35cm deep
.
2 - Prepare the pipes for the passa
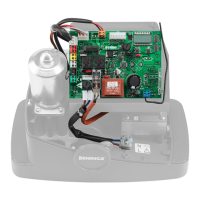
see “Electric connections”
if the rack is pre-installed at a measurement
reater than that indicated in Fi
oundation plate may have to be raised.
In this case, bend the bars at a height o
about 45 mm as indicated in Figure 5.
b
if the motor will be fixed to the
round, bend the bars at a hei
ure 6.
4 - Prepare the plate
ixing the threaded bars. With re
erence to Figure 7
use 4 lower su
ort nuts D and 4 nuts F with the relative washers R to block the
n position. The position o
the bars must be similar to that indicated in
5 - Prepare the cement followin
the manufacturer’s indications. In some cases it may
be necessary to realise a metal ca
oundation more stable.
6 -
ink the bars into the cement, payin
attention to the level of the plate and the
parallelism with the leaf
or the cement cast to be rein
- Remove the upper screws and washers, which will be successively used to
ure 9 shows the plate when
necessary, it is now possible
to raise the plate by a maximum o
20 mm, positioning 4 nuts and the relative washers
under the plate, as indicated in fi
ualified staff for realisation of the foundation
The plate must be tightly
150 mm
190 mm
190 mm
150 mm
Fig.3
Posa della piastra di fondazione - Quote
It is also indispensable that the rack pro
ects, with respect to the centre o
the plate, by
at least the measurements indicated in
the end run brackets.
In some cases it is possible that the rack projects by a
ith respect to the plumb line o
the gate in order to allow complet
the measurements indicated be
oundation plate has two lar
hey can both be used, thanks to the space present on the bottom o
ear motor, but it is easier to use the hole of the left if the pinion,

 Loading...