EasyManua.ls Logo

Bergeron By Design Height Right Kids Chair User Manual

Default Icon
4 pages
To Next Page IconTo Next Page
Page #1 background imageLoading...
Page #1 background image
Parts
Left SideRight Side
Foot Rest (8 pcs.) (4 pcs.)(4 pcs.)(8 pcs.)
a
b
c d
e
(6 pcs.) Right + Left Cap Right + Left Clip
* optional with tray
and grab rail.
Seat
2 Back Supports
Front Support
2 Metal Cross Bars
Allen KeyBack
• SHORTER THAN
BACK SUPPORTS
Slide in the Seat and Foot Plate with the curved
edge facing forward. Make sure that the Seat
and Foot Rest are at the appropriate height for
the occupant. See the Sizing section for proper
placement of the Seat and Foot Rest.
* As the child grows,
the TOP metal cross
bar CAN be removed.
Always secure child in the restraint
• Never leave child unattended
Always keep child in view
• Secure straps tightly
• Never use as a stepping stool
The front edge of the footrest should never
extend beyond the bottom edge of the front
supports at floor level
WARNING:
!
Height Right Kids Chair
WARNING: Optional infant insert required when
using tray or grabrail for children up to 3 years of age.
!
!
3 a.
b.
4
a
e
d
Insert a Wooden Dowel (e) into the larger hole in each of the Back Supports
and Front Support. Insert a Wood Nut (a), as shown into the inner holes of
the 3 Supports. Attach the 3 Wooden Supports as shown and insert Long
Screws (d). Loosely tighten the Long Screws into Wood Nuts through the Left
Side with the Allen Key. Labeling on the Rear Supports should be visible.
Attach the 2 Metal Cross Bars as shown and
insert Screws (c) . Loosely tighten the
Screws (c) into the Metal Cross Bars through
Both sides with the Allen Key.
Insert the rest of the Dowels, Wood Nuts, and
Screws as needed to attach the Right Side of
the chair. Do Not fully tighten screws.
Insert a Wood Nut (a), as shown into the inner holes of the Back. Attach the
Back as shown and insert a Long Screw (d). Loosely tighten the Long Screw
into Wood Nut through the Left Side with the Allen Key.
FRONT
SUPPORT IS
SHORTER
HARDWARE a (3pcs.)
d (3pcs.)
e (3pcs.)
HARDWARE a (4pcs.)
d (4pcs.)
e (3pcs.)
HARDWARE c (4pcs.)
HARDWARE a (1pcs.)
d (1pcs.)
a
d
d
d
d
c
c
d
c
c
Logos this side
1 2
WARNING: The child should be secured in the high chair at all times by the restraining
system. The tray is not designed to hold the child in the chair. It is recommended that the chair be
used only by children capable of sitting upright unassisted.
!
WARNING: Prevent serious injury or
death from falls or sliding out.
(Tray & Grabrail sold separately)
Question and Answer IconNeed help?

Do you have a question about the Bergeron By Design Height Right Kids Chair and is the answer not in the manual?

Bergeron By Design Height Right Kids Chair Specifications

General IconGeneral
BrandBergeron By Design
ModelHeight Right Kids Chair
CategoryIndoor Furnishing
LanguageEnglish

Summary

Safety Warnings and Usage Guidelines

Child Restraint and Supervision

Essential safety guidelines for child restraint, supervision, and safe usage of the chair.

Infant Use Requirement

Specifies the requirement of an infant insert for children up to 3 years old.

Chair Parts Identification

Main Components

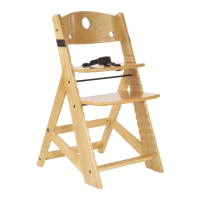
Identifies the key structural parts of the chair.

Hardware and Small Parts

Lists necessary hardware for assembly and accessories.

Chair Assembly Instructions

Step 1: Attaching Supports

Details the process of attaching wooden supports using dowels, nuts, and screws.

Step 2: Attaching Back

Guides on attaching the chair's backrest using nuts and screws.

Step 3: Attaching Right Side

Instructions for assembling the right side of the chair with hardware.

Step 4: Attaching Metal Cross Bars

Explains how to attach the metal cross bars using screws.

Assembly Completion and Adjustments

Step 6: Tighten All Screws

Instructions for tightening all screws in a specific order to secure the chair.

Seat and Footrest Adjustment

Guidelines for setting optimal height for seat and footplate for comfort and safety.

3 Point Belt Installation and Operation

Details on installing and using the 3-point safety restraint system.

Accessories, Warranty, and Care

Tray and Grab Rail Installation

Instructions for attaching tray clips and related accessories.

5 Year Limited Warranty

Information on the product's warranty coverage and terms.

Product Care and Maintenance

Guidance on cleaning and maintaining the chair for longevity.

Infant Insert Installation Guide

Infant Insert Safety Warnings

Critical safety warnings specific to using the infant insert.

Steps 1-4: Preparing and Attaching Insert

Initial steps for installing the infant insert, including preparing the seat plate.

Steps 5-7: Securing the Insert

Steps for correctly positioning and adhering the infant insert to the seat plate.

Completing Infant Insert and Tray Installation

Steps 8-9: Finalizing Insert Placement

Instructions for final placement and bonding of the infant insert to the seat plate.

Steps 10-12: Final Assembly and Tray

Final steps including tightening all screws and installing the tray.

Related product manuals