EasyManua.ls Logo

BETCO Clario - User Manual

BETCO Clario
2 pages
Print Icon
To Next Page IconTo Next Page
Loading...
To Change the Pump Assembly:
Before replacing pump assembly, remove bag
of product from dispenser/pump.
1. Depress tabs in the back plate of the dispenser
and push pump assembly up to remove the
pump assembly.
2. To insert a new pump assembly, ensure that the
new pump assembly is flush to the back plate
and is aligned with pump assembly brackets.
3. Gently push down until the back plate tabs snap
into place to secure new pump assembly.
DISPENSER INSTRUCTIONS
What’s included:
Liquid or foam pumps, alcohol towelette, wall
anchors and screws, foam adhesive strips and
dispenser keys.
HAND CARE PROGRAM
Rev. 3 05/2011
Permanent key
Removable key
©2011 Betco Corporation
All Rights Reserved.
1001 Brown Avenue
Toledo, Ohio 43607-0127
888-GO BETCO • www.betco.com
Item #91831-92
Question and Answer IconNeed help?

Do you have a question about the BETCO Clario and is the answer not in the manual?

Summary

Whats Included

Changing the Pump Assembly

Remove Old Pump Assembly

Remove pump assembly by depressing back plate tabs and pushing up.

Insert New Pump Assembly

Ensure new pump assembly is flush and aligned with brackets before insertion.

Secure New Pump Assembly

Secure new pump assembly by pushing down until back plate tabs snap.

Opening the Dispenser

Accessing the Dispenser Cover

Open dispenser cover by inserting key between wall and back plate at the bottom.

Mounting the Dispenser

Mounting with Screws and Anchors

Detailed steps for mounting dispenser using screws and anchors.

Mounting with Double-Sided Tape

Instructions for mounting dispenser using double-sided tape on suitable surfaces.

Installing Product

Connecting the Product Bag

Insert pump assembly into the pouch until it clicks securely.

Overview

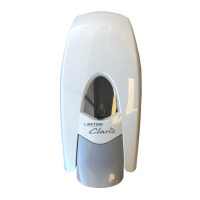
The Betco Clario Hand Care Program Dispenser is a wall-mounted unit designed for dispensing liquid or foam hand care products. It is part of the Betco Clario line, emphasizing innovative cleaning technologies. The dispenser is designed for ease of use, installation, and maintenance, offering both permanent and removable key options for access and a straightforward pump assembly replacement process.

Function Description:

The primary function of the Clario dispenser is to provide a hygienic and convenient way to dispense hand care products, such as foaming skin cleansers, in various environments. It is compatible with specific Betco Clario product bags that feature a QCT™ connector for a secure and leak-free attachment to the internal pump assembly. The dispenser is operated by pressing a lever or button (not explicitly shown but implied by the pump mechanism), which activates the pump to dispense the product.

Important Technical Specifications:

  • Mounting Methods: The dispenser supports two primary mounting methods:
    • Anchors and Screws: This is the recommended method, providing a secure attachment to the wall. It involves marking hole locations using the dispenser as a template, drilling 3/16" diameter holes, tapping plastic anchors into the holes, placing screws into the anchors (tightening halfway), hanging the dispenser over the keyholes in the back plate, and then fully tightening the screws to secure the unit.
    • Double-Sided Tape: This method is suitable for smooth, flat, dry surfaces free of chemical residue or coatings. It involves cleaning the surface with an alcohol wipe, peeling the paper from the back of the tape, pressing the dispenser firmly to the wall for several seconds, and allowing 24 hours for the tape to fully adhere before filling with product.
  • ADA Compliance: For both mounting methods, the dispenser must be mounted no more than 48 inches from the ground to comply with ADA regulations.
  • Product Compatibility: Designed for use with Betco Clario liquid or foam pumps and corresponding product bags featuring a QCT™ connector. An example product shown is "BETCO® Clario® GREEN EARTH FOAMING SKIN CLEANSER."
  • Included Components: The dispenser package includes liquid or foam pumps, an alcohol towelette for surface preparation, wall anchors and screws for mounting, foam adhesive strips for the tape mounting method, and dispenser keys (both removable and permanent).

Usage Features:

  • Easy Product Installation: Installing a new product bag involves pushing the valve end of the bag down onto the pump assembly until it clicks, ensuring the bag is fully pressed down and the pump is completely inserted into the pouch. The corners of the bag can be gently tucked to ensure complete closure of the dispenser cover.
  • Keyed Access: The dispenser cover is opened using a key. The key is inserted between the wall and the back plate at the bottom of the dispenser. Pushing up on the key releases the cover at the top.
  • Two Key Types: The dispenser comes with two types of keys:
    • Removable Key: Can be inserted and removed as needed.
    • Permanent Key: Once inserted, it cannot be removed from the dispenser, providing continuous access without the risk of misplacing the key.
  • Visual Product Indicator: The dispenser features a clear window on the front, allowing users to easily see the product level and identify the type of hand care product being dispensed (e.g., "GREEN EARTH FOAMING SKIN CLEANSER").

Maintenance Features:

  • Simple Pump Assembly Replacement: The pump assembly is designed for quick and easy replacement.
    1. Removal: Depress tabs in the back plate of the dispenser and push the pump assembly up to remove it. Before removal, the bag of product should be removed from the dispenser/pump.
    2. Insertion: To insert a new pump assembly, ensure it is flush to the back plate and aligned with the pump assembly brackets. Gently push down until the back plate tabs snap into place, securing the new pump assembly.
  • Durable Construction: While specific materials are not detailed, the visual appearance suggests a robust plastic construction suitable for commercial and institutional environments.
  • Cleaning: The manual mentions using an alcohol wipe for surface preparation during installation, implying that the dispenser's exterior can be easily cleaned.

BETCO Clario Specifications

General IconGeneral
BrandBETCO
ModelClario
CategoryDispenser
LanguageEnglish

Related product manuals