EasyManua.ls Logo

BEWISER S1020 - User Manual

BEWISER S1020
2 pages
Print Icon
To Next Page IconTo Next Page
Loading...
75x75 100x100
200x100 200x200
34”-49”
FLAT/CURVED
LB
KG
22 to 44 lbs
(10 to 20 kg)
Desk Thickness: 0.8-2.4”(20-60mm)
Upper Arm
(X1)
M4x9mm
(X4)
M4x12mm
(X4)
Allen Wrench
(X2)
(3mm)
(5mm)
Base
(X1)
Lower Arm
(X1)
VESA Assembly
(X1)
M6x14mm
(X2)
Base Lock Screw
(X1)
(5mm)
Tighten
Adjust the small screws on the arms to
adjust the arm rotation tightness.
M4x9mm screw is the default VESA
screw size for most monitors and is
designed to be hand-tightened.
M4x12mm screw is provided to
accommodate monitors requiring
longer VESA screws.
Attach the VESA Assembly to the Upper Arm
and secure it with the two M6x14mm screws.
The monitor tilt can now be easily
adjusted by hand.
For Monitors up to 44 lbs/20 kg,
Not for monitors lighter than 22 lbs/10 kg.
Install your monitor.
Ensure the monitor is
facing the right way up.
(5mm)
(3mm)
NOTE: the two mechanical springs inside the VESA Assembly are stiff. It is not
necessary to straighten the VESA Plate tilt by hand before connecting to the monitor.
Adjust tilt after the monitor, VESA Assembly and Upper Arm are all installed.
TOP
M6×14mm
BEWISER Heavy Duty Monitor Arm S1020
INSTALLATION MANUAL
If you have any questions or concerns about this product. Please feel free to email us at support@bewiserdesign.com
Parts List
Clamp Installation
-01
Arm Installation
Monitor Installation
VESA Assembly Installation
Grommet Installation
-02
Tighten
(5mm)
Use Allen Wrench to separate
Base and Clamp
Desk Thickness: 0.8-2.4” (20-60mm)
Grommet Hole Diameter: min 2” (50mm)
Please scan QR code for
installation video.
Question and Answer IconNeed help?

Do you have a question about the BEWISER S1020 and is the answer not in the manual?

Summary

Parts List and Specifications

Mounting the Arm Base

Clamp Installation

Attaches the monitor arm base to a desk using a clamp mechanism, suitable for 0.8-2.4 inch thick desks.

Grommet Installation

Installs the monitor arm base through a desk grommet hole, requiring a minimum 2-inch diameter.

Arm Assembly and Adjustment

Arm Installation

Connects the upper and lower arm sections and allows adjustment of rotation tightness.

Monitor Installation

Attaches the monitor to the VESA plate, noting weight limits and screw selection.

VESA Assembly Installation

Secures the VESA assembly to the upper arm using provided M6x14mm screws.

Arm Tension and Tilt Adjustment

Adjust Arm Tension

Adjusts gas spring tension in the upper arm using an Allen wrench for proper arm positioning.

Monitor Tilt Adjustment

Adjusts the tilt tension screw for heavy monitors to maintain the desired angle.

Additional Features and Considerations

Cable Management

Instructions for removing upper and lower arm cable covers for routing.

Optional Lower Arm Rotation Lock

Utilizes a base lock screw to prevent the lower arm from swinging.

Important Safety Caution

Warning against positioning the monitor past the back of the desk to avoid tipping.

Overview

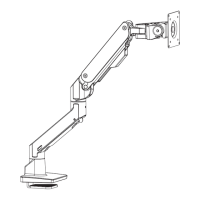
This document is an installation manual for the BEWISER Heavy Duty Monitor Arm S1020. It provides detailed instructions for assembling, installing, and adjusting the monitor arm, along with technical specifications and usage tips.

Function Description

The BEWISER Heavy Duty Monitor Arm S1020 is designed to securely hold flat or curved monitors, allowing for flexible positioning and ergonomic adjustment. It features a gas spring mechanism for easy height and tension adjustment, cable management for a tidy workspace, and an optional rotation lock for the lower arm. The arm supports both clamp and grommet installation methods, making it versatile for various desk setups. Its primary function is to enhance user comfort and productivity by providing a customizable and stable monitor mounting solution.

Important Technical Specifications

Monitor Compatibility:

  • Weight Capacity: 22 to 44 lbs (10 to 20 kg).
  • Screen Type: Flat/Curved monitors.
  • VESA Compatibility: 75x75, 100x100, 200x100, 200x200.

Desk Compatibility:

  • Desk Thickness (Clamp & Grommet): 0.8-2.4 inches (20-60 mm).
  • Grommet Hole Diameter: Minimum 2 inches (50 mm).

Materials:

  • The manual implies a robust construction suitable for heavy-duty use, likely involving metal components for durability.

Adjustability:

  • Arm Rotation: The lower arm can rotate 180° or 360° depending on whether the rotation lock is used.
  • Arm Tension: Adjustable gas spring tension in the upper arm to accommodate different monitor weights.
  • Monitor Tilt: Easily adjustable by hand after installation, with a top tension screw for extremely heavy monitors.

Usage Features

Installation Methods:

  • Clamp Installation: Secures the arm to the edge of the desk using a clamp mechanism. Requires a desk thickness of 0.8-2.4 inches (20-60 mm). The clamp is tightened with a 5mm Allen wrench.
  • Grommet Installation: Mounts the arm through an existing hole in the desk. Requires a desk thickness of 0.8-2.4 inches (20-60 mm) and a grommet hole diameter of at least 2 inches (50 mm). The grommet base is secured with a 5mm Allen wrench.

Arm Adjustment:

  • Arm Tension Adjustment: The gas spring tension in the upper arm can be adjusted using an Allen wrench. Turning counter-clockwise (+) increases tension (for heavier monitors or if the arm droops), while turning clockwise (-) decreases tension (for lighter monitors or if the arm rises). It is recommended to hold the arm in a horizontal position during adjustment.
  • Arm Rotation Tightness: Small screws on the arms can be adjusted to control the tightness of arm rotation.

Monitor Installation:

  • The VESA assembly attaches to the monitor using M4x9mm screws (default, hand-tightened) or M4x12mm screws (for monitors requiring longer screws).
  • The VESA assembly then attaches to the upper arm with two M6x14mm screws.
  • The monitor tilt can be adjusted by hand after the VESA assembly and upper arm are installed. For extremely heavy monitors, the top tension screw can be turned counter-clockwise (up to 5 full rotations) to increase tilt tension.

Cable Management:

  • The monitor arm features integrated cable management covers on both the upper and lower arms.
  • Upper Arm Cable Cover: Removed by pushing in the direction of the arrow.
  • Lower Arm Cable Cover: Removed by pinching and squeezing the protruding flaps.

Optional Lower Arm Rotation Lock:

  • The Base Lock Screw, pre-installed on the base, can be removed to allow the lower arm to rotate 360°. If the screw is kept in place, the lower arm rotation is limited to 180°. This feature is useful to prevent the monitor arm from swinging into office dividers, screens, or walls.

Maintenance Features

Tension Adjustment:

  • Regular adjustment of the gas spring tension ensures the arm properly supports the monitor's weight and maintains its position. This is a key maintenance aspect to ensure optimal performance and prevent the arm from rising or drooping.

Tilt Adjustment:

  • The monitor tilt can be fine-tuned as needed, especially for very heavy monitors, by adjusting the top tension screw. This helps maintain the desired viewing angle over time.

Troubleshooting:

  • The manual addresses a common issue where the monitor might slowly slide to one side after installation, suggesting checking for a slightly tilted table. It notes that very heavy monitors can cause the table to tilt, leading to imbalance.
  • Users are encouraged to contact support@bewiserdesign.com for any questions or concerns, indicating ongoing support for the product.

Safety Precautions:

  • A caution is included regarding positioning the monitor past the back of the desk to avoid tipping, highlighting a safety consideration during use.
  • Instructions emphasize holding the arm horizontally during tension adjustment to prevent damage and facilitate ease of adjustment.

The BEWISER Heavy Duty Monitor Arm S1020 is designed for users seeking a robust, adjustable, and aesthetically pleasing solution for mounting heavy monitors, with clear instructions for installation and ongoing use.

BEWISER S1020 Specifications

General IconGeneral
BrandBEWISER
ModelS1020
CategoryRacks & Stands
LanguageEnglish