19
4. Instructions for use
WHEN USING THE FIRST TIME
After removing the products from the box, make sure they are complete and all compo-
nents are present. Carefully wash the coffee maker before using it for the rst time. Make
3 coffees and discard them.
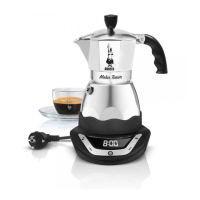
Coffee Maker
Filling/preparation procedure
• Unscrew the collecting unit.
• Extract the funnel from the heater.
• Pour the water into the heater up to the lower level of the safety valve.
• Insert the funnel into the heater.
• Fill the lter with moka ground coffee without pressing, avoiding to leave coffee powder
on the heater edge.
• Screw back the collecting unit without taking it from the handle and place the coffee
maker on its power base.
Instructions for use
Manual start:
• Connect the base to a mains outlet.
• Make sure to have previously prepared the coffee maker.
• Press the button “11”, the base goes on and starts heating, at the same time the tem-
perature maintenance function is activated and is shown on the display. The function ca
be disabled by pressing the button “9”.
• Press the button “11” again to stop the functioning.
• When the coffee is ready, the base emits a sound to alert the user, the temperature
maintenance function is activated automatically and can be disabled by pressing the
button “9”.
• When the coffee is ready, an acoustic warning signal is activated.
• The coffee is kept warm up to 30’ from the base switching on.
• To serve the coffee, lift the coffee maker off the base and pour its content into the coffee
cups.
Programmed start:
• Connect the base to a mains outlet.
• Make sure to have previously prepared the coffee maker.
• To set the programmed start, it is necessary to set the correct time by following the
instruction in the paragraph “Clock Function”.
• After having set the time, press the MODE button:
Easy-Timer_IT-UK-FR-D-ES-PT.indd 19 08/06/2018 15:02:48