5
© ITW FINISHING SYSTEMS AND PRODUCTS
INSTALLATION
Regulator Assembly
1. Unbox the regulator assembly and mount
it on the manifold connecon with the
swivel connecon .
2. If BSP thread is required, aach adaptors
to the ball valve uid outlet ball valve and
the air inlet/outlet connecons on the
regulator.
3. For agitator models, connect the air hose
from the adjusng valve on the drive
motor to the swivel elbow on the
regulator.
Air Supply
1. The air supply line should pass through an
air lter/regulator to lter dirt from air
and remove entrained water and oil.
Connect the air supply hose to the air inlet
ng on tank regulator. Connect the
atomisaon air hose to the air outlet
ng which is directly opposite air inlet
ng.
2. Connect material hose to the uid outlet
ball valve.
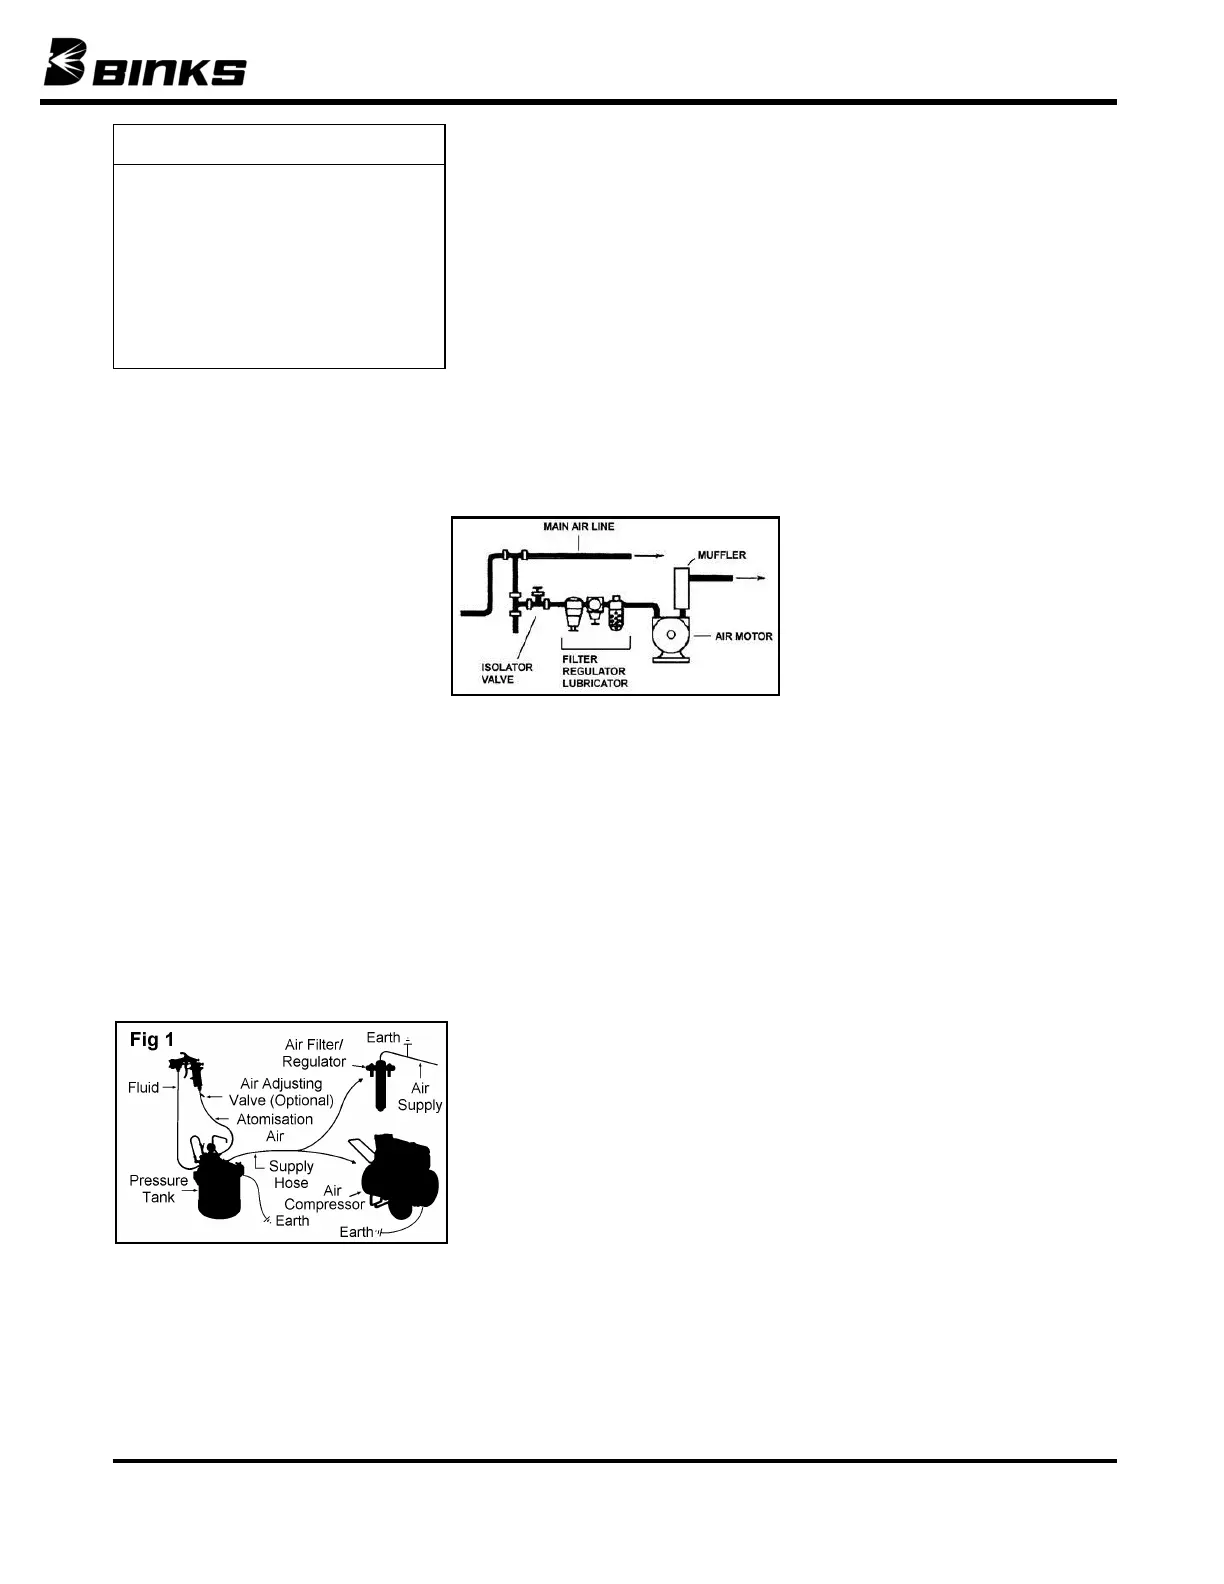
3. See Figure 1 below for a typical
installaon.
4. To avoid hazards from electrostac
discharges, the tank should be earthed
directly via an earth clamp. There is an
earth connecon point on the lower part
of the tank shell. See p7 for connecon
diagram. Air supply hoses should be
conducve to avoid creang electro stac
charges. Check connuity to earth before
using the equipment.
LUBRICATION – Agitated
Models
1. An automac air line lter/lubricator
should be installed in the air supply line no
more than 0.5m from the air motor. The
lter should be 5 micron. Install the
lubricator level with or above the motor
so the oil mist will blow directly into or
down into the motor (see Fig. 2).
2. Fill the oil reservoir with SAE 10W motor
oil. Adjust lubricator to feed 1 drop of oil
for every 1400 litres (50 cfm) of air or 1
drop per minute for connuous running.
PREPARATION
Mix and prepare material to be used
according to manufacturer’s instrucons.
Strain material through a ne mesh screen to
remove lumps, skin, and foreign maer that
might enter and clog uid passages and/or
spray equipment.
Follow pressure relief procedure on page 3..
To add material to the tank, remove the lid
and pour directly into the tank or container.
Replace the lid assembly and ghten thumb
screws securely.
Connect the material hose to the uid outlet
ball valve.
OPERATION
1. Close the air inlet valve to tank. Turn
handle on regulator counter clockwise
unl spring tension is relieved.
2. Turn on air supply to the tank.
3. Open the air inlet valve to the tank.
4. Open the uid outlet valve.
5. Turn handle on tank pressure regulator
clockwise to pressurize tank.
6. Turn on atomizaon air to spray gun at
source of supply.
7. Test spray. For further instrucons
consult literature provided with spray gun.
8. If an air motor driven agitator is used,
start the agitator by slowly opening up the
needle valve. Air motor speed should be
regulated according to the nature of the
material being agitated.
MAINTENANCE
To clean equipment, proceed as follows:
1. Turn o the air supply.
2. Follow the pressure relief procedure.
3. Turn T-handle adjusng screw on tank
uid pressure regulator counter clockwise
unl no spring pressure is felt.
4. Loosen thumb screws (17), p clamps (16)
back and p lid (11) to one side of tank.
Do not remove lid from tank.
5. To drain down the uid supply hose to the
gun, remove the Aircap and replace with
about 2 turns. Trigger the spaygun into
the booth , which will create a back
pressure in the uid line and force the
uid back into the tank.
6. Now remove the lid, empty and clean the
parts that have come into contact with the
material with compable cleaning
material.
7. When clean, pour a lile cleaning material
into the tank and replace the lid.
8. Repeat 1 to 5 of the OPERATION.
9. Do not turn on the atomising air to the
Gun. Make sure the Aircap is fully ght.
Trigger the gun and jet the cleaning
material into a container unl clean
material is visible.
10. Remove solvent and replenish with new
material as from INSTALLTION secon 1
onwards.
LUBRICATION – Agitated
Models
Refer to the service manual SBBI-E-19-095
provided with the air motor for lubricaon
informaon.
The bearings in the agitator bearing assembly
are impregnated with special non-gumming
oil. Addional lubricaon is not required.
The agitator sha seal does not require
lubricaon.
PREVENTATIVE MAINTENANCE
1. Keep the safety valve clean at all mes.
Check regularly by pulling the ring to
ensure the valve is free to operate.
WARNING
High pressure can cause serious injury.
Pressure is maintained in a pressure
tank aer the system has been shut
down.
Follow the pressure-relief procedure on
page 3 before opening the lid or ll port
or performing maintenance on the tank.
Fig 2
 Loading...