Do you have a question about the birddog NDI P200 and is the answer not in the manual?
Welcome message and support contact information for the BirdDog P200.
Instructions and tips for effectively using the BirdDog P200 user manual.
Guide to upgrading the P200 camera firmware for optimal performance and new features.
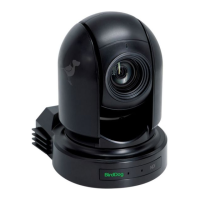
Detailed specifications and features of the BirdDog P200 camera.
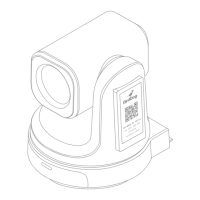
Physical dimensions of the BirdDog P200 camera, including diagrams.
Copyright notice, legal information, and acknowledgement of trademarks.
Important legal notices, security advice, and safety warnings for product handling.
Guidelines for cleaning and maintaining the BirdDog P200 camera's front glass.
Information on FCC Part 15 and European LVD/EMC Directives compliance.
Welcome message and guidance on using the P200 manual and resources.
Guide to upgrading the P200 camera firmware for optimal performance and new features.
Statement of BirdDog's commitment to customer support.
Detailed specifications and features of the BirdDog P200 camera.
Physical dimensions of the BirdDog P200 camera, including diagrams.
Explanation of NDI technology and its benefits for video transmission over Ethernet.
List of items included with the BirdDog P200 camera purchase.
List of optional accessories available for purchase to enhance P200 functionality.
Guidance on making basic power and network connections for the P200 camera.
Steps to power on the P200 camera and its initial startup routine.
Instructions for configuring computer network settings to communicate with the P200.
Introduction to NDI Tools, including Studio Monitor for viewing NDI sources.
Accessing and logging into the P200 camera's web user interface for configuration.
Configuring NDI video bitrate for optimal network performance and image quality.
Setting the frame rate for the camera's NDI output to match production requirements.
Enabling NDI groups to control visibility and access of video sources on the network.
Configuring audio embedding and routing for NDI streams.
Enabling and configuring the Tally light on the front of the camera.
Setting up an alternative NDI source for failover if the primary source becomes unavailable.
Configuring network settings for the P200 camera, including static or DHCP options.
Guidance on choosing between DHCP and static IP addresses for network configuration.
Configuring DHCP timeout and fallback IP settings for network flexibility.
Setting a custom name for the P200 camera for easier identification on the network.
Description of the 12VDC power input port and connection.
Description of the USB 2.0 port for firmware upgrades.
Description of the RS232 control port and included adapter cable.
Function of the video format selector switch.
Description of the RS-422 control port and included adapter cable.
Setting the camera ID for the IR remote controller.
Description of the IP network port for control and video streaming.
Connecting microphones and speakers to the camera's audio ports.
Description of the HDMI output port.
Description of the CVBS video output port.
Description of the 3G-SDI video output port.
Location and function of the IR sensors for remote control commands.
Description of the camera's 30X magnification optical zoom lens.
Explanation of the power LED indicator status and its meaning.
Description of fix mounting holes for brackets and tripod mounting holes.
Instructions for powering the camera ON and OFF using the remote controller.
Selecting camera ID and saving/recalling up to six preset camera positions.
Using PAN-TILT, ZOOM/FOCUS, and Auto/Manual Focus controls.
Controls for Back Light, Video Format, White Balance, and De-Flicker.
Accessing and navigating the camera's on-screen menu system.
Setting the IR SELECT switch to match the remote controller ID.
Using PoE+ or DC connection to power the camera.
Explanation of the P200's passive cooling system and heat dissipation.
Displaying the main menu and navigating through menu items using arrow buttons.
Accessing and navigating sub menus for Exposure, White Balance, Picture, PTZ, and System.
Explanation of different exposure modes and their settings.
Iris Priority mode settings for exposure control.
Shutter Priority mode and available gain levels for exposure control.
Settings for shutter speed, iris aperture, and slow shutter function.
Adjusting AE response speed and exposure compensation levels.
Explanation of various white balance modes and their applications.
How to perform a one-push white balance adjustment.
Manually setting Red and Blue gain for custom white balance.
Adjusting image sharpness and applying picture effects.
Reducing noise and flipping/mirroring the image.
Adjusting de-flicker, WDR, color intensity, hue, and contrast.
Adjusting brightness and compensating for high intensity spot lights.
Compensating for backlighting and reducing image blur with stabilizer.
Using stable zoom and adjusting image gamma.
Configuring zoom ratio, AF/MF speed, near limit, and adaptive PTZ.
Setting pan/tilt speed, preset speed, and direction.
Setting PELCO ID, IR-RECEIVE, and DISPLAY INFO.
Saving presets, reloading preset 1, and performing a factory reset.
Changing video format and checking software version.
How to pan and tilt the camera using the remote control arrow buttons.
Reversing the pan/tilt direction if the camera moves incorrectly.
Using the remote control buttons for zooming in, out, and adjusting speed.
How to focus the camera automatically or manually using the remote.
Using the BACK LIGHT button to improve exposure in backlit conditions.
Steps to change the camera's video resolution using the remote control.
How to store and recall camera shooting conditions using the preset function.
How to recall previously stored camera settings using the preset buttons.
How to cancel stored camera presets.
Instructions for operating multiple cameras using the camera select function.
Overview of the web UI for configuring A/V settings, networking, and firmware.
How to access the P200's web interface via IP address or hostname.
Steps to access the P200 when no DHCP server is available on the network.
The default password for the P200 web interface is 'birddog'.
Procedure for changing the P200's web interface password.
Setting NDI output bitrate for optimal compression and image quality.
Selecting NDI video format, ensuring compatibility with SDI/HDMI output.
Enabling NDI groups to control visibility and access among devices.
Routing audio input to NDI stream or using it for comms.
Setting an alternative NDI source for failover in case of interruption.
Configuring network settings and naming the P200 device for easy identification.
Default network configuration using DHCP for IP address assignment.
Manually setting a static IP address, subnet mask, and gateway.
Procedure for recovering the IP address if the camera becomes invisible.
Assigning a unique, friendly name to the P200 for network identification.
Information on NDI Tally support and the front panel LED indicator.
Saving and recalling PTZ presets using the dashboard interface.
Limiting the maximum speed of PTZ movements.
Activating and accessing the On-Screen Display (OSD) for camera settings.
Selecting the preferred transmit method for NDI (TCP, UDP, Multicast).
Using TCP for NDI transmission in local networks with predictable latency.
Using UDP for NDI transmission over networks with extended latency.
Using Multicast for receiving a single source on multiple receivers simultaneously.
Using MultiTCP for NDI transmission over poor network topography like WANs.
Fine-tuning individual color saturation and hue for Red, Green, Blue, Cyan, Yellow, Magenta.
Adjusting the intensity of individual colors in the image.
Adjusting the color temperature or phase for individual colors.
Recommendations for using color charts to fine-tune the Colour Matrix adjustments.
Adjusting image brightness, compensation level for shadows/highlights.
Adjusting the mask area for applying the Video Enhancement effect.
Adjusting edge definition and overall image sharpness.
Adjusting gamma offset for balancing dark and light areas in the image.
Using NewTek Studio Monitor to view NDI sources.
Receiving P200 NDI sources on NewTek TriCaster devices.
Connecting the camera to a monitor/TV via HDMI.
Streaming SDI video output from the camera.
Streaming NDI, SDI, and HDMI video output over the network.
Connecting the camera to a CVBS device for composite video output.
Controlling the camera using the BirdDog PTZ Keyboard via NDI.
Connecting the PTZ Keyboard to the network via Ethernet switch.
Information displayed on monitor during camera initial status check.
Technical specifications for VISCA over IP communication.
Steps for connecting and controlling the camera via VISCA over IP.
Detailed guide on setting DIP switches for ID, video output, and serial protocols.
Using the rotary DIP switch to select the video format.
Steps for setting up RS232 control method, baud rate, and camera address.
Wiring for SONY keyboard and daisy chaining multiple cameras via RS422.
Wiring for Non-Sony VISCA keyboard and daisy chaining multiple cameras via RS422.
Using RJ45 to RS422 extension cables and CAT5/6 Ethernet for RS422 connection.
Making RS422 daisy chain connections with RS422 standard serial port controllers.
Setting up PELCO P/D keyboard for RS485 connection using RS422 ports.
Using RJ45 to RS422 extension cables for RS485 connection.
Connecting multiple cameras via RS485, matching baud rates and using RS422/485.
Connecting multiple cameras using RS-232, RS-422, and RS-485 protocols.
Definitions of network and device related technical terms.
Definitions of network protocols and standards like IP, LAN, Mbps, and NDI.
Definitions of camera control protocols, ports, and interfaces.
Definitions of network terms and white balance concept.
| Brand | birddog |
|---|---|
| Model | NDI P200 |
| Category | Security Camera |
| Language | English |