Do you have a question about the Black & Decker BDCR20 and is the answer not in the manual?
| Type | Reciprocating Saw |
|---|---|
| Power Source | Battery |
| Voltage | 20V |
| Battery Type | Lithium Ion |
| No Load Speed | 0-3000 SPM |
| Blade Change | Tool-free |
| Stroke Length | 7/8 inch |
| Blade Diameter | Not applicable |
| Arbor Size | Not applicable |
| Bevel Capacity | Not applicable |
Maintain a clean and well-lit workspace to prevent accidents.
Do not operate power tools in areas with flammable liquids, gases, or dust.
Ensure distractions are minimized by keeping children and bystanders at a distance.
Use correct plugs and avoid modifications to prevent shock.
Prevent contact with grounded surfaces to reduce electric shock risk.
Keep tools dry; water ingress increases electric shock risk.
Handle cords carefully, avoiding carrying or pulling the tool by the cord.
Employ appropriate extension cords for outdoor operation to reduce shock.
Utilize GFCI for damp locations to minimize electric shock risk.
Remain attentive and use judgment while operating tools.
Always use eye protection and appropriate safety gear.
Ensure the switch is off before connecting power or handling the tool.
Remove any adjusting key or wrench before turning the power tool on.
Keep proper footing and balance at all times for better control.
Avoid loose clothing, jewelry, and tie back long hair around moving parts.
Ensure dust extraction facilities are connected and properly used.
Do not force the tool; use the correct tool for the application.
Do not use if the switch does not turn the tool on and off.
Disconnect power before making adjustments or changing accessories.
Store idle tools out of reach of children and unfamiliar persons.
Check for misalignment, binding, or damage; repair if necessary.
Sharp, clean cutting tools bind less and are easier to control.
Use tool, accessories, and bits according to instructions and working conditions.
Recharge only with the charger specified by the manufacturer.
Use power tools only with specifically designated battery packs.
Keep battery pack away from metal objects when not in use.
Avoid contact with battery liquid; flush with water if contact occurs.
Have your power tool serviced by a qualified repair person using identical parts.
Hold tool by insulated surfaces when cutting accessory may contact wiring.
Use clamps or other methods to secure the workpiece to a stable platform.
When not in use, place tool on its side on a stable surface.
Never reach underneath material; keep fingers away from blade and clamp.
Dull blades may cause the saw to swerve or stall under pressure.
Use extra caution when cutting overhead, paying attention to hidden wires.
Ensure pipes or conduits are free from water, electrical wiring, etc. before cutting.
Always wear proper hearing protection conforming to ANSI S12.6.
Always use safety glasses; everyday eyeglasses are not sufficient.
Use NIOSH/OSHA approved respiratory protection appropriate for dust exposure.
Some dust may contain chemicals known to cause cancer or reproductive harm.
Work in ventilated areas and wash exposed skin after contact with dust.
Limit prolonged use; vibration may cause permanent injury to fingers/hands/arms.
Use an extension cord heavy enough to carry current to prevent overheating.
Read all instructions and cautionary markings on charger and battery pack.
Do not allow any liquid to get inside the charger.
Charge only designated batteries to reduce risk of injury or damage.
Do not incinerate battery packs, even if damaged, due to explosion risk.
Do not charge or use battery in explosive atmospheres.
Wash skin with soap and water if battery contents contact skin.
If battery liquid gets into eyes, rinse and seek medical attention.
Battery liquid may be flammable if exposed to spark or flame.
Charge the battery packs only in Black & Decker chargers.
Do not splash or immerse battery packs in water or other liquids.
Do not store or use the tool and battery pack in locations exceeding 105°F (40°C).
Never attempt to open the battery pack; return damaged packs for recycling.
Store in a cool, dry place away from direct sunlight and extreme temperatures.
Charge battery pack when air temperature is between 65°F and 75°F (18°-24°C).
Charger and battery may become warm during charging; this is normal.
Check receptacle, switch, and temperature; contact service if problems persist.
Recharge the battery pack when it fails to produce sufficient power.
Keep charger cavities clear of foreign materials like steel wool or foil.
Do not freeze or immerse charger in water or any other liquid.
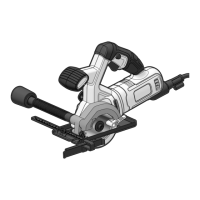
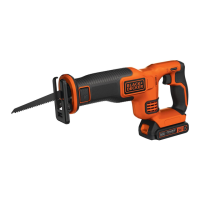
Identifies key parts of the reciprocating saw, including trigger, shoe, and handles.
Lists compatible Black & Decker batteries and chargers for the tool.
Plug the charger into an appropriate outlet before inserting the battery pack.
Insert the battery pack into the charger as shown in figure B.
Green LED flashes during charging; remains on continuously when fully charged.
Insert battery pack into tool until an audible click is heard and it is fully seated.
Depress battery release button and pull battery pack out of the tool.
Always use proper eye protection conforming to ANSI Z87.1.
Ensure the material being cut is firmly anchored or clamped to prevent slipping.
Switch on saw motor and allow it to reach maximum speed before starting the cut.
Always hold saw firmly with both hands and keep shoe against material.
Press the lock-off button, then squeeze the on/off switch to turn the tool on.
Open lever, insert blade shank, close lever securely.
Open lever to full position and remove blade.
Install blade upside-down to assist in flush cutting.
Compact design allows close cutting to floors, corners, and difficult areas.
Insert blade with teeth facing up for maximum flush cutting capabilities.
Ensure wood workpiece is firmly anchored or clamped to prevent slipping.
Place blade and shoe lightly against work to be cut.
Hold saw firmly with both hands; keep shoe against material to prevent vibration.
Use a finer blade for ferrous metals and a coarse blade for non-ferrous materials.
Clamp wood to the underside of thin sheet metals for a clean cut.
Do not force the cutting blade to reduce wear and prevent breakage.
Apply oil or coolant along the cut line for easier operation and longer blade life.
Measure and mark the surface area to be cut clearly.
Tip saw backward until the bottom edge of the shoe rests on the work surface.
Start motor, attain speed, then begin a slow upward swing with the handle.
Always ensure the blade is completely through material before continuing.
Cut only with sharp blades for cleaner, faster cuts and less motor strain.
Always ensure the shoe is firmly against the workpiece for control and reduced vibration.
Use bi-metal blades for longer life; they are more flexible and less prone to breaking.
Check battery pack installation, charge, or charger connection.
Ensure proper insertion, connection to outlet, and check temperature conditions.
Battery pack may have reached its thermal limit or is out of charge.
Use mild soap and damp cloth; avoid solvents and liquids inside the tool.
Clean tools frequently with air jet when used on fiberglass or drywall.
Tool is factory lubricated; annual service or send to service center for cleaning.
Accepts up to 12-inch blades; use shortest blade suitable for project.
Only use Black & Decker recommended accessories for safety and performance.
Indicates costs for recycling paid; return to service center for environmental recycling.
Complies with FCC Part 15 rules for digital devices.
Contact Black & Decker for technical advice, repair, or replacement parts.
Warrants product for two years against defects in material or workmanship.
Return to retailer or authorized service center for repair or replacement.
This warranty does not apply to accessories.
Call 1-800-544-6986 for a free replacement of illegible or missing warning labels.