Do you have a question about the Black & Decker FS210LS FireStorm and is the answer not in the manual?
Defines DANGER, WARNING, and CAUTION symbols used in the manual for hazard identification.
Key instructions for safe operation, emphasizing caution, common sense, and safety equipment.
Covers reading manual, wearing protective gear, maintaining the work area and machine.
Includes preventing unintentional starts, using guards, and general responsible operation.
Understanding kickback causes and methods to avoid it for safe operation.
Guidelines for using guards, splitters, and proper workpiece positioning.
Emphasizes disconnecting power before adjustments, repairs, or part changes.
Details on circuit requirements, extension cords, and motor specifications for safe power connection.
Instructions for properly grounding the machine to prevent electric shock hazards.
Charts and guidelines for selecting the correct gauge extension cord based on machine requirements.
Steps for unpacking, removing protective coating, and cleaning unpainted surfaces.
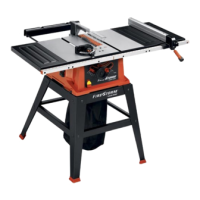
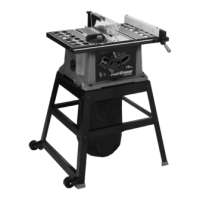
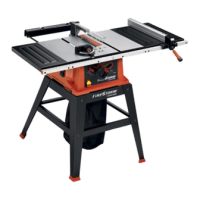
Lists required tools, time estimate, and identifies all table saw parts for assembly.
Instructions for attaching the dust bag and securely mounting the saw to the assembled stand.
Steps for aligning the blade guard and splitter for kickback prevention and fastening the support bracket.
Detailed steps for attaching the splitter to the support bracket and aligning it with the saw blade.
Steps for assembling extension wings and fastening guide rails to the table and wings.
Instructions for installing, positioning, and locking the rip fence on the saw table.
Guidance on using the miter gage with table slots for accurate cross-cutting operations.
Steps for assembling the spring clip and mounting the miter gage holder to the saw cabinet.
Instructions for attaching outfeed support brackets, rods, and securing the assembly.
Procedures for operating the on/off switch, locking the switch, and understanding overload protection.
How to use handwheels and lock handles for blade height and tilt adjustments.
Procedure to accurately set the saw blade's positive stops at 90 and 45 degrees.
Moving, locking, aligning, and adjusting the rip fence for accurate and safe cuts.
Using the miter gage for various cuts and adjusting its index stops for precise angles.
Checking and readjusting the saw blade to be parallel with the miter gage slots.
Step-by-step instructions for removing the old blade and installing a new one.
Safe and proper method for performing cross-cuts using the miter gage.
How to use a clamped block on the fence as a cut-off gauge for consistent cross-cuts.
Guidelines for ripping, emphasizing fence use, guards, and avoiding kickback.
How and when to use a push stick for ripping narrow workpieces less than 4 inches wide.
Explains the necessity of wood facings on the rip fence for special operations.
Safety precautions for dadoing, including removing the guard, and details on cutterhead arrangement.
Steps for attaching the dado head set and performing typical dado operations safely.
Dimensions and instructions for making a featherboard to help prevent kickbacks.
Solutions for problems like no power, blown fuses, damaged cords, or motor overload.
Addressing issues with unsatisfactory cuts, dull blades, or slow blade speed.
Solutions for vibration, inaccurate cuts, material pinching, or blade lock problems.
Pattern and material recommendations for making a push stick for safe ripping operations.
Information on available accessories and guidelines for tool cleaning and maintenance.
Details on service centers, warranty coverage, and limitations for commercial use.
| Power Source | Corded Electric |
|---|---|
| Blade Diameter | 7-1/4 in |
| No-Load Speed | 5, 000 RPM |
| Bevel Capacity | 45 degrees |
| No Load Speed | 5, 000 RPM |
| Arbor Size | 5/8 in |