This document is a user manual for the Black & Decker Rotary Lawnmower models GR340, GR342, GR345, and GR346. It provides comprehensive instructions for operation, maintenance, and safety.
Function Description
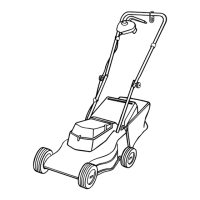
The Black & Decker Rotary Lawnmower is designed for cutting grass in residential lawns and similar areas. It operates on AC (mains) electrical power and is intended for use in daylight or good artificial light. The mower features a rotary blade system for efficient grass cutting and includes a grassbox for collecting clippings. It is designed with double insulation for enhanced electrical safety, meaning all external metal parts are electrically isolated from the power supply through an extra insulation barrier.
Important Technical Specifications
- Models: GR340, GR342, GR345, GR346
- Power Supply: AC (mains) electrical supply, 230 volts AC only.
- Electrical Safety (UK): Requires a 13 amp fuse (BS1362 approved) for non-rewireable plugs. Users are advised to ensure the fuse cover is refitted when changing fuses.
- Double Insulation: The mower is double insulated, eliminating the need for earthing.
- EC Declaration of Conformity: Conforms to directives 98/37/EC, 89/336/EEC, 73/23/EEC, EN 55014, EN 60335, EN 61000, and 2000/14/EC (Lawn mower, L ≤ 50 cm, Annex VIII, No. 0086).
- Sound Levels (measured according to 2000/14/EC):
- LPA (sound pressure): 81 dB(A)
- LWA (acoustic power): 95 dB(A)
- LWA (guaranteed): 96 dB(A)
- Hand/arm weighted vibration value (according to EN 50144): < 2.5 m/s²
Usage Features
- Handle Assembly: The handle consists of an upper handle, lower handles, switch box, switch lever, safety lock-off, electric cable, cable clips, and handle assembly (wing nut and bolt). The upper and lower handles are joined by screwing them together, and the lower handles are inserted into the mower body and secured with screws.
- Height of Cut Adjustment: The mower features a spring system (21) for adjusting the cutting height. Wheels (4) can be moved into the desired slot to select the height of cut. It is crucial to ensure all four wheels are placed in the same position for an even cut.
- Grassbox Assembly: The grassbox is a two-piece plastic construction (14 & 15) that needs to be assembled by clipping the parts together. To fit the grassbox, the spring-loaded grass flap is lifted, and the two arms on the front edge of the grassbox are located behind the lugs on the rear edge of the cutter deck. The grass flap is then released to lock the grassbox into position.
- Starting the Mower: To start, tilt the handle downwards slightly to raise the front of the mower, depress the safety lock-off button (12) on the switchbox (10), and while still depressed, pull the switch lever (11). The mower will start, and the lock-off button can then be released as the mower is lowered to its cutting position.
- Stopping the Mower: Release the switch lever to stop the mower. The mower will continue to run for a short time after the switch lever is released.
- Cable Restraint: The electric cable can be secured through a slot and over a restraint hook (Fig. E1) to prevent it from entering the cutting path.
- Cutting Method: The manual recommends a directional cutting method (Fig. F2a) to maximize cutting performance and reduce the risk of the extension lead entering the cutting path. This involves working away from the cable, cutting across slopes, and exercising caution when changing direction.
- Safety Lock-off: A safety lock-off button (12) is integrated into the switchbox (10) to prevent accidental starting.
- Operator Responsibility: The operator is responsible for accidents or hazards to other people or property.
- Footwear: Always wear stout shoes or boots; rubber or man-made footwear is recommended. Do not operate barefoot or in open sandals.
- Protective Equipment: Wear safety spectacles or goggles, and ear protection if the sound level is uncomfortable. Use a face mask if dusty.
- Clothing: Wear long trousers to protect legs from ejected debris.
- Clearance: Keep children, animals, and other persons at least 6m (20ft) away from the cutting area. Keep hands and feet away from rotating parts and discharge openings.
- Pre-operation Check: Before use, visually check the blade, blade nut, and cutter assembly for wear or damage. Ensure the blade nut is securely fastened. Clear the lawn of sticks, stones, wire, and other debris.
- RCD Recommendation: For increased safety, it is strongly recommended to use a high sensitivity (30mA) residual current device (RCD) with the electrical power supply.
- Grassbox Full Indicator: If loose grass scatters from beneath the mower, the grassbox is likely full and needs emptying.
- Cutting Long Grass: For grass over 10cm (4 inches), two cuts are recommended: the first at maximum height, the second at medium or close height, for an easier and better finish.
Maintenance Features
- Blade Maintenance: The steel blade is designed to give a fine finish. While it will cut even when blunt, if cutting performance deteriorates due to damage or wear, the blade may need sharpening or replacement. It is recommended to sharpen or replace the blade at the beginning of each season. Only Black & Decker recommended replacement parts should be used.
- Blade Replacement (Fig. G): Disconnect the mower from the electrical supply. Turn the mower on its side. Using a cloth or heavy-duty gloves, grip the blade and use the provided spanner to loosen and remove the nut (16) in an anti-clockwise direction. Replace the blade, then reassemble the washer and nut. Do not remove the impeller (17). If fitted, ensure the clutch washer is reassembled.
- Cleaning: Always disconnect from the electrical supply before cleaning. Do not use solvents or cleaning fluids; use a blunt scraper to remove grass and dirt. Clean all plastic components with a damp cloth. Keep the mower clean and free from grass cuttings, especially the underside of the cutter deck and air vents.
- Cable Inspection: Regularly inspect the power supply cable for signs of damage or ageing. Do not use if damaged.
- Storage: Store the mower in a dry place, out of reach of children, when not in use.
- General Checks: Keep all nuts, bolts, and screws tight. Do not operate if any parts are defective; replace defective parts with new ones.
- Fault Finding: A table is provided to help diagnose common issues like the motor buzzing but the blade not moving, or no noise and the blade not moving. Solutions include disconnecting from the electrical supply, removing obstructions, fitting a new fuse, or checking electrical connections.
- Authorized Service: For repairs and replacement parts, use only Black & Decker recommended parts and accessories and contact authorized repair agents.
- Product Improvement: Black & Decker reserves the right to change product specifications without prior notice due to continuous improvement.
- Recycling: Black & Decker offers a free recycling facility for its products at the end of their working life. Products can be returned to any authorized repair agent for collection.