6
◆ Before replacing the top cover of the mains plug ensure
that the cable restraint (3) is holding the outer sheath of
the cable firmly and that the leads are correctly fixed at
the terminal screws.
◆ If the plug has a fuse cover, make sure that the fuse cover
is fitted. Do not use the plug if the fuse cover is missing
or damaged.
Never use a light socket.
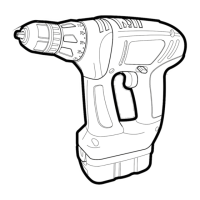
OVERVIEW (fig. A)
Motor unit
1. Variable speed switch
2. Forward/reverse slider
3. Head release button
4. Bit holder
5. Battery
6. Battery release buttons
Drill/screwdriver head
7. Torque adjustment collar
8. Chuck
Jigsaw head
9. Lock-off button
10. Saw shoe
Sander head
11. Sanding base
Charger
12. Charger
13. Charging indicator
14. End of charge indicator
Assembly
Warning! Before assembly, remove the battery from the tool.
Fitting and removing the battery (fig. B)
KC2000
◆ To fit the battery (5), line it up with the receptacle on the
tool. Slide the battery into the receptacle and push until
the battery snaps into place.
◆ To remove the battery, push the two release buttons (6)
simultaneously while at the same time pulling the battery
out of the receptacle.
KC2002
◆ To fit the battery (5), line it up with the receptacle on the
tool. Slide the battery into the receptacle and push until
the battery snaps into place.
◆ To remove the battery, push the release button (10) while
at the same time pulling the battery out of the receptacle.
Fitting and removing tool heads (fig. C)
The different tool heads can be easily exchanged.
◆ Lock the tool by setting the forward/reverse slider (2) to
the centre position.
◆ To remove a tool head, depress the head release button (3)
and take the head off the tool.
◆ To fit a tool head, line it up with the tool as shown and
push it onto the tool until it snaps into place.
Fitting and removing a drill bit or screwdriver bit
(fig. A & D)
The drill/screwdriver head is fitted with a keyless chuck to
allow for an easy exchange of bits.
◆ Lock the tool by setting the forward/reverse slider (2) to
the centre position (fig. A).
◆ Open the chuck by turning the front part (15) with one
hand while holding the rear part (16) with the other (fig. D).
◆ Insert the bit shaft (17) into the chuck.
◆ Firmly tighten the chuck by turning the front part (15) with
one hand while holding the rear part (16) with the other.
This tool is supplied with a double-ended screwdriver bit in
the bit holder (4) (fig. A).
◆ To remove the screwdriver bit from the bit holder, lift the
bit from the recess.
◆ To store the screwdriver bit, firmly push it into the holder.
Fitting and removing a saw blade (fig. F & G)
◆ Lock the tool by setting the forward/reverse slider (2) to
the centre position (fig. F).
◆ To fit a saw blade, lift the lever (18) and hold it in this
position (fig. G).
◆ Insert the saw blade into the holder as shown. Make sure
that the teeth are pointing to the front.
◆ Release the lever.
◆ To remove the saw blade, lift the lever (18) and pull the
saw blade from the holder.
Fitting and removing sanding sheets (fig. F & I)
The sanding head uses pre-cut sanding sheets.
◆ Lock the tool by setting the forward/reverse slider (2) to
the centre position (fig. F).
◆ Before fitting a new sheet, remove the two additional
diamond tips (20) (fig. I).
◆ To fit a sanding sheet, line it up with the sanding base as
shown.
◆ Press the sheet firmly and evenly onto the sanding base,
making sure that the holes in the sheet coincide with the
holes in the base.
◆ To remove the sheet, pull it off the sanding pad.