Do you have a question about the Black & Decker WORKMATE 79-001 and is the answer not in the manual?
Assemble the four saw horse feet using provided mounting screws for stability.
Place the unit on the floor, press release buttons, and lift until it locks into position.
Confirm the unit is locked into the lower 'sawhorse' height of 23½ inches.
Extend all four base legs to achieve the upper 'workbench' height.
Verify each leg is extended for safe use at the higher working height.
Snap the handle knobs into the handle arms located on the vise bracket.
Adhere to load limits, avoid unbalanced loads, not use as a step, and maintain proper storage.
Pivot screws need no lubrication; check tightness and clean vise screw if binding occurs.
Store grips upside down, fold legs, release latches, and pull unit up to lock for minimal space.
Adjust the parallel vise jaws using the two vise handles for a maximum 5% inch opening.
Utilize independently operated vise handles to taper the jaw opening from 0 to 5% inches.
Use swivel grips in vise holes to extend capacity up to 12 inches, or 21 inches diagonally.
The Work Center functions as a sawhorse in its lower position for sawing tasks.
Hold a mitre box for accurate angle cuts; place foot on step for added rigidity.
Easily saw tubular pieces held horizontally in the specially designed V-grooves.
Vertical V-grooves allow rigid vertical grasping of tubular objects.
Hold material at perfect height and position for efficient work.
Provides strength and stability to handle large and awkward sizes and shapes.
Power sand the most irregular shapes with secure grip from swivel grips.
Perform routing tasks easily and professionally with improved results.
Brings the job up to a convenient working height for better reach and visibility.
Construct mounting boards for tools to make them portable and attachable to the Work Center.
Always wear safety glasses and securely mount tool accessories to mounting boards.
Attach drill stands to plywood boards with blocks gripped securely in the vise jaws.
Set Work Center at workbench height for cleaning or use anywhere with portable tools.
Use power tool accessories like buffers more often due to increased ease and convenience.
Use swivel grips and independent vise handles to securely hold even the most irregular shapes.
Create a work table by attaching plywood to a wood block gripped in the vise jaws.
Each vise end works independently, allowing secure clamping of tapered objects.
Provides a steady work surface allowing access to projects from any angle.
Ensure objects are always at the proper height for comfortable working.
Tool for clamping parts on horizontal surfaces, fitting 3/4" holes, adjustable height, 360° rotation.
Provides accuracy for cutting rafters, joists, trim; offers mitre angles from 30° to 90°.
Enables shaping and routing on WORKMATE, guiding the router for edges and designs.
Provide additional versatility for holding objects or serve as replacements for lost grips.
One-year warranty covering defects in material or workmanship for the product.
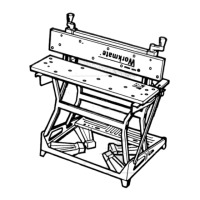
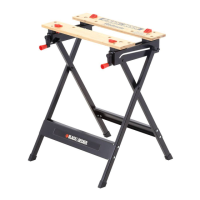
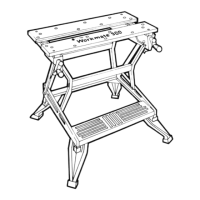
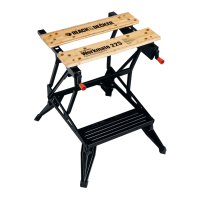
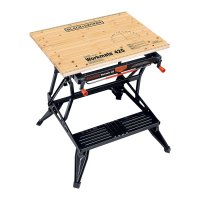
The Black & Decker WORKMATE® is a versatile portable work center and vise, designed to assist with a wide range of workshop tasks, from the simplest to the most complex. It functions as a vise, sawhorse, and workbench, offering a convenient and rigid work surface for various projects.
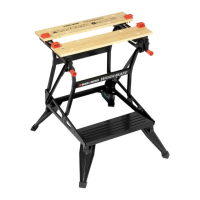
The core function of the WORKMATE® revolves around its two parallel vise jaws, which are independently adjustable. This allows for clamping objects with a maximum jaw opening of 5 1/8 inches. Because each handle operates independently, the vise opening can be tapered from 0 to 5 1/8 inches, accommodating irregularly shaped or tapered objects like bikes, furniture, doors, and shutters. The WORKMATE® also features swivel grips that fit into appropriate vise holes, extending the vise capacity up to 12 inches wide for standard objects or up to 21 inches when objects are held diagonally. These swivel grips are particularly useful for securing odd-shaped items for tasks such as sanding, sawing, and routing.
The device can be set up in two working heights: a lower "sawhorse" height and an upper "workbench" height, allowing users to choose the position best suited for their particular job. In its lower position, it serves as a stable sawhorse, ideal for sawing lumber. The upper "workbench" height provides a comfortable working level for planing, sanding, routing, and other detailed tasks.
The WORKMATE® is designed to be lightweight, portable, and compact for easy storage. Its all-steel frame ensures strength and durability while remaining easy to move.
Setting up the WORKMATE® is straightforward. To assemble, the four sawhorse feet are attached using the provided mounting screws. The unit is then placed on the floor, and by pressing release buttons on either side, it can be lifted until it locks into position at the lower "sawhorse" height. To raise it to the full "workbench" height, the four base legs are extended. It is crucial to ensure that each leg is swung into its extended position and that the unit locks into place for safe use at both working heights. Snap handle knobs into the handle arms on the vise bracket complete the setup.
The vise jaws can hold lumber up to 12 inches wide, making it ideal for shelving projects. V-grooves in the jaws are specifically designed to hold pipe and tubing up to 5 1/4 inches wide, both horizontally and vertically, ensuring a rigid grip for sawing or other operations. The independent action of the vise jaws and the use of swivel grips enable the clamping of irregularly shaped or tapered objects, providing an extra pair of hands when needed.
For precise angle cuts, the WORKMATE® can securely hold a mitre box. Placing a foot on the WORKMATE® step adds rigidity during sawing tasks. When planing, sanding, or routing, the WORKMATE® holds material securely at a perfect height and position, making these tasks easier and leading to more professional results. It offers the strength and stability to handle large and awkward sizes and shapes, bringing the job up to a comfortable working height where users can reach and see it, even with hard-to-hold items.
The WORKMATE® is also compatible with power equipment. Users can construct individual mounting boards for their power tools, such as drill stands, to save workbench space and make their tools completely portable. These mounting boards, typically made of plywood with a block of wood attached underneath, are gripped securely in the vise jaws, providing rigidity for tool operation. This setup allows for tasks like cleaning rusty tools, drilling, and buffing to be performed more conveniently.
For extra work space, a general-purpose table can be created by attaching a piece of plywood with a block of wood to the underside, centering it over the vise jaws. This transforms the WORKMATE® into an extra-long table surface for various work or play occasions.
The WORKMATE® is designed for low maintenance. Its pivot screws are of a low friction design, meaning no lubrication is necessary for their operation. However, if binding of the vise jaws occurs, cleaning or lubrication of the slider and vise screw may be required to restore smooth movement. It is also recommended to periodically check the pivot screws for tightness to ensure continued stability and performance.
When storing the WORKMATE®, swivel grips should be stored upside down in the tabletop. All four base legs should be folded in and clamped in a locked position. By placing one foot on the step and simultaneously pulling both retainer latches, the unit can be pulled straight up until the latches release, then closed and clamped in a locked position, allowing for convenient storage in minimal space.
| Brand | Black & Decker |
|---|---|
| Model | WORKMATE 79-001 |
| Category | Tool Storage |
| Product Type | Workbench |
| Type | Portable Workbench |
| Material | Plastic |
| Weight Capacity | 350 lbs |
| Dimensions | 30 x 25 x 29.5 inches |
| Foldable | Yes |
| Color | Black |