Do you have a question about the Black Stone Culinary 2230 and is the answer not in the manual?
General safety guidelines for gas appliances, including usage restrictions and clearances.
Specifies minimum distances from flammable materials and overhead structures.
Lists codes and standards for installation.
Outlines the terms and conditions of the manufacturer's warranty.
Provides a thorough explanation of warranty coverage, limitations, and purchaser responsibilities.
Attaching the four legs to the bottom of the griddle body using screws.
Mounting a door magnet bracket to the logo panel using screws.
Securing the logo panel to the front legs of the unit.
Connecting the cart base to the appliance legs.
Screw the four caster wheels into the appliance legs.
Attaching a side panel to the right side of the cart.
Attaching a side panel to the left side of the cart.
Securing the rear panel to the back of the appliance.
Mounting a door magnet bracket to the cart base.
Assembling and attaching door handles to the cabinet doors.
Placing the inner shelf leg into the cart base hole.
Attaching the left cabinet door assembly to the cart.
Attaching garbage bag brackets to the right side of the cabinet.
Securing garbage bag holders to the attached brackets.
Attaching Z-shaped bracket and plastic bumper to the cabinet.
Mounting the paper towel holder to the left side of the cabinet.
Attaching side shelf brackets to the left side of the griddle body.
Installing three side shelf pegs onto each side shelf.
Securing the left side shelf using shoulder bolts.
Securing the left side shelf to the side shelf brackets.
Inserting the side table into its designated pin on the right side.
Securing the side table to the right side shelf.
Attaching the table stopping bracket to the side table.
Loosely threading screws into the right side of the griddle body.
Connecting the side shelf table by sliding keyholes onto screws.
Securing the side shelf table to the right side of the griddle body.
Installing the four control knobs into their positions.
Attaching the grease cup to the designated slot on the back.
Assembling and attaching the hood handle to the front of the hood.
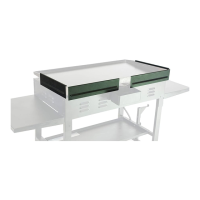
Placing and securing the griddle top and hood onto the main body.
Instructions on how to properly unfold the side table.
Lists essential features required for the LPG cylinder valve.
Specifies standards and requirements for LPG cylinders.
Safety precautions and warnings related to the gas regulator.
Guidance on checking and maintaining fittings and hoses.
Procedures for checking gas leaks on the cylinder, valves, hose, and regulator.
Initial cleaning steps for the griddle top before first use.
Verifying proper function of control knobs and valves.
Instructions for lighting the appliance using battery-powered ignition.
How to inspect and verify the burner flame pattern.
Recommended oils for seasoning the griddle.
Solutions for common issues like brownish residue on the griddle.
Tips and methods to prevent rust on the griddle surface.
Instructions for cleaning the appliance after each use.
Guidelines for safely storing the appliance.
Steps for safely disconnecting the LPG cylinder.
Safety guidelines for storing LPG cylinders.
Information on LPG cylinder exchange and filling.
Steps to diagnose and resolve ignition problems.
Identifying and fixing issues related to gas flow and burner flames.
Addresses flames exiting the air gate, indicating potential obstructions.
Contact information and hours for customer support.
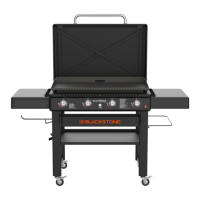
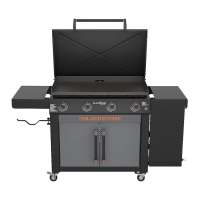
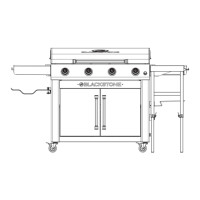
This document serves as the owner's manual for the Blackstone 36" Griddle with Folding Side Table and Cabinet, Model 2230. It provides comprehensive instructions for assembly, safe operation, maintenance, and troubleshooting of the appliance.
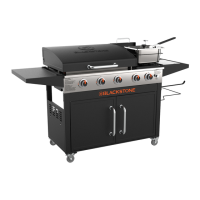
The Blackstone 36" Griddle is an outdoor cooking appliance designed for domestic use. It features a large griddle top for cooking, supported by a cabinet that includes folding side tables and storage. The griddle operates on Liquefied Petroleum Gas (LPG) and is equipped with multiple tubular burners, allowing for varied heat zones across the cooking surface. An integrated hood covers the griddle top, and a grease cup is provided for collecting cooking byproducts. The appliance is designed for outdoor use only, providing a versatile cooking platform for a range of meals.
Assembly: The manual provides a detailed assembly guide with an exploded view and step-by-step instructions. Key assembly steps include attaching the legs to the griddle body, securing the logo panel and cart base, installing caster wheels, attaching side and rear panels, assembling and attaching cabinet doors with handles, inserting an inner shelf, and attaching garbage bag brackets and a holder. Side shelf brackets and side shelves are installed, followed by the paper towel holder. The side table is then attached, and control knobs are installed. Finally, the griddle top and hood assembly are placed onto the griddle body, and the grease cup is hung. The manual emphasizes the need for two people for heavy pieces and advises wearing gloves due to sharp edges.
LPG Cylinder Connection: Connecting the LPG cylinder involves ensuring control knobs are OFF, turning the OPD hand wheel clockwise to fully stop the cylinder, and removing the safety cap. The regulator is then held in a straight line with the Type 1 valve outlet and hand-tightened clockwise. The LPG cylinder must be placed on the cart base and secured with a wing screw. The manual strictly warns against cross-threading and using tools for connection, and advises against using a regulator that cannot be connected properly.
Ignition Instructions: Before ignition, users must check the valves by turning knobs to OFF, pushing them in and releasing to ensure they spring back, and rotating them to LOW then back to OFF to confirm smooth operation. For battery-powered ignition, an AA battery is inserted into the ignitor button. Gas is turned ON at the LPG cylinder by turning the OPD hand wheel counterclockwise 1 to 3 turns. To ignite, the ignitor button is pushed and held while the control knob is pushed and turned counter-clockwise to HIGH. The temperature can then be adjusted. The manual includes warnings about gas flow if the burner does not ignite and advises checking for gas leaks.
Match Lighting: If battery ignition fails, match lighting instructions are provided. This involves turning the control knob to OFF, lighting a match or long lighter (no shorter than 11 inches), placing the flame next to the burner, and then pushing in and turning the control knob to start gas flowing.
Burner Flame Check: Users are instructed to light burners and rotate knobs from HIGH to LOW to observe the flame. Healthy flames are described as having flickers of yellow, dark blue, and vibrant blue. Yellow or irregular flames indicate a potential issue, possibly a clogged burner, which could lead to fire.
Griddle Seasoning: The manual details a multi-step seasoning process for the griddle top. This involves wiping off debris, heating the griddle to high until it changes color (approximately 10 minutes), spreading 2-3 tablespoons of seasoning oil (Blackstone Seasoning and Cast Iron Conditioner or any plant-based cooking oil/rendered animal fat) across the surface with a paper towel or cotton cloth, and repeating the oil application 3-4 times or until the surface is black, ensuring the griddle stops smoking between layers. A thin, even layer of oil is crucial for proper burning off.
Cooking on the Griddle: The manual provides general safety guidelines for cooking, including warnings against placing flammable items near the appliance and handling hot parts without protection. It also advises against storing items within 3 inches of the cooking surface while in use.
Side Table Usage: The side table is designed to fold. To unfold, the side table is raised, the pull ring is pulled to release the upper leg assembly, and the spring latch on each leg is pressed to release the lower legs. Legs can then be adjusted to the desired height, and latch pins re-inserted. The maximum weight on the side shelf is 10 lbs (4.5 kg), and it may get hot during use. Users are warned not to sit or stand on the table. The hood should not be left closed for more than 10 minutes while cooking.
First Time Cleaning: Before initial use, the griddle cooking surface should be washed with hot, soapy water, then rinsed and dried completely. This is the only time soap should be used on the cooking surface, as it will ruin a seasoned griddle.
Routine Griddle Top Cleaning: After each use, the griddle top should be cleaned while still warm. This involves pushing loose food debris into the grease cup with a spatula or metal scraper, wiping the griddle top with a paper towel, applying a few tablespoons of water to the surface, and scraping the water and debris into the grease cup (coarse salt can be used for stuck-on residue). Finally, the griddle top is wiped again with a paper towel, dried completely, and a thin coat of cooking oil is applied to maintain seasoning and protect against rust. The grease cup must be removed and emptied after each use, but only after it has completely cooled.
Preventing Rust: Frequent use of the griddle helps add to the seasoning, making rust less likely. For humid or coastal climates, more frequent seasonings may be required. If rust appears, it can be rubbed off with steel wool, low grit sandpaper, or a Blackstone Pumice Stone, followed by re-seasoning.
Appliance Cleaning: The entire appliance should be cleaned after each use, once it has cooled. Abrasive pads should not be used on areas with graphics. If a bristle brush is used on cooking surfaces, ensure no loose bristles remain. Plastic and painted surfaces should be washed with warm soapy water and wiped dry with a non-abrasive cloth. Citrisol, abrasive cleaners, or concentrated cleaners should not be used on plastic parts to prevent damage. Grease buildup can cause fires, so any part experiencing buildup should be cleaned after each use.
Burner Assembly Cleaning: Detailed instructions are provided for cleaning the burner assembly. This involves turning off gas, removing the cooking top, detaching and removing the burner, and then cleaning the inside of the burner tubes with a narrow bottle brush or a stiff wire bent into a small hook. Compressed air can be used to blow through the burner tube and ports, ensuring air blows through each hole (with eye protection). The outer surface of the burner should be brushed to remove grime, and any blocked ports cleaned with a stiff wire. Finally, burners are carefully replaced, ensuring the gas rail fuel nozzle is re-engaged within the burner opening.
LPG Cylinder Disconnection: To disconnect, control knobs must be OFF, the LPG cylinder turned OFF by the OPD hand wheel, and the coupling nut turned counter-clockwise by hand to remove the regulator. A safety cap should be placed on the LPG cylinder valve outlet when not in use.
LPG Cylinder Storage: LPG cylinders should be stored outdoors, out of reach of children, and never inside a building, garage, or enclosed area. Spare cylinders should not be stored under or near the appliance, and cylinders should not be filled beyond 80% full. The LPG cylinder must be turned OFF when the appliance is not in use.
Troubleshooting: The manual includes sections for troubleshooting ignition issues (burner not igniting, ignitor wire misaligned, damage to ignition system) and gas flow issues (yellow/irregular flames, obstructions, empty/low LPG cylinder, triggered flow limiting device, stuck regulator). Solutions range from replacing batteries, adjusting ignitor needles, cleaning burners/jets/fuel rail, refilling cylinders, resetting the safety system, to contacting customer service for replacement parts.
| Category | Griddle |
|---|---|
| Model | 2230 |
| Brand | Blackstone Culinary |
| Material | Steel |
| Heat Source | Propane |
| Cooking Surface | Steel |
| BTUs | 30, 000 BTUs |