7
ENGLISH
(Original instructions)
Read the instruction manual before use.
Electrical safety
Your charger is double insulated; therefore no
earth wire is required. Always check that the
mains voltage corresponds to the voltage on the
rating plate. Never attempt to replace the charger
unit with a regular mains plug.
u If the supply cord is damaged, it must be replaced by the
manufacturer or an authorised BLACK+DECKER Service
Centre in order to avoid a hazard.
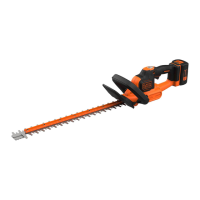
Features
This appliance includes some or all of the following features.
1. On/off switch
2. Handle
3. Lock off button
4. Battery
5. Second handle
6. Guard
7. Spool housing
8. Head
9. Edge guide
Assembly
Warning! Before assembly, make sure that the tool is
switched off and the battery has been removed.
Fitting the guard (g. A & B)
u Remove the screw from the guard.
u Keeping the guard (6) square to the strimmer head (8)
slide it into place until the retaining tab clicks into place
(Ensure that the guide rails (10) on the guard (6) are
correctly aligned with the guide rails (11) on the strimmer
head (8).
u Secure the guard (6) with the screw (12).
Warning! Never use the tool unless the guard is properly
tted.
Adjusting the position of the secondary handle
(g. C)
The second handle (5) can be adjusted to provide optimum
balance and comfort.
u Lift the locking clamp (14) on the secondary handle.
u Gently slide the secondary handle (5) up or down the tube
(13) to the desired height.
u Secure the locking clamp (14) once the desired position
has been acheived.
Adjusting the height of the tool (g. D)
This tool has a telescopic mechanism, allowing you to set it to
a comfortable height. There are multiple height settings.
To adjust the height setting, proceed as follows:
u Release the height adjust locking clamp (15).
u Gently pull the tube (13) up or down to the desired height.
u Close the height adjust locking clamp (15).
Releasing the cutting line
In transit, the cutting line is taped to the spool housing.
Warning! Before assembly, remove the battery from the tool.
u Remove the tape holding the cutting line to the spool
housing (7).
Charging the battery (g. E)
The battery needs to be charged before rst use and
whenever it fails to produce sufcient power on jobs that were
easily done before. The battery may become warm while
charging; this is normal and does not indicate a problem.
Warning! Do not charge the battery at ambient temperatures
below 10 °C or above 40 °C. Recommended charging
temperature: approx. 24 °C.
Note: The charger will not charge a battery if the cell
temperature is below approximately 10 °C or above 40 °C.
The battery should be left in the charger and the
charger will begin to charge automatically when the cell
temperature warms up or cools down.
u To charge the battery (4), insert it into the charger (16).
The battery will only t into the charger in one way. Do
not force. Be sure that the battery is fully seated in the
charger.
u Plug in the charger and switch on at the mains.
The charging indicator (16a) will ash green continuously
(slowly).
The charge is complete when the charging indicator (16a)
lights green continuously. The charger and the battery can
be left connected indenitely with the LED illuminated. The
LED will change to ashing green (charging) state as the
charger occasionally tops up the battery charge. The charging
indicator (16a) will be lit as long as the battery is connected to
the plugged-in charger.
u Charge discharged batteries within 1 week. Battery life will
be greatly diminished if stored in a discharged state.
Leaving the battery in the charger
The charger and battery pack can be left connected with the
LED glowing indenitely. The charger will keep the battery
pack fresh and fully charged.
Charger diagnostics
If the charger detects a weak or damaged battery, the
charging indicator (16a) will ash red at a fast rate.