Do you have a question about the Black+Decker FEJ520JF and is the answer not in the manual?
Read all safety warnings and instructions before operating. Failure may result in shock, fire, or injury.
Use only as described in this manual. Other operations may cause personal injury.
Keep this manual for future reference to ensure safe operation and maintenance.
Avoid picking up liquids or flammable materials to prevent fire hazards.
Do not operate the appliance near water or immerse it to prevent electrical hazards.
Disconnect charger by pulling the plug, not the lead, to prevent damage and hazards.
Appliance usable by children 8+ and persons with reduced capabilities under supervision.
Inspect appliance for damaged or defective parts before each use to ensure safe operation.
Do not use the appliance if any part is damaged or defective to prevent injury.
Have damaged parts repaired or replaced by an authorized agent to maintain safety.
Regularly check the charger lead for damage and replace if defective for safety.
Only replace parts specified in this manual. Do not attempt unauthorized repairs.
Unplug charger before cleaning. Store appliance dry. Keep away from children.
Residual risks exist from misuse, prolonged use, etc. Be aware of potential hazards.
Explanation of symbols found on the charger, including double insulation and transformer details.
Mandatory reading of the entire manual before operating the appliance.
The tool is double insulated, requiring no earth wire. Check power supply voltage matches rating plate.
Details the transformer's safety features, isolating mains supply from output.
Charger shuts off at high temperatures. Base needs repair if inoperable due to heat.
The charging base is designed and intended for indoor use only.
Explains symbols found on the appliance, including the date code.
Specifies that only charger S010Q 23 should be used with this appliance.
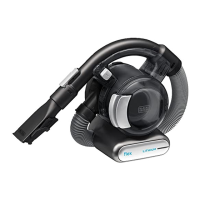
Lists the features included in the tool, which may vary.
Operates in slow speed, low power, or BOOST mode. Press button to turn on/off.
Extend crevice tool until it clicks. Fit brush for dusting. Retract using release button.
Slide nozzle into extension tube until it clicks. Includes flip down brush for hard-to-reach areas.
Slide extension tube onto floor head until it clicks for proper assembly.
Appliance senses thick pile carpet and auto-adjusts to BOOST mode for better cleaning.
Depress release button to remove beater bar. End pieces are removable for clearing debris.
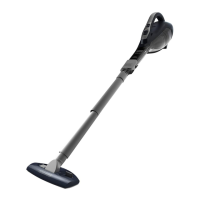
Appliance can be charged as a single unit or while attached to the floor extension.
Attach wall mount to wall for convenient storage. Ensure fixing is suitable for wall type and weight.
Red filter LED illuminates when the filter is blocked and requires cleaning.
Battery icon illuminates when charging. LED display shows charge status.
Indicator illuminates when the appliance is in BOOST mode for higher power operation.
Press the dust bowl release button to begin filter cleaning process.
Eject the dust bowl from the appliance to access the filters.
Lift the filter assembly using the metal handle from the dust bowl.
Empty remaining dust from the dust bowl by shaking it over a dustbin.
Remove the filter (21) from the pre-filter (20) for cleaning.
Ensure all remaining dust is emptied from the dust bowl.
Wash the dust bowl with warm soapy water to clean it.
Wash the filters thoroughly with warm soapy water.
Ensure all filters are completely dry before refitting them onto the appliance.
Refit the cleaned and dried filters back onto the appliance.
Close the dust bowl, ensuring the release latch clicks securely into place.
Always unplug the appliance before performing any maintenance or cleaning tasks.
Wipe the appliance periodically with a damp cloth; avoid abrasive cleaners.
Avoid abrasive/solvent cleaners and immersing the appliance in water for safe maintenance.
The appliance is designed for long-term operation with minimal maintenance requirements.
Run battery down, switch off. Unplug charger. Clean ventilation slots and motor housing.
Replace filters every 6-9 months or when worn/damaged. Use specific part numbers.
Pre-scented filters are available for a pleasant odour. Dispose of used filters at recycling centres.
Handle fragrance filters with care, wash skin after contact, wear protection, seek medical advice if needed.
Remove old filters as described and fit new filters as described for proper function.
Products and batteries marked with the symbol must not be disposed of with household waste.
Recycle electrical products and batteries according to local provisions for resource conservation.
This document provides instructions for the BLACK+DECKER FEJ520JF and FEJ520JFS Dustbuster® hand-held vacuum cleaners, designed for household vacuum cleaning purposes. It covers safety guidelines, operational procedures, and maintenance tips to ensure safe and effective use of the appliance.
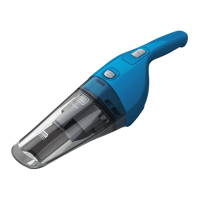
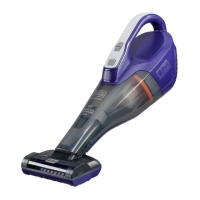
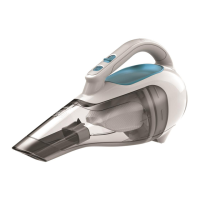
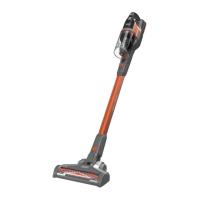
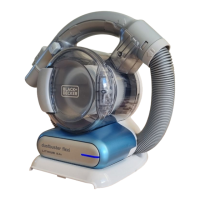
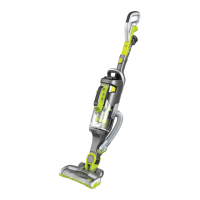
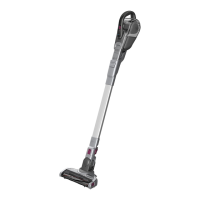
The BLACK+DECKER Dustbuster® is a versatile hand-held vacuum cleaner designed for general household cleaning tasks. It features a powerful motor and a range of attachments to tackle various cleaning challenges, from quick spills to more extensive floor cleaning. The appliance is equipped with a rechargeable battery, offering cordless convenience. Its design allows for both handheld use and conversion into a stick vacuum with the floor extension tube and head, making it adaptable to different cleaning needs. The vacuum also incorporates a "smart tech" multi-LED display that provides visual feedback on the appliance's status, including charging, filter condition, and BOOST mode activation.
Switching On and Off: The appliance operates with a simple on/off power switch. A single press turns the unit on in a low power mode, which conserves battery life. Pressing the button again activates BOOST mode for increased cleaning performance. A third press turns the product off.
Pull Out Crevice Tool: For reaching tight spaces and corners, the vacuum includes a pull-out crevice tool. To use it, extend the tool until it clicks into place. A push-in brush can be fitted onto the crevice tool for dusting and upholstery cleaning. To retract the crevice tool, press the release button, allowing it to return to its normal position.
Floor Extension Tube: The floor extension tube transforms the hand-held unit into a stick vacuum. The nozzle of the hand-held unit slides into the floor extension tube until an audible 'click' confirms it's securely in place. The tube also features a flip-down brush, which is useful for cleaning difficult-to-reach areas on floors.
Floor Head: The floor head attaches to the end of the floor extension tube, again with an audible 'click' to ensure a secure connection. This attachment is designed for efficient floor cleaning.
Floor Sense Feature: A unique floor sensing feature allows the appliance to automatically adjust its cleaning mode. When it detects thick pile carpet, it switches from low speed to BOOST mode to provide greater cleaning performance without manual intervention.
Charging: The appliance can be charged either as a single hand-held unit or while attached to the floor extension. To charge, the charger is placed into the charging port, and then plugged into an electrical outlet. The LED charging indicator will illuminate to show that charging is in progress. The multi-LED display provides detailed information on the battery's state of charge, filter status, and BOOST mode activation. The battery icon illuminates when charging is required, and the LED display indicates the current charge level.
Wall Mounting: For convenient storage, a wall bracket is provided. The wall mount can be attached to a wall, ensuring the fixing method is suitable for the wall type and the weight of the appliance. When mounting, ensure the location is within reach of an electrical outlet for charging the vacuum while it's on the bracket.
Multi LED Display: The multi-LED display offers crucial feedback:
Cleaning the Filters: Regular filter cleaning is essential for maintaining optimal performance. The process involves:
Replacing the Filters: Filters should be replaced every 6 to 9 months, or sooner if they appear worn or damaged. Replacement filters are available from BLACK+DECKER dealers. Pre-scented filters are also available. Worn-out filters should be disposed of at a local recycling center. The replacement process involves removing the old filters as described in the cleaning section and fitting new ones.
Removing and Clearing Hair from the Beater Bars: To maintain the effectiveness of the floor head, hair and debris should be regularly cleared from the beater bars.
General Maintenance:
Safety Precautions: Always read the manual carefully before operating the appliance. Do not use the appliance to pick up liquids or flammable materials. Avoid using it near water or immersing it. Never pull the charger lead to disconnect it; keep the lead away from heat, oil, and sharp edges. If any part is damaged or defective, do not use the appliance and have it repaired by an authorized agent. Regularly check the charger lead for damage. The appliance/battery must be charged in a well-ventilated area. Children aged 8 and above, and persons with reduced capabilities, can use the appliance under supervision and after understanding the hazards involved. Children should not play with the appliance or perform cleaning and user maintenance without supervision.
| Model | FEJ520JF |
|---|---|
| Type | Cordless Stick Vacuum |
| Power Source | Battery |
| Battery Type | Lithium-ion |
| Charging Time | 4 hours |
| Runtime | 20 minutes |
| Cord Length | Cordless |
| Included Accessories | Crevice Tool, Brush Tool |