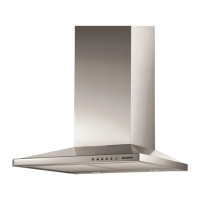
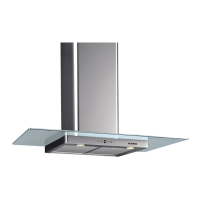
This document provides instructions for the use, care, and installation of BLANCO rangehoods, specifically models RCWT90X, BWC60TB, BWC90TB, BWC61TB, and BWC91TB.
The BLANCO rangehoods are designed to blend seamlessly with modern kitchen décor, offering ease of use and high performance. They are part of a wider range of BLANCO kitchen products, including cooktops, ovens, dishwashers, microwaves, sinks, and taps, designed to complement each other.
Function Description
The rangehoods are designed to extract cooking fumes and odors from the kitchen environment. They can be installed in two versions:
- Ducted Version (Fig. 1B): Air is extracted from the kitchen and discharged to the atmosphere outside. This is the recommended method for optimum performance.
- Recirculated Version (Fig. 1A): Air is filtered through active carbon filters and then recirculated back into the kitchen. This option is suitable when outside extraction is not possible.
The rangehoods feature a control panel (Fig. 9) with the following functions:
- Push-button A (On/off lights switch): Controls the rangehood's lighting.
- Push-button B (On/off rangehood switch): Turns the rangehood on and off. When switched on, it starts at speed level 1. To switch off, press for 2 seconds. Pressing it when the rangehood is at speed level 1 will decrease the motor speed.
- Display C: Indicates the selected motor speed level and activates the timer.
- Push-button D (Switches on the rangehood, increases motor speed): Turns on the rangehood and increases the motor speed. Touching this button at the 3rd speed activates an intensive function for 10 minutes, after which the appliance returns to the original speed. The display blinks during this function.
- Key E (Timer function): Pressing Key E will cause the motor to run for 15 minutes at the selected speed and then automatically turn off. The timer is deactivated by re-pressing Key E. The decimal point on the display flashes when the timer is active. The timer cannot be activated if the intensive speed is functioning.
- "Clean Air" Function: Activated by pressing Key E for 2 seconds when the appliance is off. This function runs the motor for 10 minutes every hour at the first speed. During operation, a rotary movement of the peripheral segments is visualized on the display. After 10 minutes, the motor switches off, and a fixed letter "C" is displayed until it restarts after 50 minutes for another 10 minutes. Press any key (except light keys) to return to normal functioning, or press Key E to deactivate the function.
Important Technical Specifications
The document provides technical specifications for different models:
RCWT90X:
- Voltage: 220-240V
- Frequency: 50/60Hz
- Lamp Max: 2 x Halogen lamps 20W MAX
- Rated Input: 290W
- Dimensions (approximate): Max. 1039 mm height, Min. 707 mm height, 571 mm depth, 485 mm width, 900 mm base width, 318 mm flue width, 259 mm flue depth.
BWC61TB - BWC91TB:
- Voltage: 220-240V
- Frequency: 50/60Hz
- Lamp Max: 2 x LED Lamps 1.5W
- Rated Input: 253W
- Dimensions (approximate): Max. 995 mm height, Min. extractor 560 mm height, Min. filter 665 mm height, 490 mm width, 600-900 mm base width, 60 mm base depth, 318 mm flue width, 259 mm flue depth.
BWC60TB - BWC90TB:
- Voltage: 220-240V
- Frequency: 50/60Hz
- Lamp Max: 2 x LED Lamps 2.5W
- Rated Input: 255W
- Dimensions (approximate): Max. 995 mm height, Min. extractor 560 mm height, Min. filter 665 mm height, 490 mm width, 600-900 mm base width, 60 mm base depth, 318 mm flue width, 259 mm flue depth.
Installation Warnings:
- The exhaust air must not be discharged into a flue used for other gas or fuel-burning appliances.
- Minimum height above cooktop to the lowest point of the rangehood must be 650 mm.
- Local regulations concerning exhaust air discharge must be followed.
- All Blanco rangehoods are for indoor application/installation only.
- After installation and removal of the protective layer, it is recommended to clean the rangehood with a stainless steel cleaner.
Usage Features
- Pre-cooking operation: It is recommended to operate the appliance prior to cooking.
- Post-cooking operation: Leave the appliance in operation for 15 minutes after cooking to eliminate vapors and odors.
- Lighting: The light function is designed for use during cooking, not for prolonged general illumination.
- Active Carbon/Grease Filter Saturation Indicators:
- If display item C flashes, alternating with the letter F (e.g., 1 and F), the grease filters need to be washed.
- If display item C flashes, alternating with the letter A (e.g., 1 and A), the carbon filters (ACK62836) need to be replaced.
- After cleaning/replacing filters, reset the electronic memory by pressing button A for approximately 5 seconds until F or T stops flashing on display C.
Maintenance Features
- Grease Filters: These filters capture grease particles and are subject to clogging. To prevent fire hazards, they should be cleaned at least every 2 months.
- Cleaning procedure: Remove filters, wash in a solution of water and neutral liquid detergent, soak, rinse thoroughly with warm water, and dry.
- Dishwasher safe: Filters can be washed in a dishwasher, though aluminum panels may change color after several washes (this is not a defect).
- Active Carbon Filters: These filters purify the air in recirculated versions. They are not washable or reusable and must be replaced at maximum every four months. Saturation depends on frequency of use, type of cooking, and regularity of grease filter cleaning. (Product Code: ACK62836)
- Light Replacement (Halogen - Fig. 7):
- For 12 volt 20W Halogen lamps.
- Remove the glass retaining ring and glass.
- Replace the globe with another of the same type.
- Replace the glass and retaining ring.
- LED Lamp Replacement (Fig. 8): If the appliance uses LED lamps, replacement requires the intervention of a specialized technician.
- General Cleaning: Ensure the rangehood is cleaned frequently for optimal performance. There is a risk of fire if cleaning is not carried out according to instructions.
- Repairs: For any repairs, always contact an authorized Technical Customer Service Centre and request original spare parts. Repairs by untrained personnel may cause damage and void the warranty.
Installation Guidelines:
- Electrical Connection:
- The appliance is Class II, so no earth cable is necessary.
- Connection to mains: BROWN = L line, BLUE = N neutral.
- If a plug is provided, the cooker hood must be installed for easy plug access.
- If directly connected to the electrical network, an omnipolar switch with a minimum 3mm opening between contacts, in line with the electrical load and local standards, must be installed.
- Ducting:
- If a connection tube composed of two parts is used, the upper part must be placed outside the lower part.
- Do not connect the rangehood exhaust to conductors used for hot air or fumes from other non-electrical appliances.
- Remove anti-grease filters (Fig. 5) before assembly for easier handling.
- For suction versions, prepare the hole for air evacuation.
- Recommended air exhaust pipe diameter is 150mm. Smaller diameters may reduce efficiency and increase noise.
- Ducting length should not exceed 3 meters.
- Use galvanized or similar metal flue pipe; PVC pipe is not recommended.
- A 90° bend in ducting causes approximately 35% efficiency loss; additional 90° bends can cause up to 15% loss per bend.
- Ducting size should comply with manufacturer specifications.
- Fixing to the Wall (Fig. 2, Fig. 4):
- Use screws and anchors suited to the wall type (e.g., reinforced concrete, plasterboard).
- Drill holes A as per dimensions in Fig. 2.
- Fix the appliance to the wall and align it horizontally.
- Secure the hood using screws A through the holes shown in Fig. 4.
- Fixing the Decorative Telescopic Flue (Fig. 2, Fig. 3, Fig. 4):
- Arrange the electrical power supply within the decorative flue area.
- Prepare the air exhaust opening for ducted or external motor versions.
- Adjust the width of the upper flue support bracket (Fig. 3) and fix it to the wall using screws A (Fig. 3), ensuring it is in line with the hood and 20mm from the ceiling (Fig. 2).
- Connect flange C to the air exhaust hole using a connection pipe (Fig. 4).
- Insert the upper flue into the lower flue and rest above the frame.
- Extract the upper flue up to the bracket and fix it with screws B (Fig. 3).
- Recirculating Version:
- Install the hood and flues as described for the ducted version.
- Assemble charcoal filters (refer to kit instructions) onto the suction unit inside the hood.
- Center filters by turning them 90 degrees until the stop catch is tripped (Fig. 6). Charcoal filters are available as an optional extra (Product Code: ACK62836).
Safety Precautions:
- Take care when operating the rangehood in the same room as an open fireplace or burner that requires air from the environment and uses non-electrical energy. The rangehood removes air, which a burner or fireplace may need for combustion. Negative pressure must not exceed 4Pa (4x10⁻⁵ bar).
- Provide adequate ventilation for safe rangehood operation.
- Follow local laws for external air evacuation.
- If the supply cord is damaged, it must be replaced by the manufacturer, authorized service center, or a similarly licensed person to avoid hazards.
- Electrical appliances can be dangerous.
- The appliance is not intended for use by persons (including children) with reduced physical, sensory, or mental capabilities, or lack of experience and knowledge, unless supervised or instructed by a responsible person.
- Young children should be supervised to ensure they do not play with the appliance.
- Do not check or remove filters when the rangehood is operating.
- Flambé cooking is prohibited underneath the rangehood.
- Constantly check food frying to avoid overheated oil becoming a fire hazard.
- Disconnect the electrical plug prior to any maintenance.
- Do not touch lighting or adjacent areas when lighting is on, and for a period after using the light.
- Avoid leaving cooktop on (gas and electric) without a saucepan covering the burner or cooking zone, as heat transferring upwards can damage filters and cause a fire hazard.
- Ensure adequate ventilation when the rangehood is used simultaneously with gas or other fuel-burning appliances. Exercise care when a rangehood is installed in an area where a gas burner is operating, as it may draw air necessary for proper combustion.
- Accessible parts may become hot when used with a cooking appliance.
The manufacturer declines all responsibility for damages caused by breaching these warnings. The appliance conforms to European Directive EC/2002/96 (WEEE) and should be disposed of responsibly at a suitable electric and electronic appliance recycling collection point.