Do you have a question about the Blaupunkt AUGSBURG C30 and is the answer not in the manual?
Button to unlock the removable front panel.
Knob for adjusting audio system volume.
Buttons for FM/AM tuning and presets.
Buttons for tape deck functions like FF, FR, Eject.
Buttons for accessing menus and navigating settings.
Introduction to the manual and system.
Guidelines for safe operation while driving.
Notes on installing the unit and approved accessories.
Information on warranty and contact details.
Security feature involving a detachable panel.
System requires a code after power disconnection.
Enabling an LED indicator for theft protection status.
Methods for switching the car audio system on and off.
Using the power button to control system operation.
Automatic system activation upon cassette insertion.
How to increase or decrease the audio volume.
Adjusting the volume level when the system powers on.
Temporarily silencing the audio output.
Enabling or disabling audible feedback for button presses.
Selecting the radio as the audio source.
Utilizing RDS features for enhanced radio reception.
Selecting FM, MW, LW bands and memory presets.
Methods for finding radio stations (seek, manual).
Adjusting how sensitive the seek tuning is.
Manually saving favorite radio stations.
Automatically storing strongest reception stations.
Accessing previously stored radio stations.
Selecting stations based on broadcast program type.
Choosing the display language for program types.
Automatic treble reduction to improve reception.
Controlling the display of RDS text information.
Activating or deactivating traffic announcement priority.
How to stop a current traffic announcement.
Adjusting the volume for traffic alerts.
Inserting and beginning playback of a cassette tape.
Mechanism to remove a cassette from the deck.
Switching between side A and side B of a tape.
Controls for fast-winding audio tapes.
Initiating operation of the CD changer unit.
Choosing a specific CD from the magazine.
Navigating and selecting individual tracks on a CD.
Features for previewing tracks (Cue/Review).
Playing tracks in a random or shuffled order.
Previewing the beginning of each track.
Customizing the duration of track scanning.
Temporarily pausing CD playback.
Showing the current time on the display.
Adjusting the clock to the correct time.
Selecting the time format for the display.
Activating the clock display when the system is off.
Modifying the low-frequency audio response.
Modifying the high-frequency audio response.
Enabling or disabling the loudness enhancement feature.
Adjusting the level of loudness boost.
Shifting audio sound between left and right speakers.
Shifting audio sound between front and rear speakers.
Options for connecting external audio devices via AUX.
Enabling or disabling the auxiliary audio input.
This document outlines the operating instructions for a Blaupunkt car audio system, specifically the Augsburg C30, Boston C30, Dublin C30, Minnesota DJ30, Montreux C30, and Ontario DJ30 models. It covers various functions related to radio, cassette, and CD changer operation, as well as general system settings.
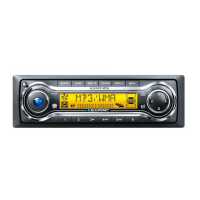
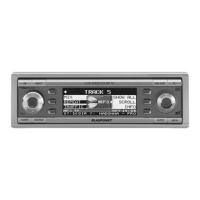
The device features a user-friendly interface with several buttons and controls. The [V] button (1) is used to unlock the release panel, a feature available on the Boston C30, Dublin C30, Montreux C30, and Ontario DJ30 models. The FMT button (2) selects FM memory levels and initiates the TravelStore function for the Boston C30, Dublin C30, Montreux C30, and Ontario DJ30. For the Augsburg C30 and Minnesota DJ30, the FM button (2) serves a similar purpose for FM memory levels. Volume control (3) adjusts the audio output. The ON button (4) switches the unit on/off and mutes the sound. RDS (5) toggles RDS convenience features and displays variable text. The M•L button (6) selects MW and LW wavebands (for Boston C30, Dublin C30, Montreux C30, and Ontario DJ30), while the TS button (6) starts the TravelStore function (for Augsburg C30 and Minnesota DJ30).
Cassette operations include the eject button (7) and the cassette slot (8). Fast rewind (FR) (9) and fast forward (FF) (10) buttons control tape movement. The GEO button (11) adjusts balance and fader settings. The CD•C button (12) switches the sound source between radio, cassette, and a connected CD changer. The AUDIO button (13) adjusts bass and treble, and also activates/deactivates the Loudness function. Cursor buttons (14) are used for navigation. The MENU button (15) activates the basic settings menu and displays the time. Buttons 1-5 (16) are used for station presets. Finally, the TRAFFIC button (17) switches traffic information standby on/off.
The car audio system incorporates a theft protection system. For models like the Boston C30, Dublin C30, Montreux C30, and Ontario DJ30, this involves a removable front panel. Removing the panel automatically switches off the system, making it inoperable to thieves. The panel should be stored securely. For all models, a cassette tape inserted into the car audio system will remain in place when the panel is removed.
To remove the operating panel, press the [V] button (1) and then slide the panel to the left to remove it. To replace it, slide the panel into the guides from left to right until it locks into place. If the car audio system is on when the panel is removed, it will automatically switch off. When the panel is replaced, the system will switch back on, resuming the last used settings (radio, tape deck, or CD changer).
The Augsburg C30 and Minnesota DJ30 models feature a four-digit code for theft protection. This code must be entered each time the car audio system is disconnected from its power supply. The code inquiry is not activated at the factory, but can be activated by the user. The code number can be found in the Radio Pass document.
To enter the code, switch on the car audio system. "CODE" and then "0000" will appear in the display. Press station keys 1-4 (16) repeatedly to enter each digit of your code number. When the correct code number appears, press [V] (14). If the code is entered incorrectly three times, a waiting period of one hour will be imposed, indicated by "WAIT 1 H".
The code LED can be activated on the Augsburg C30 and Minnesota DJ30 to visibly indicate theft protection. When activated, the code LED (4) will flash when the system is switched off. To activate/deactivate, press MENU (15), navigate to "LED" using cursor buttons (14), and select "ON" or "OFF".
The car audio system can be switched on/off in several ways. If connected to the vehicle ignition, it can be switched on/off with the ignition. It can also be switched on when the ignition is off by pressing and holding ON (4) until it switches on. The radio will automatically switch off after one hour to prevent battery drain.
For models with a removable front panel (Boston C30, Dublin C30, Montreux C30, and Ontario DJ30), removing the panel switches the system off, and replacing it switches it back on, resuming previous settings.
Inserting a cassette tape will also switch on the car audio system if it is off and no cassette is in the tape deck. Playback will begin automatically.
The volume can be adjusted from 0 (off) to 66 (maximum) using the volume control knob (3). To increase, turn the knob to the right; to decrease, turn it to the left.
The power-on volume can be adjusted to a desired level. Press MENU (15), navigate to "ON VOL" using cursor buttons (14), and adjust the volume using cursor buttons (14). If set to "0", the system will switch on at the volume used before it was switched off. A warning is provided regarding potential hearing damage if the power-on volume is set too high.
The mute function allows for immediate volume reduction. Press ON (4) briefly to activate mute, indicated by "MUTE" in the display. The mute level can also be selected via the MENU (15).
During telephone operation, if the system is equipped with a mobile telephone and connected, it will automatically switch to mute. Traffic announcements will override mute if traffic information priority is activated.
The beep tone, which sounds for functions requiring a longer key press, can be switched on/off via the MENU (15) by navigating to "BEEP" and selecting "ON" or "OFF".
The system features an RDS radio receiver, displaying station names and program types (PTY). To switch to radio mode from tape or CD changer, press CD•C (12) repeatedly until "RADIO" appears.
Special RDS functions, AF (Alternate Frequency) and REG (Regional), enhance performance. AF continuously searches for the best reception frequency. REG prevents tuning into regional programming variations. REG can be activated/deactivated in the MENU (15). RDS functions are enabled by pressing RDS (5).
The system supports FM, MW, and LW wavebands (MW and LW are not available for Augsburg C30 and Minnesota DJ30). There are three FM memory banks and one each for MW and LW, each storing five stations. FMT or FM (2) switches between FM memory levels. M•L (6) switches between MW and LW memory levels (not for Augsburg C30 and Minnesota DJ30).
Radio stations can be tuned automatically or manually. Automatic seek tuning is done by pressing cursor buttons (14). Manual selection is also done with cursor buttons (14), but requires RDS and PTY functions to be deactivated.
The seek tuning sensitivity can be adjusted from "SENS HI6" (highest) to "SENS LO1" (lowest) via the MENU (15).
Radio stations can be stored manually by selecting the desired memory bank, tuning to the station, and pressing and holding one of the station preset buttons 1-5 (16) for over two seconds.
The TravelStore function automatically stores the five strongest FM stations in the FMT memory bank. This is activated by pressing and holding FMT (2) for over two seconds, or briefly pressing TS (6) for Augsburg C30 and Minnesota DJ30.
Program Type (PTY) allows selection of stations based on program type (e.g., CULTURE, SPORT, JAZZ). PTY can be switched on/off via the MENU (15). The PTY language can also be selected (German, English, French) via the MENU (15).
The Interference-related treble cut (HICUT) function improves reception by automatically cutting treble and noise when interference occurs. HICUT can be switched on/off via the MENU (15).
The display of variable text (advertising or other texts transmitted by RDS) can be adjusted. Press and hold RDS (5) until "NAME FIX" appears to prevent variable texts, or "NAME VAR" to display them.
The TRAFFIC button (17) switches traffic information priority on/off. When active, "TRAFFIC" lights up. A warning beep sounds if the reception area of the traffic information station is left. If listening to a cassette or CD, playback is interrupted for traffic announcements.
The volume for traffic announcements can be adjusted via the MENU (15) by navigating to "TAVOLUME". Traffic announcements can be interrupted by pressing TRAFFIC (17).
To start tape deck operation, insert a cassette into the slot (8) with the open side facing right. Playback begins automatically. If a cassette is already in, press CD•C (12) repeatedly until "CASSETTE" appears.
To eject a cassette, press the eject button (7). To change cassette sides, press FR (9) and FF (10) simultaneously. The tape automatically reverses at the end.
Fast forward (FF) (10) and fast rewind (FR) (9) are activated by pressing the respective buttons until they click. Pressing the opposite button stops the function. During fast forward/rewind, the radio plays.
If traffic information priority is active, cassette playback will be interrupted for traffic announcements.
The Minnesota DJ30 and Ontario DJ30 models include a CDC A 08 CD changer. Other compatible CD changers can be connected. Refer to the CD changer's instructions for handling CDs.
To start CD changer operation, press CD•C (12) repeatedly until "CHANGER" appears. Playback begins with the first CD.
CDs can be selected using cursor buttons (14). Tracks on the current CD can also be selected with cursor buttons (14). Audible fast forward/reverse (CUE/REVIEW) is activated by pressing and holding cursor buttons (14).
The display mode can be switched between track number/CD number or track number/elapsed playing time via the MENU (15) by navigating to "CDC DISP".
Individual tracks or entire CDs can be repeated by pressing 3 (RPT) (16). "RPT TRCK" repeats the current track, and "RPT DISC" repeats the entire CD. Pressing 3 (RPT) (16) repeatedly stops the repeat function.
Tracks can be played in random order (MIX) by pressing 4 (MIX) (16). "MIX CD" plays the current CD randomly, and "MIX ALL" plays all CDs randomly. The MIX function is stopped by pressing 4 (MIX) (16) repeatedly until "MIX OFF" appears.
All tracks on all CDs can be scanned by pressing 5 (SCAN) (16). The scan time (5 to 30 seconds) can be adjusted via the MENU (15) by navigating to "SCANTIME". The SCAN function is stopped by pressing 5 (SCAN) (16).
Playback can be interrupted (PAUSE) by pressing 2 (II) (16). Pressing 2 (II) (16) again resumes playback.
The clock can be displayed briefly by pressing and holding MENU (15). To set the time, press MENU (15), navigate to "CLOCKSET", and use cursor buttons (14) to adjust minutes and hours.
The 12/24-hour time display mode can be selected via the MENU (15) by navigating to "24 H MODE" or "12 H MODE".
The clock can be activated for display when the car audio system is switched off but the ignition is on. This is done via the MENU (15) by navigating to "CLOCKOFF" or "CLOCK ON". The time can also be displayed briefly for eight seconds when the system is off by pressing MENU (15).
Bass and treble can be adjusted using the AUDIO button (13) and cursor buttons (14). Press AUDIO (13) to select "BASS" or "TREB", then use cursor buttons (14) to adjust.
Loudness boosts bass and treble at low volumes for a more natural sound. It is activated by pressing AUDIO (LD) (13) for over two seconds. "LD" lights up when active. The Loudness intensity can be set from one to six via the MENU (15) by navigating to "LOUDNESS".
Balance and fader settings are adjusted using the GEO button (11) and cursor buttons (14). Press GEO (11) to select "BAL" (balance) or "FADER", then use cursor buttons (14) to adjust.
Other external audio sources (portable CD players, MiniDisc players, MP3 players) can be connected to the line output instead of the CD changer. An adapter cable is required. The AUX output must be activated in the MENU (15) by navigating to "AUX OFF" or "AUX ON". Once activated, "AUX" can be selected by pressing CD•C (12).
| Bluetooth | Yes |
|---|---|
| USB Port | Yes |
| SD Card Slot | Yes |
| Equalizer | Yes |
| AUX | Yes |
| Steering Wheel Control | Yes |
| Display Type | LCD |
| Radio Tuner | AM/FM |
| Wavebands | FM, AM |