This document is a user manual for the Blaze Outdoor Products BLZ-48-VHOOD range hood, designed for outdoor use.
Function Description
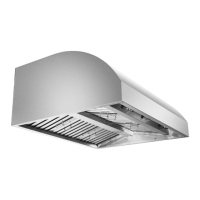
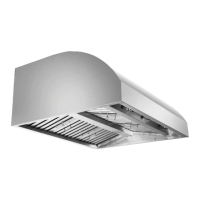
The Blaze BLZ-48-VHOOD is an outdoor range hood designed to ventilate cooking fumes, smoke, and heat from outdoor cooking areas. It features a powerful fan system with multiple speed settings and integrated lighting to illuminate the cooking surface. The hood is intended to be installed above an outdoor grill or cooktop to maintain a clean and comfortable cooking environment.
Important Technical Specifications
Dimensions:
- Hood Width: 48 inches
- Hood Depth: 36 inches
- Hood Height: 18 inches
- Clearance: The hood requires a minimum clearance of 36 inches and a maximum of 40 inches from the cooking surface.
Control Panel:
The control panel features three main switches:
- Left Fan Switch (A): Adjusts the speed of the left motor, which has 4 speed settings. Turning the knob clockwise increases speed, and counter-clockwise returns it to the original position and stops the motor.
- Lights Switch (B): Turns the lights on or off. Turning the knob clockwise or counter-clockwise will turn off the lights.
- Right Fan Switch (C): Adjusts the speed of the right motor, which has 4 speed settings. Turning the knob clockwise increases speed, and counter-clockwise returns it to the original position and stops the motor.
- Main Switch: Turns on or off the main power for motors and lights.
Venting Options:
The hood supports two main venting options:
- Vertical Roof Venting (Option 1): Ducts the exhaust vertically through the roof.
- Direct Wall Venting (Option 2): Ducts the exhaust horizontally through a side wall.
The hood is designed to accept 8-inch round ducting. It is crucial to ensure proper ducting to achieve optimal performance and avoid fire hazards. The manual recommends using 4-inch (102cm) laundry-type wall caps for venting. It also states that this model comes with two vent outlets, each ready to accept 8-inch pipe. Combining into a single pipe can create a competition between the two motors, either creating poor performance and/or one motor overtaking the other. As vented as described above, one would require two vent caps with damper and screen each having a rating of 1000 CFM per cap.
Electrical Requirements:
The hood comes with a 3-foot cord and must be plugged into a 110V outlet which should be wired to a 10 AMP breaker.
Materials:
The hood is constructed with stainless steel baffle filters.
Usage Features
Installation:
- Pre-installation Check: Upon receipt, inspect the hood for any damage, plug in and test controls (lights, fan) before installing, and report any damage to the dealer immediately.
- Mounting Height: It is critical to install the hood at the proper mounting height (36-40 inches above the cooking surface). Hoods mounted too low could result in heat damage and fire hazard, while hoods mounted too high will lose performance and efficiency.
- Ducting: Venting through a sidewall is acceptable if it cannot vent directly above your range hood. Vent with completely straight runs of pipe. If necessary, use as few elbows in the venting as possible, with no more than 3 90-degree elbows. Every elbow in the ducting reduces airflow and the vent hood's performance. Make sure there is at least 24 inches of straight vent between any elbows. Use silver or duct tape to seal all joints in the vent system. Use caulking to seal exterior openings around the cap. Always use metal or aluminum ducts for maximum airflow. Always keep the duct clean to ensure proper airflow.
- Wall Hood Installation Steps:
- Step 1 (Secure Hood to Wall): Secure the hood to the wall using appropriate screws and parts. This involves using a mounting bracket and screws for wooden wall studs or flat screws and wall anchors for dry wall/sheet rock walls.
- Step 2 (Install Grease Trays): Install the two grease trays in the front and back of the unit.
- Step 3 (Install Grease Filters): Install all grease filter handles to the filters, then insert the filters into the hood, ensuring they rest on the previously installed grease trays.
- Motor Rotation: The manual provides detailed instructions for motor rotation, which may be necessary for specific venting configurations. This involves removing and re-installing the motor cover plate and potentially rotating the motor itself.
Safety Precautions:
- Fire Hazard: To avoid the possibility of explosion or fire, do not store or use combustible, flammable, or explosive vapors and liquids (such as gasoline) inside or in the vicinity of this or any other appliance. Keep items that could explode (such as aerosol cans) away from cook-top burners, ovens, and range hoods. Do not store flammable or explosive materials in adjacent cabinets or surrounding areas.
- Grease Fire Prevention: Never leave surface units unattended at high settings. Boil-overs cause smoking and greasy spills that may ignite. Heat oils slowly on low or medium settings. Always turn hood ON when cooking. Clean ventilating fans frequently. Grease should not be allowed to accumulate on fan or filter.
- In case of a grease fire:
- SMOTHER FLAMES with a close-fitting lid, cookie sheet, or metal tray. Then turn off the burner. BE CAREFUL TO PREVENT BURNS. If the flames do not go out immediately, EVACUATE AND CALL THE FIRE DEPARTMENT.
- NEVER PICK UP A FLAMING PAN - you may be burned.
- DO NOT USE WATER, including wet dish cloths or towels - a violent steam explosion may result.
- General Safety: Always contact your dealer with any problems or situations that you do not understand. Do not tamper with the controls. Never allow the filters to become blocked or clogged. Do not allow foreign objects, such as cigarettes or napkins, to be sucked into the hood. If the cook-top and range hood is near a window, use an appropriate window treatment. Avoid long drapes or other window coverings that could blow over the cook-top and hood, resulting in a fire hazard. Always run the blower(s) while the appliance is in operation. Failure to do so could result in the overheating and failure of components. Do not leave children or pets alone or unattended in the area while the cook-top and range hood are in use. The minimum vertical distance between the cooking surface and the exterior part of the hood must be no less than 36 inches. The vertical distance may be longer for the range or cook-top being used.
Maintenance Features
Care & Cleaning:
- General Cleaning:
- Never put your hand into the area housing the fan while the fan is operating.
- Turn off and disconnect power to the hood before cleaning.
- Make sure your cook-top and hood are cool before cleaning.
- Use only the types of cleaning solutions mentioned in this manual.
- Completely dry the filter(s) immediately after cleaning.
- Exterior Surfaces:
- Regular care will help preserve the appearance of your range hood.
- Always wipe stainless steel surfaces with the grain to avoid scratches.
- Clean periodically with hot soapy water and clean cotton cloth.
- For heavier soil, use a liquid degreaser such as 409™ or Fantastic™.
- If the hood looks splotchy, use a stainless steel cleaner on the surface. Promptly and gently remove cleaner with a soft towel or wipe.
- After cleaning, you may use non-abrasive stainless steel polish (such as 3M™ or ZEP™) to buff out stainless luster. Always scrub lightly and with a clean cotton cloth.
- DO NOT use:
- Corrosive or abrasive detergent (e.g., Comet Power Scrub™ or EZ-Off™ oven cleaner).
- Steel wool or scouring pads, which will scratch and damage the stainless steel surface.
- Leak cleaning solution onto or into the control panel.
- Allow deposits to accumulate or remain on the hood.
- Allow salt solutions, disinfectants, bleaches, or cleaning compounds to remain in contact with the stainless steel for extended periods.
- Baffle Filters:
- All Blaze BBQ hoods come with stainless steel baffle filters. They should be inspected for grease accumulation periodically.
- The baffle filters can be washed in a dishwasher or in a sink with hot, soapy water.
- Simple periodic cleaning will ensure maximum filter effectiveness.
- Cleaning Steps:
- Step 1: Slide the filter forward off the rear lip. Lower the filter rear, then slide the filter front out. Repeat this step for all filters on the front and back of the hood.
- Step 2: When cleaning filters, always remove the grease channels and clean with hot soapy water. Both the filters and the channels are dishwasher safe. Dry thoroughly before re-installing.
Troubleshooting:
The manual provides solutions for common issues:
- Control Panel not responding, Blower not working:
- Turn on power at the circuit breaker panel or fuse box.
- Check for a tripped breaker or blown fuse under the black plastic cover on the rear of the hood.
- Make sure the hood power cable is plugged in and powered.
- Lights not turning on:
- See "nothing works" solutions.
- Check the wiring on the lights to insure a secure connection/no loose wires.
- Swap out lights to determine if bulbs are defective.
- Range hood vibrates when blower is on:
- Make sure the range hood has been secured properly to the ceiling or wall.
- Ensure the two nuts (one on each side) on the blower motor's axle are tight. These are accessible by removing the safety covers on each side.
- Ensure the venting system is correct. Back-pressure caused by incorrect venting not only leads to poor performance but can also create vibrations at the hood.
- Blower system seems weak:
- Increase the fan speed.
- Make sure the ducting is sized and run correctly. Range hood will not function efficiently with insufficient duct size (e.g., 9" duct over 8" hole).
- Check to see if the duct is clogged or if the damper unit (half-circular flapper) is installed correctly. A tight mesh on the side wall cap unit might also cause restriction to the air flow.
- Ensure the correct vent termination cap is used with whose CFM rating matches that of each motor.
- Air not venting out properly:
- Make sure there is at least 36" between the top of the cooking surface and the bottom of the hood.
- Reduce the number of elbows and length of duct work.
- Ensure all joints are properly connected, sealed, and taped.
- Make sure power is on high speed for heavy cooking.
- See checks under "Blower system seems weak" above.
Warranty:
- One Year Warranty - Parts Only: For one year from the date of original purchase, Blaze will repair or replace any non-consumable parts or components that failed due to manufacturing defects.
- What is NOT Covered:
- Consumable parts such as light bulbs and filters (stainless, aluminum, or charcoal).
- Damage due to natural wear, improper maintenance, or use of abrasive cleaning products.
- Chips, dents, or cracks due to abuse, misuse, or improper installation.
- Damage caused by accident, fire, floods, or natural disaster.
International customers should consult their selling dealer or distributor for specifics pertaining to their product warranty and procedure. No one else is authorized to perform any obligations under this warranty.