2 5
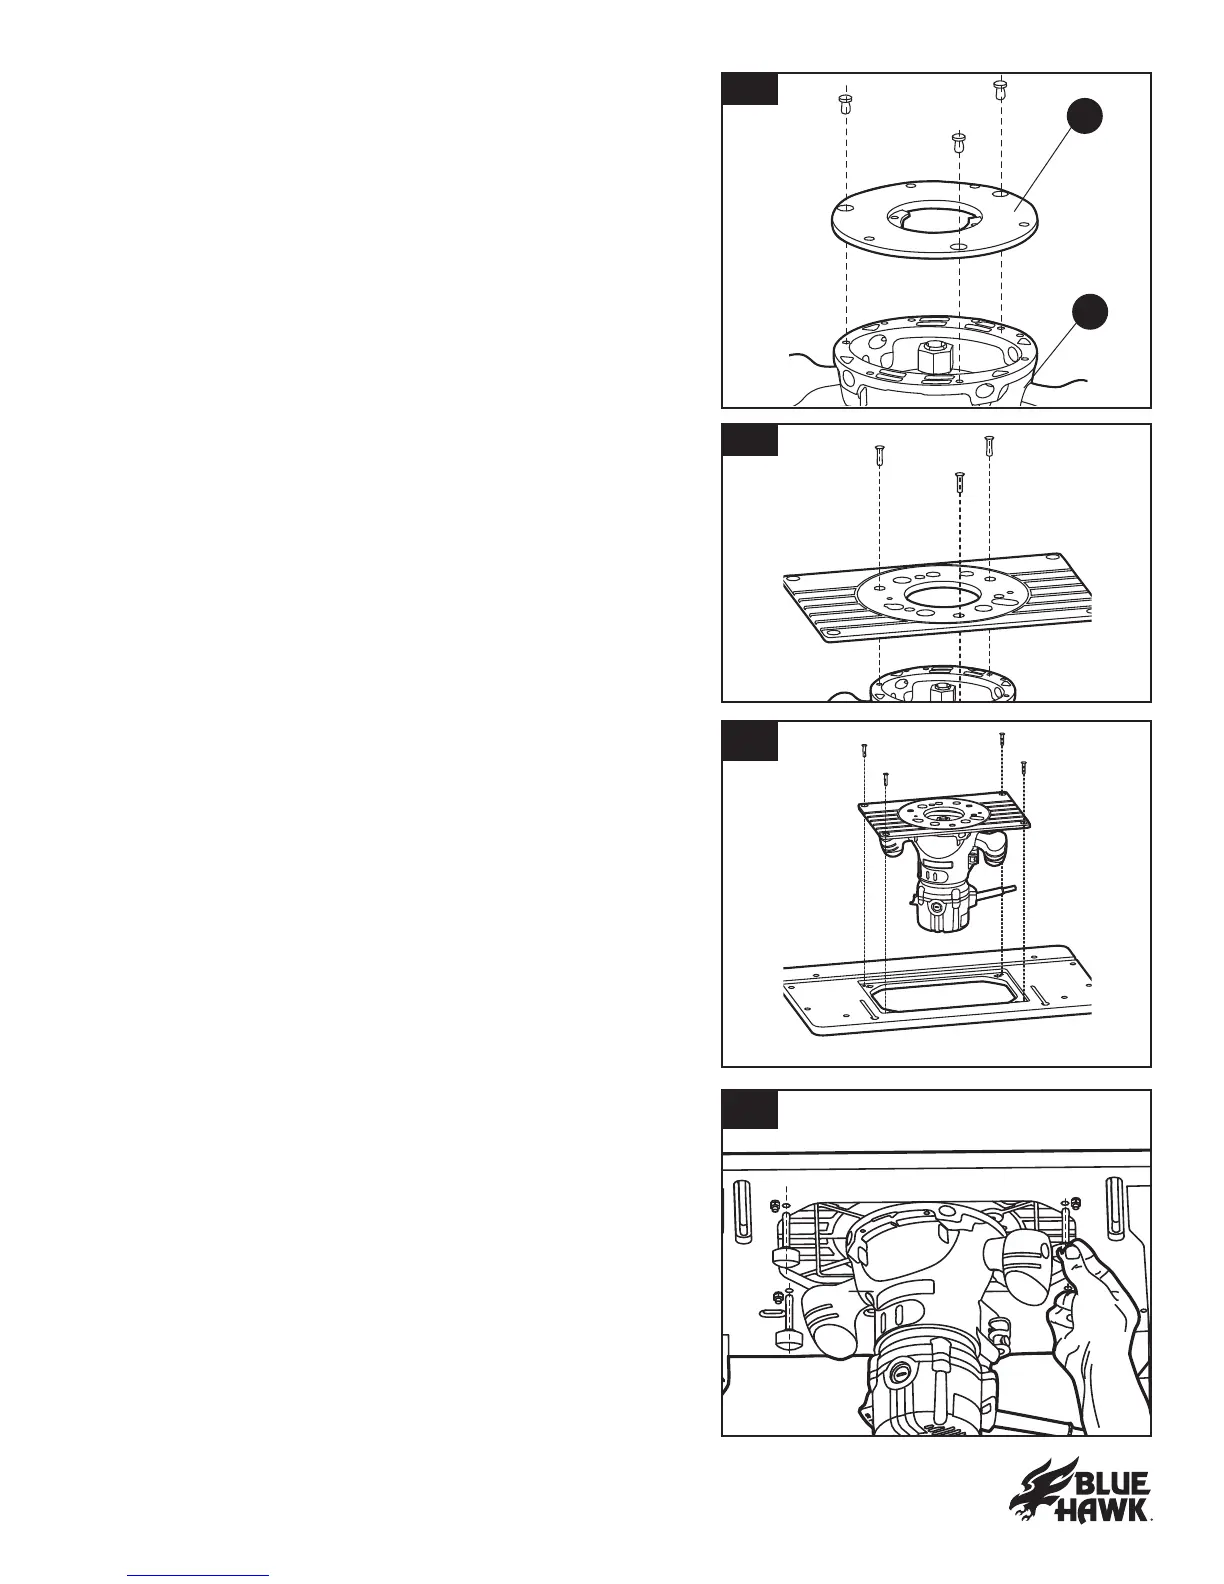
23. ATTACHING THE FIXED ROUTER TO THE TABLE
a . U n p l u g t h e r ou t er a n d t h e r ou t er t a b l e.
b . R emov e t h e p l a st i c su b - b a se ( F )
from the xed base (D).
c. R emov e t h e scr ews t h a t secu r e t h e u n i v er sa l r ou t er
mou n t i n g p l a t e ( D 1 ) a n d r emov e i t f r om
t h e r ou t er t a b l e.
d . P l a ce t h e r ou t er u p si d e d own so t h a t i t i s r est i n g on i t s
t op ca p a n d a l i g n t h e t h r ee h ol es ( a ) i n t h e cen t er of
t h e u n i v er sa l r ou t er mou n t i n g p l a t e wi t h t h e h ol es i n
t h e r ou t er . M a k e su r e t h a t t h e h ol e i s a l i g n ed
wi t h t h e t a b l e- a b ov e d ep t h a d j u st men t n u t
l oca t ed on t h e r ou t er .
e. Insert a at-head screw through each of the three
h ol es i n t h e u n i v er sa l r ou t er mou n t i n g p l a t e a n d i n t o
t h e h ol es i n t h e r ou t er b a se, a n d t h en t i g h t en ea ch
at-head screw securely.
f . R e- i n st a l l t h e u n i v er sa l r ou t er mou n t i n g p l a t e t o t h e
r ou t er t a b l e a n d r ep l a ce a n d l oosel y t i g h t en t h e 4
scr ews t h a t wer e r emov ed i n st ep 3 .
g . I n st a l l t h e f ou r l ev el i n g scr ews i n t o t h e f ou r h ol es
a r ou n d t h e u n i v er sa l mou n t i n g p l a t e op en i n g . A d j u st
the mounting plate height so that it is ush with the
t a b l e. A t u r n t o t h e r i g h t r a i ses t h e u n i v er sa l mou n t i n g
p l a t e a n d a t u r n t o t h e l ef t l ower s t h e p l a t e.
h . U si n g a st r a i g h t ed g e ( a v a i l a b l e sep a r a t el y ) , ch eck
t o b e cer t a i n t h a t t h e su r f a ce of t h e u n i v er sa l r ou t er
mounting plate is ush with the tabletop surface.
i . T o h ol d t h e mou n t i n g p l a t e i n p osi t i on , t i g h t en t h e
f ou r scr ews i n S t ep 3 . R ech eck t o ma k e su r e t h a t t h e
surface of the router mounting plate is ush with the
t a b l et op su r f a ce. I f n ot , r ep ea t S t ep 6 .
NOTICE: F a i l u r e t o ma k e su r e t h a t t h e u n i v er sa l r ou t er
mounting plate is ush with the tabletop surface can
r esu l t i n p oor r ou t i n g p er f or ma n ce. S l i d e a sq u a r e-
cu t b oa r d f r om r i g h t t o l ef t a cr oss t h e u n i v er sa l r ou t er
mou n t i n g p l a t e t o b e su r e t h a t t h e b oa r d mov es smoot h l y .
23a
23b
23c
23d
F
D
 Loading...