This document is the installation manual for the BlueStar Double Electric Wall Oven, model DEWO. It provides comprehensive instructions for the safe and proper installation, operation, and maintenance of the appliance.
Function Description:
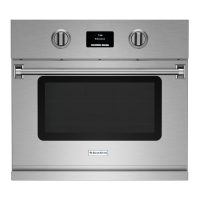
The BlueStar Double Electric Wall Oven is a residential all-electric wall oven designed for home use. It features two independent oven cavities, allowing for simultaneous cooking at different temperatures or with different cooking methods. The appliance is designed for ease of installation and operation, offering various cooking functions such as baking, broiling, and heat assist.
Important Technical Specifications:
The manual provides detailed clearances and dimensions for both swing/drop door and 2 drop door models of the 30-inch double electric wall oven.
For the Top Oven (30" Oven):
- Dimensions: 26.25"W x 20"D x 15"H
- Oven Broiler Element Rating: 5000 WATTS
- Oven Bake Element Rating: 2500 WATTS
- Oven Heat Assist Element: 1800 WATTS
For the Bottom Oven (30" Oven):
- Dimensions: 26.25"W x 20"D x 15"H
- Oven Broiler Element Rating: 2500 WATTS
- Oven Bake Element Rating: 2500 WATTS
- Oven Heat Assist Element: 1800 WATTS
Electrical Requirements:
- 240V, 60Hz, 40 AMPS, 1 PH
- The unit must be on a non-GFI, dedicated outlet.
- The appliance is configured to work with 208, 220, 240 volt single phase 60Hz power.
- It must be grounded, and the circuit should be grounded and polarized.
- The electrical connection exits the appliance at the lower rear toward the right (viewed from front side), where a 5" handy box is supplied for field connections.
- The electrical connection provided is a 4-wire system (neutral, ground, L1, L2). If the current power is a 3-wire system, a jumper wire from the ground to neutral location on the terminal block inside the control compartment of the unit will be required.
- A wiring diagram is affixed to the appliance.
Usage Features:
- Child-Safe Control Lock: The electronic control includes a lock feature designed for child safety, though it is not a guarantee of safe operation. Children should not be left unattended in the kitchen while the appliance is in use.
- Zero Clearance Installation: The appliance is designed for zero clearance installation, but the front of the unit should not be obstructed.
- Oven Racks: Oven racks should always be placed in the desired position while the oven is cool. If racks must be moved while hot, care should be taken to avoid contact between potholders and heating elements.
- Ventilation: The ventilation and flue ways of the appliance must remain unobstructed at all times.
- Safety Precautions: The manual emphasizes several safety precautions, including not storing flammable materials near the appliance, not using water on grease fires, and never using the appliance as a space heater.
Maintenance Features:
- Qualified Installation and Service: Installation and service must be performed by a qualified installer, electrician, or service agency to avoid electrical shock hazards and ensure proper functioning.
- Warranty Service: Warranty service must be performed by an authorized service agent. Customers can request service by calling 800-449-8691 or visiting www.bluestarcooking.com.
- Serial Number Location: The serial number is located on the appliance, and its location is indicated in the manual to assist with service and parts acquisition.
- Accessing Control Compartment for Service: To access the control compartment panel for service, users need to remove screws attaching the control panel, slide it down from mounting pins (being careful with wiring), and then pull it forward.
- Replacement Parts: Replacement parts can be acquired by calling Customer Service at 1-800-449-8691.
- Performance Checklist: A performance checklist is provided at the end of the manual to ensure proper installation. This checklist covers appearance, aesthetics, electrical connection, heating elements function, oven door, and controls. It also serves as a form to validate the warranty by mailing, emailing, or submitting it online within 90 days of installation with a copy of the receipt.
Installation Guidelines:
- Unpacking: The manual provides detailed steps for unpacking, including checking for damage upon delivery, ensuring the container is upright, moving the container close to the installation location, cutting straps, and thoroughly inspecting the appliance for damage. If damage is found, the dealer should be contacted, and all packaging material should be saved.
- Handling: Due to its size and weight, a rolling lift jack, air sled, or pallet jack should be used to move the appliance. Users are advised not to push against edges or sides, or use the kick panel or oven door handle to push or pull the appliance. Gloves are recommended during installation.
- Mounting: The unit should be inserted into the cabinet until the front frame is flush against the cabinet. Screws are then inserted through the control box into the side of the cabinet.
- Leveling: For optimum performance, the appliance should be leveled during installation using a carpenter-type level, checking side to side, front to back, and diagonally.
- Electrical Connections: All local and national codes, including the National Electric Code (NEC), ANSI/NFPA 70, must be observed. The appliance is equipped with a 5" handy box for electrical connections. All electrical wiring should be free and clear, without being pinched or obstructed.
- Grounding: The appliance is intended to be grounded. Cutting, removing, or disregarding the grounding wire is strictly prohibited as it can lead to severe shock hazards.
The manual strongly advises reading all sections before beginning installation and retaining the instructions for future reference. It also warns against removing permanently affixed labels, warnings, or data plates, as this may void the manufacturer's warranty.