EN
26
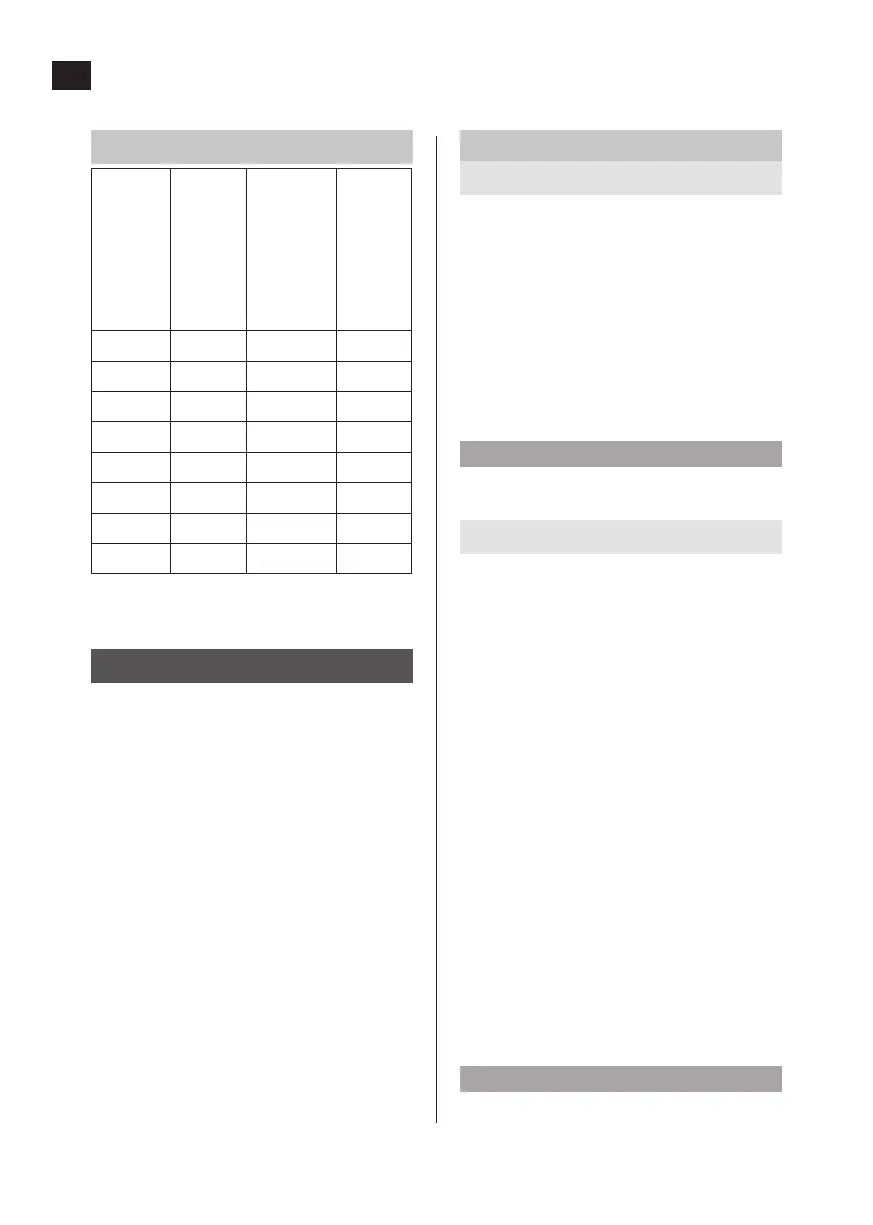
ATTENUATION VALUES
Frequency (Hz)
Measured mean
attenuation (dB)
Measured standard
deviation (dB)
Minimum
requirement (dB)
63 11 3.9 0
125 8.8 3.4 5
250 14 3.7 8
500 25.7 5.6 10
1000 27.1 2.9 12
2000 35 4 12
4000 33.2 5.1 12
8000 33.8 5 12
SNR = 23 dB, H = 29 dB, M = 21 dB, L = 12 dB
As per EN ISO 4869-2 for α = 1
ASSEMBLY
1. Put the neck strap (6) and all 4 tabs in
the fasteners in the helmet (1) and lock in
place (see diagram A).
2. Put the earmu fasteners (3) in the
openings on the side of the helmet (1)
and lock in place (see diagram C).
3. Fit the mesh part on the visor (2) by
inserting the mesh in the peak from
underneath until it clicks in place.
4. Put the assembled visor (2) in the
openings on the ear protection (see
diagram D).
5. Fold the visor (2) forward (see diagram E).
6. Insert the visor (2) in the openings on the
ear protection (3) as far as possible (see
diagram F).
ADJUSTING
Adjusting the neck strap
1. Turn the regulator (4) so that the neck
strap ts to your head.
2. The neck strap should sit rmly to your
head when you put on the helmet.
3. Tighten the strap by turning the regulator
(4) clockwise.
4. Loosen the strap by turning the regulator
(4) anticlockwise.
5. The helmet should sit rmly without
pressing uncomfortably to your head.
IMPORTANT:
Always make sure that the helmet is properly
adjusted before using it.
Adjusting the ear protection
The height and positioning (3) of the ear
protection can be adjusted.
1. Press down the holder (3) for the ear
protection to lock it over the ear.
2. Move the ear protection (3) up or down to
the required height (see diagram G).
3. Turn the ear protection (3) to the required
position (see diagram G).
4. Pull out the ear protection (3) to put them
on and take them o more easily.
5. Use the ear protection regulator (5) to
pull them together if they are too loose.
6. Move the regulator (5) towards the plus
sign (+) to tighten (see diagram I).
7. Move the regulator (5) towards the minus
sign (+) to loosen (see diagram I).
The user is responsible for checking that the
ear protection on the helmet is mounted,
adjusted and maintained in accordance with
the manufacturer’s instructions.
WARNING!
• The earmus, especially the sealing rings,
are subjected to wear during normal use