8
S T E P
1
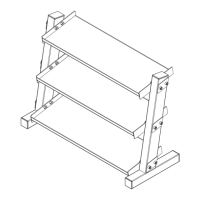
Be careful to assemble all components
in the sequence they are presented.
NOTE: Wrench tighten all hardware at the end of this step.
A. Insert two Foot Caps (5) into both Base Frames (C).
B. Insert a Round End Cap (8) into both Base Frames (C).
C. Insert a Round End Cap (6) into both Upright (A).
D. Attach No Slip Tape (7) onto both Base Frames (C).
E. Attach two No Slip Tape (7) onto Cross Bar (B).
F. Connect Upright (A) to Base Frame (C) by using:
Two 2 (M12x70 carriage bolt)
Two 4 (M12 washer)
Two 3 (M12 nylon lock nut)
G. Connect Upright (A) to Base Frame (C) by using:
Two 2 (M12x70 carriage bolt)
Two 4 (M12 washer)
Two 3 (M12 nylon lock nut)
H. Connect Crossbar (B) to both Upright (A) and secure using:
Four 1 (M12x65 hex head bolt)
Four 4 (M12 washer)
Four 3 (M12 nylon lock nut)