Preparing the worktop for
Preparing the worktop for Preparing the worktop for
Preparing the worktop for
installation of the hob
installation of the hobinstallation of the hob
installation of the hob
CAUTION:
CAUTION:CAUTION:
CAUTION:
Before cutting secure the outer
adhesive tape to avoid traces of jigsaw on the
top.
• The worktop must have a
must lie horizontally and be sealed to
the wall side against overflowing liquids or moi
ture.
• The cut surfaces (cutout e
with special varnish, silicone rubber or cast raisin
in order to prevent swelling caused by humidity.
Clean and dry the worktop in the cutout area
thoroughly.
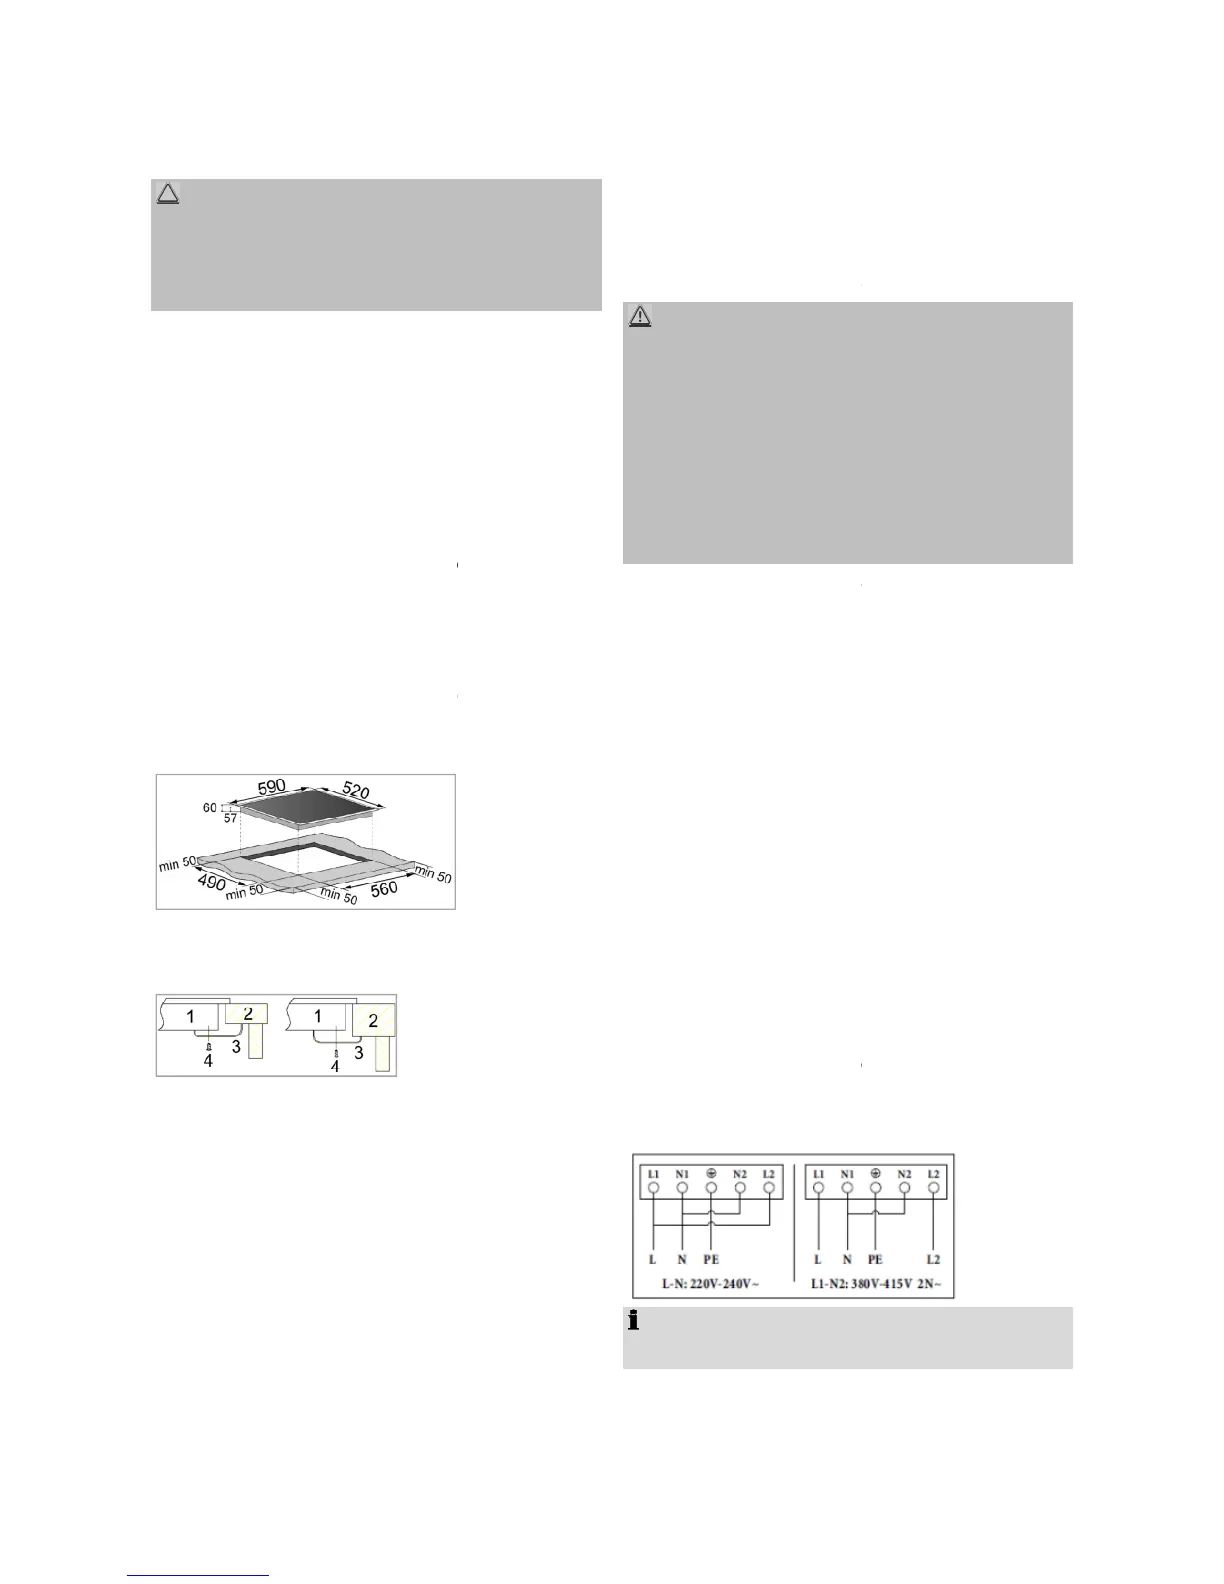
Worktop cutout
Worktop cutoutWorktop cutout
Worktop cutout
Prepare the cutout of the worktop
dimensional drawing.
Figures in mm
Installing the hob
Installing the hobInstalling the hob
Installing the hob
1
11
1
2
22
2
3
33
3
4
44
4
•
First check the factory fitted hob seal
frame to the integrity and the proper fit.
Put the hob with the connecting cable
control panel to the front into the pr
Make sure that the distances to the cutting are
equal on all four sides and that the seal is resting
Fix the hob depending on the worktop thickness
by attaching the enclosed
installation of the hob
installation of the hobinstallation of the hob
installation of the hob
adhesive tape to avoid traces of jigsaw on the
must lie horizontally and be sealed to
the wall side against overflowing liquids or moi
with special varnish, silicone rubber or cast raisin
in order to prevent swelling caused by humidity.
Clean and dry the worktop in the cutout area
First check the factory fitted hob seal
frame to the integrity and the proper fit.
Put the hob with the connecting cable
control panel to the front into the pr
Make sure that the distances to the cutting are
equal on all four sides and that the seal is resting
Fix the hob depending on the worktop thickness
hob bottom at the provided holes and fasten them
with the screws (4).
Electrical connection
Electrical connectionElectrical connection
Electrical connection
Information for the
Information for the Information for the
Information for the
authorized expert
authorized expertauthorized expert
authorized expert
WARNING:
WARNING:WARNING:
WARNING:
•
The installation to the mains supply must conform
to the local standards and regulations.
appliance to a domestic power
socket or using multiple sockets or extension c
Improper connection may cause to an
Before connecting, ensure that the power supply
corresponds with the information on the rating l
Fix the mains cable in the tension relief.
The electrical installation must have an isolation
device which lets you disconnect the appliance at
all poles from the power supply.
ted with a contact width of
Arrange the mains cable in such a way that it
does not get in contact with any hot components
of the appliance. Do not lead it over sharp edges
or corners.
Mains socket
Mains socketMains socket
Mains socket
The socket must be connected according to the
pole circuit breaker. The co
nection is shown below:
NOTE
NOTENOTE
NOTE:
: :
:
L1
L1L1
L1-brown L2
L2L2
L2-black P3
P3P3
P3-green
hob bottom at the provided holes and fasten them
authorized expert
authorized expertauthorized expert
authorized expert
The installation to the mains supply must conform
to the local standards and regulations.
appliance to a domestic power
socket or using multiple sockets or extension c
Improper connection may cause to an
electric
electric electric
electric
Before connecting, ensure that the power supply
corresponds with the information on the rating l
Fix the mains cable in the tension relief.
The electrical installation must have an isolation
device which lets you disconnect the appliance at
all poles from the power supply.
ted with a contact width of
Arrange the mains cable in such a way that it
does not get in contact with any hot components
of the appliance. Do not lead it over sharp edges
The socket must be connected according to the
pole circuit breaker. The co
yellow N1
N1N1
N1-blue N2
N2N2
N2-grey
 Loading...