WWW.NIKOLAOUTOOLS.COM
SAFETY INSTRUCTIONS
Warning: Read the manual carefully before use. Failure to follow the warnings and instrucons may result in tool damage, physical injury
and/or damage to property. Store the manual in a safe place for future reference.
TECHNICAL SPECIFICATIONS
Technical data
Model BDS7300
Input power 710 W
6 posion varible speed control 1000 - 2100 (min)
Diameter of the sanding paper 225 mm
Diameter of the pad 210 mm
Height 160 cm
Weight 4,1 kg
Other characteriscs
So grip
Led light on the pad
Flexible sanding head, adjust in degree 0-120
Big support handle
Change carbon brush easily
* The manufacturer reserves the right to make minor changes to product design and technical
specicaons without prior noce unless these changes signicantly aect the performance
and safety of the products. The parts described / illustrated in the pages of the manual that
you hold in your hands may also concern other models of the manufacturer's product line
with similar features and may not be included in the product you just acquired.
* To ensure the safety and reliability of the product and the warranty validity, all repair,
inspecon or replacement work, including maintenance and special adjustments, must only
be carried out by technicians of the authorized service department of the manufacturer.
* Always use the product with the supplied equipment. Operaon of the product with
non-provided equipment may cause malfuncons or even serious injury or death. The
manufacturer and the importer shall not be liable for injuries and damages resulng from
the use of non-conforming equipment.
Personal safety
• Use an approved dust aspirator. Venlate the work area and/or use a dust collector. Connuous and prolonged exposure to high concentraons of airborne
dust may aect respiratory funcon.
• Do not overreach. Keep balance and proper foong at all mes. This helps the operator have beer control of the power tool in unexpected situaons.
• Lead-based paint should only be removed by a qualied professional.
• Sanding drywall can result in stac electricity accumulaon in the tool. For your safety, the drywall sander is grounded.
OPERATING INSTRUCTIONS
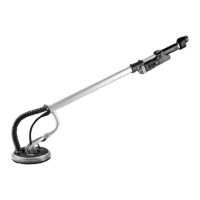
The drywall sander should be held with both hands on the main pipe (A), as shown in Fig. 1. The hands can be posioned anywhere along the main tube to
provide the best combinaon of reach and leverage for the specic applicaon.
WARNING! Keep hands on the main tube (A) Fig. 1. do not place them in the area around the grinding head. Grinding heads rotate in many direcons and can
cause injury.
How to hold a drywall sander
• Place a special drywall dust bag in your vacuum cleaner.
CAUTION: If you do not use a dust bag suitable for drywall dust, the level of suspended dust parcles in the workplace will increase. Connuous and prolonged
exposure to high concentraons of airborne dust can aect respiratory funcon.
• Connect the vacuum cleaner hose to the drywall sander. Open the hose connector of the drywall sander by turning the large nut (A) counterclockwise a few
turns. Push the rotang vacuum cleaner hose connector (B) into the sander connector and seal it securely. Turn the large nut clockwise to ghten the connector.
• Insert the six es to avoid tangling the sander cable and the vacuum cleaner hose. Place the cable and the vacuum cleaner hose parallel to each other. Insert
the bundles at intervals, starng with the drywall sander. Wrap the long end of each bundle around the vacuum cleaner hose. Then wrap the small end of
each bundle around the cord (see below).
• Connect the hose to your vacuum cleaner: use a 38 mm to 47 mm adapter if necessary. If your vacuum cleaner requires a special connector (something other
than the standard 38 mm to 47 mm connectors), contact your vacuum cleaner supplier.
INSTALLATION
The following items are supplied with the drywall sander:
• The sucon hose, at its end, includes a standard 22.5 mm connector for connecon to the sander. A second 22.5 mm to 40.4 mm adapter adapts the hose
connector to t the vacuum cleaner.
• It also features a stac electricity dissipaon funcon to dissipate the stac electrical charges somemes seen when recovering drywall dust.
Connecon of drywall sander with vacuum cleaner
 Loading...