1 | Overview
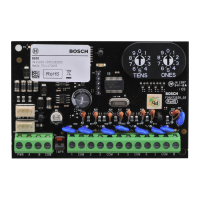
2 | SDI2 address settings
The module’s switches provide a tens and ones value for the
module’s address. For single-digit address numbers 1 through
9, set the tens switch to 0 and the ones digit to the appropriate
number. The following illustration shows the address switches
setting for addresses 1 and 11.
Set the switches per the control panel configuration. Each
B308 module must have a unique address.
3.1 | Install the module in the enclosure
Refer to the following illustration for installing into the enclo-
sure.
3.2 | Install and wire the tamper switch
You can connect an optional enclosure door tamper switch
for one module in an enclosure.
1. Put the ICP-EZTS Tamper Switch (P/N: F01U009269)
into the enclosure’s tamper switch mounting location.
For complete instructions, refer to EZTS Cover and Wall
Tamper Switch Installation Guide (P/N: F01U003734).
2. Plug the tamper switch wire onto the module’s tamper
switch connector.
3.3 | Attach to the control panel
Use either the module’s terminal strip labeled with PWR, A, B,
and COM, or the module’s interconnect wiring connectors (wire
included) to attach to the control panel. Interconnect wiring
parallels the PWR, A, B, and COM terminals on the terminal
strip.
Refer to the following illustrations for wiring.
NOTICE!
Use the terminal strip wiring or interconnect wiring
connector to the control panel. Do not use both. When
connecting multiple modules, combine terminal strip
and interconnect wiring connectors in series.
3 | Installation
Callout ― Description
1 ― Module with mounting bracket installed
2 ― Enclosure
3 ― Mounting screws (3)
Callout ― Description
1 ― Terminal strip wiring (SDI2)
2 ― Interconnect cable (P/N: F01U079745) (included)
Callout ― Description
1 ― Bosch control panel
2 ― B308 modules
Callout ― Description
1 ― Bosch control panel
2 ― B308 modules
CAUTION!
Remove all power (AC and battery) before making any
connections. Failure to do so might result in personal
injury and/or equipment damage.
NOTICE!
The module reads the switch setting only during
power up. Cycle the power to the module to enable
the new setting.
= Outputs 11 to 18
= Outputs 111 to 118
2.1 | Valid addresses and output numbers per
control panel
Valid B308 addresses are dependent on the number of outputs
allowed by a particular control panel.
Control
panel
Valid B308
addresses
Corresponding output
numbers
B9512G 01 - 59 11 - 18, 21 - 28, 31 - 38, 41 -
48, 51 - 58, 61 - 68, 71 - 78,
81 - 88, 91 - 98, 101 - 108,
111 - 118, 121 - 128, 131 -
138, 141 - 148, 151 - 158,
161 - 168, 171 - 178, 181
- 188, 191 - 198, 201 - 208,
211 - 218, 221 - 228,
231 - 238, 241 - 248, 251 -
258, 261 - 268, 271 - 278,
281 - 288, 291 - 298, 301
- 308, 311 - 318, 321 - 328,
331 - 338, 341 - 348, 351 -
358, 361 - 368, 371 - 378,
381 - 388, 391 - 398, 401
- 408, 411 - 418, 421 - 428,
431 - 438, 441 - 448, 451 -
458, 461 - 468, 471 - 478,
481 - 488, 491 - 498, 501
- 508, 511 - 518, 521 - 528,
531 - 538, 541 - 548, 551 -
558, 561 - 568, 571 - 578,
581 - 588, 591 - 598
B8512G 01 - 09 11 - 18, 21 - 28, 31 - 38, 41 -
48, 51 - 58, 61 - 68, 71 - 78,
81 - 88, 91 - 98
B6512 01 - 09 11 - 18, 21 - 28, 31 - 38, 41 -
48, 51 - 58, 61 - 68, 71 - 78,
81 - 88, 91 - 96
B5512 01 - 05 11 - 18, 21 - 28, 31 - 38,
41 - 48, 51 - 58
B4512 01 - 03 11 - 18, 21 - 28, 31 - 38
D9412GV4 01 - 12 11 - 18, 21 - 28, 31 - 38,
41 - 48, 51 - 58, 61 - 68,
71 - 78, 81 - 88, 91 - 98,
101 - 108, 111 - 118,
121 - 128
D7412GV4 01 - 06 11 - 18, 21 - 28, 31 - 38,
41 - 48, 51 - 58, 61 - 64
D7212GV4 01 - 02 11 - 18, 21 - 24
To find the output numbers for each address, multiply the
address number by 10 for the base number, and then use
numbers 1 through 8 in the ones place for the output numbers.
For examples, refer to Section 8.
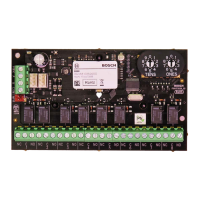
This module is a supervised device that provides 8
programmable outputs (Form C relays) and connects to control
panels through the SDI2 bus.
Callout ― Description
1 ― SDI2 interconnect connectors - connect SDI2 control
panel and SDI2 devices
2 ― SDI2 terminal strip - connect SDI2 control panel and
SDI2 devices
3 ― Tamper switch connector
4 ― Terminal strip (outputs)
5 ― Heartbeat LED (blue)
6 ― Address switches